


HTML, as everybody knows, is called HyperText Markup Language, which is used to display texts on your browser and with the help of its special aiding scripts like JavaScript and CSS, that content of your become beautiful to look at. Color coding is part of that beautifying your HTML web page.
Color code in HTML works as an identifier that identifies and represents that color on the web. The commonly used color coding is of HEX that represents ‘Hexadecimal’ code for that color. Similarly, there are other color codes like RGB, short for ‘Red, Green, Blue’. Another color code called HSL, short for ‘Hue, Saturation, Lightness’. The HSL is an added advantage when selecting the color of your choice.
Since generally, the use of hexadecimal codes are preferred, we have explained the hexadecimal codes to our best. The Hexadecimal color codes contain a symbol, a hash ( # ) and a set of six digits or numbers. They are in the hexadecimal number system, So an ‘FF’ is the highest number and represents ‘255’ from the hexadecimal number system.
These six digits contain three pairs representing the RB color code. Out of these six digits, the first pair of two digits represents the intensity of your ‘Red’ color. So an ‘FF’ for the place of our first pair will represent the red color with maximum intensity. ‘00’ is used for the least intensity and ‘FF’ for the highest. For getting a ‘Green’ color, the middle pair represents the intensity.
Similarly, for ‘Blue’, the last pair represents the intensity.
- So a hexadecimal number such as #FF0000 will result in??

- A hexadecimal number such as #00FF00 will result in? ??
- And a hexadecimal number such as #0000FF will result in??
- To get a yellow color, which is a combination of ‘Red’ and ‘Green’, a similar hexadecimal number is created, such as #FFFF00.


HTML Color Picker
A color picker, when created, allows a user to ‘pick’ a color of his own choice. The most standard color picker is used in Windows applications like in MS Word or Paint and others. You all are familiar with a color picker; you can jog your memory by looking at the picture below:

An input type as “color” is used for creating input fields that will contain a color. But some browsers like Internet Explorer 11 and older versions do not support this input type. Thus depending on the browser, a color picker pops up when you use the input type. Some browsers will simply turn this input field into a text box like below:

Thus when a supported browser is used, the same code will result in the following color picker palette.
And when that colored box is clicked, a color palette pops up. Here I am using Google Chrome version ‘ 78.0.3904.97‘, which supports the input type color attribute.

The code for creating such a color picker will be explaining in the next section.
Source Code for creating a color picker
Following is an explanation for creating the simplest color picker in HTML. See the code below:
Code
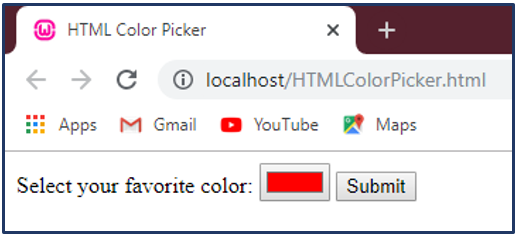
<body>
<form action="HTMLColorPicker.html">
Select your favorite color:
<input type="color" name="favcolor" id="color" >
</form>
</body>
The above HTML code contains a FORM element that uses an input type called ‘color’. This color input type creates and displays the simplest color picker, windows standard color picker. It allows the user to select a color of his choice.
The input type as color creates a text box or more of a button that has ‘Black’ as its default background color. When we click on it, it displays a choice for colors for the user.
Observe the working of this color picker given below:
Step 1: Clicking on the button with ‘Black’ as its default background color.

The above code simply creates a button as shown above.
Step 2: Click and Select your new color.


Step 3: We selected a bright Green color for demonstration. Click on the?‘OK button.

In the above screen-shots, you can easily see the selected color is shown in the last screen-shot.
The input type ‘color’ provides this simple functionality of a color picker in HTML5. After picking your color, it is your choice of what the selected color can be used for.
In the following example,?I incremented the above example and modified it with some inclusions.
The following example is a combination of HTML and Javascript. This example has a FORM element that uses the input type ‘color’ tag. This FORM, when submitted, our JAVASCRIPT is triggered.
Observe the source code for the FORM element below:
Code:
<body>
<form action="HTMLColorPicker.html">
Select your favorite color:
<input type="color" name="favcolor" id="color" >
<input type="submit" onclick = "ReturnColor()" id="submit" />
</form>
</body>
We added a new line to our previous program. A submit button. This submit button is when clicked; our Java script is triggered, which is given below:
function ReturnColor(c)
{
//saving the selected color value by ID
var c= document.getElementById("color").value;
var str= new String ("You chose:");
//The color is saved as its HEX color code.
document.write(str+c);
}
When the ‘Submit’ button is clicked, our function in javascript is triggered. The above function, ReturnColor (), returns the HEX code, that is, Hexadecimal code for the selected color by our color picker. When the code is executed, the following is our output.


The above output is in the HEX code. The 6 numbers represent the inclusion of Red, Green and Blue colors resulting in the selected color. This HEX code can also be converted easily into RGB code.
Similarly, we can save the above code and set it as a background color or a font color for the user. To do so, we added a few more lines of code into our already existing source code.
Following is the complete code, with the HTML body remaining the same:
<script>
function ReturnColor(c)
{
//saving the selected color value by ID
var c= document.getElementById("color").value;
var str= new String ("You chose:");
//The color is saved as its HEX color code
document.write(str+c);
document.write("<br/>");
//A HEX color code can be converted into RGB code
var R=c.slice(1,3);
var G=c.slice(3,5);
var B=c.slice(5);
//Displaying the corresponding RGB code
document.write("In RGB format, RGB("
+ parseInt(R,16) + ","
+ parseInt(G,16) + ","
+ parseInt(B,16) + ")");
document.write("<br/>");
//Setting our selected color as Font color
var color = c;
var str1 = "Your color will appear as this font color";
var str2 = str1.fontcolor(c);
document.write(str2);
//Setting our selected color as Background color
document.write("<div style='border: solid; height: 90px; width: 90px; background-color:"+color+"'/>");
}
</script>
This is our complete script. When the code is executed, and a color is selected, the following is the output that is displayed.

Conclusion
There are many ways and many combinations that can help you to create a color picker, that too smart one. For example, with the combination of HTML5 and CSS and JavaScript, you can use yet another element called ‘canvas’ that has its own libraries that helps create a lightweight, small and cross-browser color picker. But that’s for another time.
Das obige ist der detaillierte Inhalt vonHTML-Farbauswahl. Für weitere Informationen folgen Sie bitte anderen verwandten Artikeln auf der PHP chinesischen Website!

Hei?e KI -Werkzeuge

Undress AI Tool
Ausziehbilder kostenlos

Undresser.AI Undress
KI-gestützte App zum Erstellen realistischer Aktfotos

AI Clothes Remover
Online-KI-Tool zum Entfernen von Kleidung aus Fotos.

Clothoff.io
KI-Kleiderentferner

Video Face Swap
Tauschen Sie Gesichter in jedem Video mühelos mit unserem v?llig kostenlosen KI-Gesichtstausch-Tool aus!

Hei?er Artikel
Hei?e Werkzeuge

Notepad++7.3.1
Einfach zu bedienender und kostenloser Code-Editor

SublimeText3 chinesische Version
Chinesische Version, sehr einfach zu bedienen

Senden Sie Studio 13.0.1
Leistungsstarke integrierte PHP-Entwicklungsumgebung

Dreamweaver CS6
Visuelle Webentwicklungstools

SublimeText3 Mac-Version
Codebearbeitungssoftware auf Gottesniveau (SublimeText3)


 Warum wird mein Bild nicht in HTML angezeigt?
Jul 28, 2025 am 02:08 AM
Warum wird mein Bild nicht in HTML angezeigt?
Jul 28, 2025 am 02:08 AM
Das nicht angezeigte Bild wird normalerweise durch einen falschen Dateipfad, einen falschen Dateinamen oder eine falsche Erweiterung, HTML -Syntaxprobleme oder einen Browser -Cache verursacht. 1. Stellen Sie sicher, dass der SRC -Pfad mit dem tats?chlichen Speicherort der Datei übereinstimmt, und verwenden Sie den richtigen relativen Pfad. 2. überprüfen Sie, ob der Fall und die Erweiterung des Dateinamens genau übereinstimmen, und überprüfen Sie, ob das Bild durch direktes Eingeben der URL geladen werden kann. 3. überprüfen Sie, ob die IMG -Tag -Syntax korrekt ist. Stellen Sie sicher, dass es keine redundanten Zeichen gibt und der Alt -Attributwert angemessen ist. 4. Versuchen Sie, die Seite zu aktualisieren, den Cache zu l?schen oder den Inkognito -Modus zu verwenden, um Cache -Interferenzen zu beseitigen. Fehlerbehebung in dieser Reihenfolge kann die meisten Probleme mit HTML -Bildanzeigen l?sen.
 Wie erstelle ich eine ungeordnete Liste in HTML?
Jul 30, 2025 am 04:50 AM
Wie erstelle ich eine ungeordnete Liste in HTML?
Jul 30, 2025 am 04:50 AM
Um eine nicht ordnungsgem??e HTML -Liste zu erstellen, müssen Sie ein Tag verwenden, um einen Listencontainer zu definieren. Jedes Listenelement ist mit einem Tag verpackt, und der Browser fügt automatisch Kugeln hinzu. 1. Erstellen Sie eine Liste mit einem Tag; 2. Jedes Listenelement ist mit einem Tag definiert. 3. Der Browser generiert automatisch Standard -Punkt -Symbole. 4. Unterverschiedene k?nnen durch Verschachtelung implementiert werden. 5. Verwenden Sie das Attribut vom Typ Listenstil von CSS, um den Symbolstil wie Scheibe, Kreis, Quadrat oder keine zu ?ndern. Verwenden Sie diese Tags korrekt, um eine nicht ordnungsgem??e Standardliste zu generieren.
 Wie benutze ich das inhaltliche Attribut?
Jul 28, 2025 am 02:24 AM
Wie benutze ich das inhaltliche Attribut?
Jul 28, 2025 am 02:24 AM
TheContententitableAttributemakesAnyhtmlelementedableByAddingCentabled = "true", und das Erlaubnis für die Erlaubnis, dass es, dass in der Lage ist
 Die Bedeutung der semantischen HTML für SEO und Barrierefreiheit
Jul 30, 2025 am 05:05 AM
Die Bedeutung der semantischen HTML für SEO und Barrierefreiheit
Jul 30, 2025 am 05:05 AM
SemantichtmlimprovesbothseoandAccessibilityByuseing -meaningfulTagSthatConveyContentStructure.1) iTenhancesseothroughbetterContentHierarchyWithProperHeadinglevels, verbesserteIndexingviaelementSlikaND und -SupportforrichsnippetsususingStrostStrostStrostStrostStrostStrostStrostaustaustaustrota.2)
 Definieren von benutzerdefinierten Vokabeln mit HTML5 Schema.org Markup.
Jul 31, 2025 am 10:50 AM
Definieren von benutzerdefinierten Vokabeln mit HTML5 Schema.org Markup.
Jul 31, 2025 am 10:50 AM
Das Schema.org -Tag hilft Suchmaschinen, das strukturierte Datenformat von Webseiteninhalten über semantische Tags (z. B. Elementumfang, Elementtyp, ElementProp) zu verstehen. Es kann verwendet werden, um benutzerdefiniertes Vokabular zu definieren. Zu den Methoden geh?ren die Erweiterung vorhandener Typen oder die Einführung neuer Typen mithilfe von zus?tzlichem Typ. In den tats?chlichen Anwendungen sind die Struktur klar, priorisieren Sie die Verwendung offizieller Attribute, die Gültigkeit des Codes und stellen sicher, dass benutzerdefinierte Typen zug?nglich sind. Zu den Vorsichtsma?nahmen geh?ren das Akzeptieren der teilweisen Unterstützung, die Vermeidung von Rechtschreibfehlern und die Auswahl eines geeigneten Formats wie JSON-LD.
 So erstellen Sie ein Sucheingangsfeld in einem HTML -Formular
Aug 02, 2025 pm 04:44 PM
So erstellen Sie ein Sucheingangsfeld in einem HTML -Formular
Aug 02, 2025 pm 04:44 PM
UsTheelementWitHinatagTocreateEmanticSearchfield.2.IncludeaForAccessibility, settheform'Saction undMethod = "AttributestosendDatoAsearchendPointWithasharableUrl.
 Was ist der Zweck des REL -Attributs in einem Link -Tag in HTML?
Aug 03, 2025 pm 04:50 PM
Was ist der Zweck des REL -Attributs in einem Link -Tag in HTML?
Aug 03, 2025 pm 04:50 PM
rel = "styleSheet" linkScssFilesforstylingThePage; 2.rel = "vorlad" HintStopreloadcriticalResourcesForperformance; 3.rel = "icon" setStheWebsit'sfavicon;
 Wie behandle ich eine Schaltfl?che Klicken Sie mit Onclick?
Jul 30, 2025 am 05:16 AM
Wie behandle ich eine Schaltfl?che Klicken Sie mit Onclick?
Jul 30, 2025 am 05:16 AM
Verwenden Sie das Onclick -Attribut in HTML, um die Klick -Ereignisse direkt zu binden, was für einfache Szenarien geeignet ist, jedoch nicht für die Code -Wartung f?rderlich ist. 2. Die Funktion der Onclick -Attributzuweisung von Elementen in JavaScript ist für die Trennung von Strukturen und Verhaltensweisen f?rderlicher, überschreibt jedoch den vorherigen Ereignis -Handler. 3.. Es wird empfohlen, die AddEventListener -Methode zu verwenden, um mehrere Ereignisüberwachung zu unterstützen und den Ereignisfluss besser zu steuern, und sollte nach dem Laden des DOM operieren, um h?ufige Fehler wie vorzeitigen Zugriff auf Elemente oder Anführungskonflikte in HTML zu vermeiden. Daher ist Onclick für Anf?nger und kleine Projekte geeignet, w?hrend AddEventListener besser für komplexe Anwendungen geeignet ist.
