


Troubling into the volume for a file externally altered error and wondering how to fix it? Why does this error message keep popping up? Now read this post on MiniTool to get several efficient workarounds to fix this vexing issue.
Have you received an error message says the volume for a file externally altered when you want to copy some files to your external hard drive? Encountering this error can be very annoying and frustrating, as the error message keeps popping up to prevent you from accessing the files. It indicates problems regarding the reliability of the data stored within the volume.
The complete error message is: The volume for a file has been externally altered so that the opened file is no longer valid.”
It has simple error messages “The volume for a file externally altered” and then a black background. When I try to remove the error by clicking the x, it pops up again. If you keep pressing x about 20-30 times, the message goes away but the black background remains and I can't use my computer. I just need to extract some old files from it so I don't mind if it's not a perfect solution. Please help.answers.microsoft.com
Possible Causes of the Volume for a File Externally Altered Error
Below are several common reasons why this error occurs:
- Corrupted File System: A malfunctioning file system on the external drive can create discrepancies in file data, resulting in this error.
- Incomplete Transfer: Abruptly unplugging a USB drive while files are being transferred can leave the file only partially saved, leading to corruption.
- Antivirus Disruption: Certain antivirus programs might aggressively scan external drives, which can disrupt file access and cause this error.
- Defective Hardware: A malfunctioning USB port or a damaged external drive can cause problems with data read/write operations, resulting in the “the volume for a file externally altered” notification.
- File System Incompatibilities: If the file system on the external drive differs from your computer’s (for example, FAT32 compared to NTFS), it may create complications during file transfers.
Necessary Step: Recover Files from Volume with a File Externally Altered Error
Before proceeding to the specified methods, be sure first to scan and restore your essential files to prevent data loss. If you encounter file system issues, system crashes, or accidental file deletions, MiniTool Power Data Recovery is a reliable and free tool for data recovery.
This tool provides a comprehensive solution for recovering deleted files across different situations, ensuring the highest level of data retrieval.
To obtain this robust data recovery software, simply click the green button below to download and install it.
Let’s learn how to recover files using MiniTool Power Data Recovery.
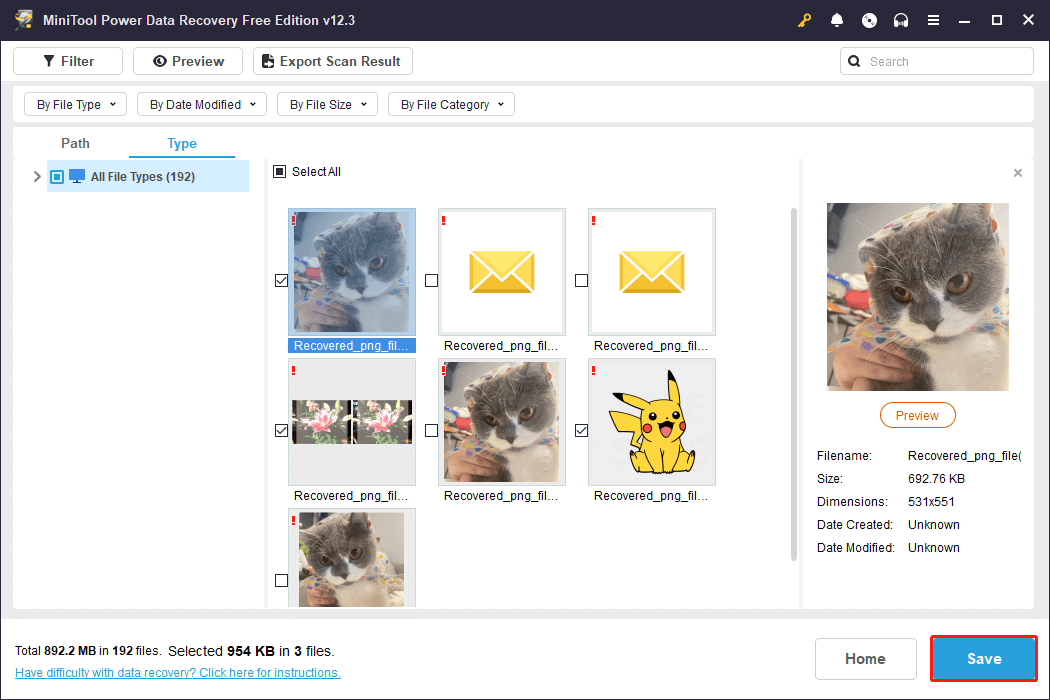
Step 1. Scan the Partition
Launch MiniTool Power Data Recovery. By default, you will locate the Logical Drives tab. In this window, select the target partition where the volume for a file externally altered error appears and click the Scan button. Please wait patiently to get the best scanning result.

Step 2. Preview and Check the Desired Files
After scanning, you may notice that all files are listed by file path under the Path tab. This is the default file display mode of this software. In addition to finding the required files by expanding folders one by one, you can also use the Filter, Preview, Type, and Search features. Check the boxes in front of the wanted files.

Step 3. Save the Wanted Files
Click the Save button to store the checked files. In the pop-up window, select an appropriate location to store the recovered files and click OK. The location must be different from the original location to avoid data overwriting.
How to Fix the Volume for a File Externally Altered Error
Fix 1. Uninstalling Third-Party Antivirus & Disabling Real-Time Protection
The volume for a file externally altered error might be caused by your Antivirus software, as it could be excessively protecting your system and disrupting file transfer activities.
To address this issue, depending on the Antivirus program you are using, access its settings.
Step 1: Navigate to the Control Panel > Programs and Features and uninstall any Third-Party Antivirus programs.
Step 2: Launch Windows Security using the search bar.
Step 3: Go to Virus & threat protection > Manage settings.
Step 4: Disable Real-time protection.
Step 5: In the pop-up window, click the Yes button to confirm the change.

Fix 2. Checking Volume Shadow Copy & Windows Backup Services are Running
Volume Shadow Copy is a feature in Microsoft Windows that enables users to create manual or automatic backups or snapshots of their computer drives or files.
Step 1. Press Win R to open the Run dialog box.
Step 2. Type services.msc in the Run dialog box and hit Enter.
Step 3. Locate Volume Shadow Copy and Windows Backup, right-click on them, and select Start. Wait until the process is complete.

Fix 3. Update Windows to fix the volume for a file externally altered error
To resolve the issue of encountering a “the volume for a file externally altered” error, it’s important to update your Windows operating system. This can help ensure that your system’s files are up to date and functioning correctly, potentially eliminating conflicts or glitches that may cause this error.
Step 1: Press Win I to launch Windows Settings and go to Update & Security.
Step 2: Click the Check for updates button.
Step 3: Follow the prompts to install any available updates, and restart your computer afterward to apply the changes effectively.
Fix 4. Update the Driver
When transferring the files to your external driver, you may encounter the volume for a file externally altered error. The outdated driver may trigger this issue. Therefore, you can update it to fix it.
Step 1: Press Win X and select Device Manager.
Step 2: Find and right-click on the faulty driver and select Update Driver. After updating, restart the system and the error should be gone.
Bottom Line
This post introduces a professional and robust data recovery tool to help you rescue your data securely and effectively and 4 feasible methods to fix the volume for a file externally altered error. Hope the information is useful for you.
The above is the detailed content of Instant Fixes: The Volume for a File Externally Altered. For more information, please follow other related articles on the PHP Chinese website!

Hot AI Tools

Undress AI Tool
Undress images for free

Undresser.AI Undress
AI-powered app for creating realistic nude photos

AI Clothes Remover
Online AI tool for removing clothes from photos.

Clothoff.io
AI clothes remover

Video Face Swap
Swap faces in any video effortlessly with our completely free AI face swap tool!

Hot Article
Hot Tools

Notepad++7.3.1
Easy-to-use and free code editor

SublimeText3 Chinese version
Chinese version, very easy to use

Zend Studio 13.0.1
Powerful PHP integrated development environment

Dreamweaver CS6
Visual web development tools

SublimeText3 Mac version
God-level code editing software (SublimeText3)
Hot Topics


 How to Fix KB5060829 Not Installing & Other Reported Bugs
Jun 30, 2025 pm 08:02 PM
How to Fix KB5060829 Not Installing & Other Reported Bugs
Jun 30, 2025 pm 08:02 PM
Many users encountered installation issues and some unexpected problems after applying the Windows 11 update KB5060829. If you're facing similar difficulties, don't panic. This MiniTool guide presents the most effective fixes to resolve KB5060829 not
 Cannot Fix Update KB5060999 Not Installing on Windows 11?
Jun 23, 2025 pm 08:03 PM
Cannot Fix Update KB5060999 Not Installing on Windows 11?
Jun 23, 2025 pm 08:03 PM
KB5060999 What are the update contents of Windows 11 23H2? How to download? What to do if the update fails? This article will be described in detail and provides a solution to the failure of KB5060999 installation. Quick Navigation :- Windows 11 23H2 KB5060999 Updated Content - KB5060999 Reason for installation failure - Solve the problem that KB506099 cannot be installed - Summary of Windows 11 23H2 KB5060999 Update KB5060999 is a cumulative security update for Windows 11 released by Microsoft on June 10, 2025
 Spotlight on Windows 10 KB5061087 & Fixes for Not Installing
Jun 30, 2025 pm 08:03 PM
Spotlight on Windows 10 KB5061087 & Fixes for Not Installing
Jun 30, 2025 pm 08:03 PM
Microsoft has released Windows 10 KB5061087 for 22H2 to fix some issues. From this post on MiniTool, learn how to install this preview optional update on your PC. Also, you can know what to do if KB5061087 fails to install via Windows Update.Quick Na
 Windows Security is blank or not showing options
Jul 07, 2025 am 02:40 AM
Windows Security is blank or not showing options
Jul 07, 2025 am 02:40 AM
When the Windows Security Center is blank or the function is missing, you can follow the following steps to check: 1. Confirm whether the system version supports full functions, some functions of the Home Edition are limited, and the Professional Edition and above are more complete; 2. Restart the SecurityHealthService service to ensure that its startup type is set to automatic; 3. Check and uninstall third-party security software that may conflict; 4. Run the sfc/scannow and DISM commands to repair system files; 5. Try to reset or reinstall the Windows Security Center application, and contact Microsoft support if necessary.
 Windows can't access shared folder on network
Jun 30, 2025 pm 04:56 PM
Windows can't access shared folder on network
Jun 30, 2025 pm 04:56 PM
When encountering the "Windowscan'taccesssharedfolderonnetwork", you can usually solve the problem through the following steps: 1. Turn on the network discovery and file sharing function and turn off password protection; 2. Make sure that the target computer is enabled to share and set the correct permissions; 3. Check the firewall rules and service status to ensure that it allows shared access; 4. Use the credential manager to add network credentials for long-term and stable connection.
 Windows 'Getting Windows ready, Don't turn off your computer' stuck
Jun 30, 2025 pm 05:18 PM
Windows 'Getting Windows ready, Don't turn off your computer' stuck
Jun 30, 2025 pm 05:18 PM
When you encounter Windows stuck in the "GettingWindowsready, Don't turnoff your computer" interface, you should first confirm whether it is really stuck; 1. Observe whether the hard disk indicator light is flashing, 2. Check whether the fan sound has changed, 3. Wait at least 30 to 60 minutes to ensure that the system has enough time to complete the update operation.
 Cannot Fix Dune Awakening Connection Failed Issue? Fixes Here
Jun 21, 2025 pm 08:01 PM
Cannot Fix Dune Awakening Connection Failed Issue? Fixes Here
Jun 21, 2025 pm 08:01 PM
The Dune Awakening connection failed issue can be frustrating, especially for players who are eager to jump into the game. If you're unsure how to resolve this, this MiniTool article offers assistance. It outlines common causes and provides solutions
 Windows clipboard history not working
Jun 30, 2025 pm 05:14 PM
Windows clipboard history not working
Jun 30, 2025 pm 05:14 PM
When the Windows clipboard history is not working, you can check the following steps: 1. Confirm that the clipboard history function is enabled, the path is "Settings>System>Clipboard", and if it is not enabled, Win V will not respond; 2. Check whether the copy content type is limited, such as large images, special formats or file paths may not be saved; 3. Ensure that the system version supports it, Windows 101809 and above, and some enterprise versions or LTSC do not support it; 4. Try to restart the ClipboardUserService service or end the clipups.exe process; 5. Clear the clipboard cache or reset the settings, close and then turn on the "Clipboard History" or run the "echooff|clip" command to clean up the cache
