


Leaflet.js: A lightweight JavaScript library for building interactive maps
Leaflet.js is a popular, lightweight, open source JavaScript library for creating interactive maps that work well on major desktop and mobile platforms.

Core points:
- Leaflet.js is a popular, lightweight and open source JavaScript library for creating interactive maps that are compatible with mainstream desktops and mobile devices.
- Creating a basic map using Leaflet.js requires creating an HTML page, referencing the Leaflet library file, preparing map data (including coordinates and basemap), and setting up the Leaflet map.
- Leaflet.js supports a wide range of map customization, including disabling mouse wheel zoom, adding multiple vector layers, customizing markers, and adding popups to display details.
- Leaflet.js supports a large number of plugins developed by the Leaflet community that provide extended functionality for the original maps, including adding more map tiles, pages, URL templates, PNG images, tile images, advanced zoom options and enhanced Tile interaction.
Leaflet.js is one of the most popular map libraries at present, and it is a flexible, lightweight, open source JavaScript library for creating interactive maps. Leaflet is a framework that displays map data, and the data and basemap must be provided by the developer. The map consists of tile layers and has browser support, default interactivity, panning and zooming capabilities. You can also add more custom layers and plugins and all map features in Leaflets. This map library converts your data into map layers and has strong support, making it the go-to choice for most developers. It works well on major desktop and mobile platforms, making it an ideal JavaScript library for mobile and larger screen maps.
This tutorial will show you how to create a beautiful, interactive South Pacific map using HTML, CSS, and Leaflets that highlight the most popular beaches. I collected data from the TripAdvisor website and compiled the top 10 best beaches in the South Pacific selected by Travelers' Choice in 2021.
Have you seen some interesting maps and wished to create your own map? Follow me on this exciting journey and I will show you how to draw a cool map and highlight the top 10 best beaches with Leaflets.
Four steps to create a basic Leaflet map:
The process of building a simple map using Leaflet is simple. Some HTML and JavaScript basics are helpful, but don't worry if you're a complete beginner. Using this JavaScript library is very easy and I will walk you through every line of code step by step as I create this amazing and insightful map.
1. Create a basic HTML page
First, I create an HTML page to render the map object. Then add a <div> to hold the map and give it an ID (such as "map") for reference later. Next, I add some style details where I specify width and height as 100vw and 100vh. This will make the map occupy the entire page:
<pre class='brush:php;toolbar:false;'><!DOCTYPE html>
<html lang="en">
<head>
<meta charset="utf-8">
<title>Leaflet Map</title>
<style type="text/css">
body{
margin: 0;
padding: 0;
}
#map {
width: 100vw;
height: 100vh;
}
</style>
</head>
<body>
<div id="map"></div>
</body>
</html></pre>
<p><strong>2. Quoting Leaflet JavaScript library file</strong></p>
<p> Since I'm using the Leaflet library, I need to include the necessary JavaScript and CSS files for the library. You can download the file directly, install the file locally using JavaScript package manager (npm), or use the managed version on its CDN: </p>
<pre class='brush:php;toolbar:false;'><!DOCTYPE html>
<html lang="en">
<head>
<meta charset="utf-8">
<title>Leaflet Map</title>
<link rel="stylesheet" href="https://unpkg.com/leaflet@1.6.0/dist/leaflet.css" integrity="sha512-xwE/Az9zrjBIphAcBb3F6JVqxf46+CDLwfLMHloNu6KEQCAWi6HcDUbeOfBIptF7tcCzusKFjFw2yuvEpDL9wQ==" crossorigin=""/>
<style type="text/css">
body{
margin: 0;
padding: 0;
}
#map {
width: 100vw;
height: 100vh;
}
</style>
</head>
<body>
<div id="map"></div>
<??>
<??>
</body>
</html></pre>
<p><em> Note: The <code>integrity property allows the browser to check the retrieved scripts to ensure that the code will not be loaded if the source code has been tampered with.
3. Prepare data
To draw any map, coordinate values, such as latitude and longitude. I collected the latitude and longitude of each data point from here . Also, for Leaflet development, I also need the basemap, which I get from a website called OpenStreetMap.
4. Set Leaflet Map
Now is the fun part of creating the map, writing some code. You won't believe how many lines of code it takes to create a fully functional map using Leaflet. This ease of development, and the fact that Leaflet is an open source JavaScript library, makes it rank high on the map library list.First of all, remember that everything in this JavaScript library is accessed through the letter "L", and all functions are extended through it.
Initialize the map
First, I declare the map variable and initialize it using Leaflet map. The first parameter is the ID of defined earlier. The second parameter is where you want the center of the map to be located. The last one is the zoom level. I set the zoom level to 3.5, but you can set it to whatever level you like. I use these parameters for my map, but there are many different options available to set the state, interaction, animation and events of the map, which you can view here: [Leaflet documentation link should be inserted here]<div>
const map = L.map('map', {
  center: [-29.50, 145],
  zoom: 3.5
});
Add base map
Next, I added the tile layer, which will be the basemap of the Leaflet map. A tile layer is a set of tiles accessed from the server through a direct URL request. This tile layer adds geographic boundaries to the map.Be sure to include attribution text for this, because most developers forget to do this:
L.tileLayer('https://{s}.tile.openstreetmap.org/{z}/{x}/{y}.png', {
  attribution: '? <a href="http://m.miracleart.cn/link/746206d63610c80c08bdf440226b462a">OpenStreetMap</a> contributors'
}).addTo(map);
Add default tag
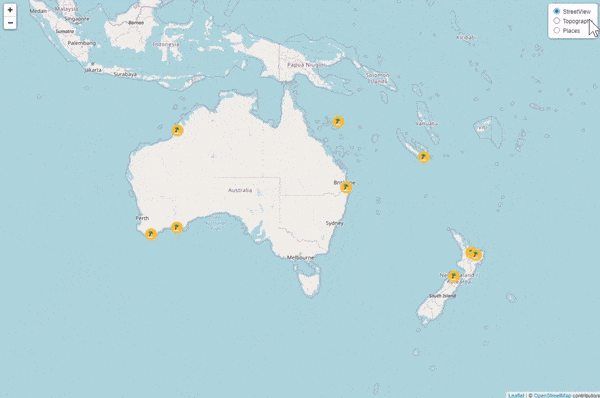
I added a mark to indicate the beach. Leaflet provides this feature as the default feature. Since I need to display ten beaches, I will add a marker separately and use the latitude and longitude values ??of each beach:
const marker1 = L.marker([-37.699450, 176.279420]).addTo(map);
const marker2 = L.marker([-27.643310, 153.305140]).addTo(map);
// ... 其他標(biāo)記 ...
Look! An absolutely cute and fully functional Leaflet map is all set up and ready to use. Is Leaflet development easy?
The following image shows everything so far.

You can find the full code from this CodePen: [CodePen link should be inserted here]
Custom Leaflet Map
A useful feature of the Leaflet JavaScript library is that it can quickly build basic maps, and it has many options to customize the map. So let me show you four ways to make this Leaflet map more informative and aesthetic.
(The remaining part should be added here, adjust and polish the code blocks according to the original structure and content, and replace the placeholder links and pictures to keep the picture position unchanged)
(Finally, the summary part also needs to be rewrite and polished accordingly)
The above is the detailed content of A Beginner's Guide to Creating a Map Using Leaflet.js. For more information, please follow other related articles on the PHP Chinese website!

Hot AI Tools

Undress AI Tool
Undress images for free

Undresser.AI Undress
AI-powered app for creating realistic nude photos

AI Clothes Remover
Online AI tool for removing clothes from photos.

Clothoff.io
AI clothes remover

Video Face Swap
Swap faces in any video effortlessly with our completely free AI face swap tool!

Hot Article
Hot Tools

Notepad++7.3.1
Easy-to-use and free code editor

SublimeText3 Chinese version
Chinese version, very easy to use

Zend Studio 13.0.1
Powerful PHP integrated development environment

Dreamweaver CS6
Visual web development tools

SublimeText3 Mac version
God-level code editing software (SublimeText3)
Hot Topics


 Java vs. JavaScript: Clearing Up the Confusion
Jun 20, 2025 am 12:27 AM
Java vs. JavaScript: Clearing Up the Confusion
Jun 20, 2025 am 12:27 AM
Java and JavaScript are different programming languages, each suitable for different application scenarios. Java is used for large enterprise and mobile application development, while JavaScript is mainly used for web page development.
 Javascript Comments: short explanation
Jun 19, 2025 am 12:40 AM
Javascript Comments: short explanation
Jun 19, 2025 am 12:40 AM
JavaScriptcommentsareessentialformaintaining,reading,andguidingcodeexecution.1)Single-linecommentsareusedforquickexplanations.2)Multi-linecommentsexplaincomplexlogicorprovidedetaileddocumentation.3)Inlinecommentsclarifyspecificpartsofcode.Bestpractic
 How to work with dates and times in js?
Jul 01, 2025 am 01:27 AM
How to work with dates and times in js?
Jul 01, 2025 am 01:27 AM
The following points should be noted when processing dates and time in JavaScript: 1. There are many ways to create Date objects. It is recommended to use ISO format strings to ensure compatibility; 2. Get and set time information can be obtained and set methods, and note that the month starts from 0; 3. Manually formatting dates requires strings, and third-party libraries can also be used; 4. It is recommended to use libraries that support time zones, such as Luxon. Mastering these key points can effectively avoid common mistakes.
 Why should you place tags at the bottom of the ?
Jul 02, 2025 am 01:22 AM
Why should you place tags at the bottom of the ?
Jul 02, 2025 am 01:22 AM
PlacingtagsatthebottomofablogpostorwebpageservespracticalpurposesforSEO,userexperience,anddesign.1.IthelpswithSEObyallowingsearchenginestoaccesskeyword-relevanttagswithoutclutteringthemaincontent.2.Itimprovesuserexperiencebykeepingthefocusonthearticl
 JavaScript vs. Java: A Comprehensive Comparison for Developers
Jun 20, 2025 am 12:21 AM
JavaScript vs. Java: A Comprehensive Comparison for Developers
Jun 20, 2025 am 12:21 AM
JavaScriptispreferredforwebdevelopment,whileJavaisbetterforlarge-scalebackendsystemsandAndroidapps.1)JavaScriptexcelsincreatinginteractivewebexperienceswithitsdynamicnatureandDOMmanipulation.2)Javaoffersstrongtypingandobject-orientedfeatures,idealfor
 JavaScript: Exploring Data Types for Efficient Coding
Jun 20, 2025 am 12:46 AM
JavaScript: Exploring Data Types for Efficient Coding
Jun 20, 2025 am 12:46 AM
JavaScripthassevenfundamentaldatatypes:number,string,boolean,undefined,null,object,andsymbol.1)Numbersuseadouble-precisionformat,usefulforwidevaluerangesbutbecautiouswithfloating-pointarithmetic.2)Stringsareimmutable,useefficientconcatenationmethodsf
 What is event bubbling and capturing in the DOM?
Jul 02, 2025 am 01:19 AM
What is event bubbling and capturing in the DOM?
Jul 02, 2025 am 01:19 AM
Event capture and bubble are two stages of event propagation in DOM. Capture is from the top layer to the target element, and bubble is from the target element to the top layer. 1. Event capture is implemented by setting the useCapture parameter of addEventListener to true; 2. Event bubble is the default behavior, useCapture is set to false or omitted; 3. Event propagation can be used to prevent event propagation; 4. Event bubbling supports event delegation to improve dynamic content processing efficiency; 5. Capture can be used to intercept events in advance, such as logging or error processing. Understanding these two phases helps to accurately control the timing and how JavaScript responds to user operations.
 What's the Difference Between Java and JavaScript?
Jun 17, 2025 am 09:17 AM
What's the Difference Between Java and JavaScript?
Jun 17, 2025 am 09:17 AM
Java and JavaScript are different programming languages. 1.Java is a statically typed and compiled language, suitable for enterprise applications and large systems. 2. JavaScript is a dynamic type and interpreted language, mainly used for web interaction and front-end development.
