


HDFS upgrade guide under CentOS system: Ensure safe and smooth data upgrade
Upgrading HDFS involves steps such as system update, dependency installation, configuration adjustment and service restart. This article provides detailed upgrade steps and precautions to help you complete HDFS upgrades safely and efficiently.
Detailed explanation of the upgrade steps
-
Confirm the CentOS version:
Use the following command to view the current CentOS version:
cat /etc/centos-release
Data backup is crucial: Be sure to back up all HDFS data before any upgrade operation.
-
System update: Use the following command to update the system package:
sudo yum update -y
-
Install the necessary components: Install the necessary software packages, such as GCC and OpenSSH clients:
sudo yum install -y gcc openssh-clients
-
Configure HDFS environment:
- Edit
/etc/hadoop/conf/core-site.xmland/etc/hadoop/conf/hdfs-site.xmlfiles, and configure key properties of HDFS, such asfs.defaultFSanddfs.replication. - Set
JAVA_HOMEenvironment variable correctly.
- Edit
-
Stop HDFS service: Before upgrading, be sure to stop HDFS NameNode and DataNode services:
 sudo systemctl stop hadoop-namenode
sudo systemctl stop hadoop-datanode
-
Rolling Upgrade HDFS: It is recommended to use rolling upgrade mode to avoid service interruptions. Execute the following command:
 sudo hdfs namenode -upgrade
sudo hdfs datanode -upgrade
-
Upgrade Verification: After the upgrade is complete, use the following command to check the HDFS service status and cluster report:
sudo hdfs dfsadmin -report
Upgrade precautions
- Data backup: Again, be sure to back up all important data before upgrading to prevent data loss.
- Compatibility issues: Compatibility issues may occur during the upgrade process. Please refer to the official Hadoop documentation and community resources to solve it.
- Test environment verification: Before upgrading the production environment, it is recommended to conduct complete testing in the test environment first.
The above steps are for reference only, and the actual upgrade process may vary depending on environmental differences. Be sure to refer to the official Hadoop documentation or seek help from professionals.
The above is the detailed content of How to upgrade CentOS HDFS. For more information, please follow other related articles on the PHP Chinese website!

Hot AI Tools

Undress AI Tool
Undress images for free

Undresser.AI Undress
AI-powered app for creating realistic nude photos

AI Clothes Remover
Online AI tool for removing clothes from photos.

Clothoff.io
AI clothes remover

Video Face Swap
Swap faces in any video effortlessly with our completely free AI face swap tool!

Hot Article
Hot Tools

Notepad++7.3.1
Easy-to-use and free code editor

SublimeText3 Chinese version
Chinese version, very easy to use

Zend Studio 13.0.1
Powerful PHP integrated development environment

Dreamweaver CS6
Visual web development tools

SublimeText3 Mac version
God-level code editing software (SublimeText3)
Hot Topics


 How to uninstall MySQL and clean residual files
Apr 29, 2025 pm 04:03 PM
How to uninstall MySQL and clean residual files
Apr 29, 2025 pm 04:03 PM
To safely and thoroughly uninstall MySQL and clean all residual files, follow the following steps: 1. Stop MySQL service; 2. Uninstall MySQL packages; 3. Clean configuration files and data directories; 4. Verify that the uninstallation is thorough.
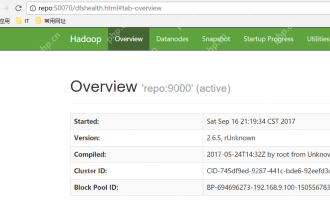 Hadoop pseudo-distributed cluster construction
May 07, 2025 pm 04:45 PM
Hadoop pseudo-distributed cluster construction
May 07, 2025 pm 04:45 PM
Software preparation I am using a virtual machine with CentOS-6.6, with the host name repo. Refer to the steps to install a Linux virtual machine in Windows, I installed JDK in that virtual machine, refer to the guide to installing JDK in Linux. In addition, the virtual machine is configured with a key-free login itself, and the settings for configuring key-free login between each virtual machine are referenced. The download address of Hadoop installation package is: https://mirrors.aliyun.com/apache/hadoop/common/. I am using hadoop 2.6.5 version. Upload the Hadoop installation package to the server and unzip [root@repo~]#tarzxv
 .NET Core Quick Start Tutorial 1. The beginning: Talking about .NET Core
May 07, 2025 pm 04:54 PM
.NET Core Quick Start Tutorial 1. The beginning: Talking about .NET Core
May 07, 2025 pm 04:54 PM
1. The Origin of .NETCore When talking about .NETCore, we must not mention its predecessor .NET. Java was in the limelight at that time, and Microsoft also favored Java. The Java virtual machine on the Windows platform was developed by Microsoft based on JVM standards. It is said to be the best performance Java virtual machine at that time. However, Microsoft has its own little abacus, trying to bundle Java with the Windows platform and add some Windows-specific features. Sun's dissatisfaction with this led to a breakdown of the relationship between the two parties, and Microsoft then launched .NET. .NET has borrowed many features of Java since its inception and gradually surpassed Java in language features and form development. Java in version 1.6
 Detailed explanation of the installation steps of MySQL on macOS system
Apr 29, 2025 pm 03:36 PM
Detailed explanation of the installation steps of MySQL on macOS system
Apr 29, 2025 pm 03:36 PM
Installing MySQL on macOS can be achieved through the following steps: 1. Install Homebrew, using the command /bin/bash-c"$(curl-fsSLhttps://raw.githubusercontent.com/Homebrew/install/HEAD/install.sh)". 2. Update Homebrew and use brewupdate. 3. Install MySQL and use brewinstallmysql. 4. Start MySQL service and use brewservicesstartmysql. After installation, you can use mysql-u
 Steps to add and delete fields to MySQL tables
Apr 29, 2025 pm 04:15 PM
Steps to add and delete fields to MySQL tables
Apr 29, 2025 pm 04:15 PM
In MySQL, add fields using ALTERTABLEtable_nameADDCOLUMNnew_columnVARCHAR(255)AFTERexisting_column, delete fields using ALTERTABLEtable_nameDROPCOLUMNcolumn_to_drop. When adding fields, you need to specify a location to optimize query performance and data structure; before deleting fields, you need to confirm that the operation is irreversible; modifying table structure using online DDL, backup data, test environment, and low-load time periods is performance optimization and best practice.
 Postman Integrated Application on CentOS
May 19, 2025 pm 08:00 PM
Postman Integrated Application on CentOS
May 19, 2025 pm 08:00 PM
Integrating Postman applications on CentOS can be achieved through a variety of methods. The following are the detailed steps and suggestions: Install Postman by downloading the installation package to download Postman's Linux version installation package: Visit Postman's official website and select the version suitable for Linux to download. Unzip the installation package: Use the following command to unzip the installation package to the specified directory, for example /opt: sudotar-xzfpostman-linux-x64-xx.xx.xx.tar.gz-C/opt Please note that "postman-linux-x64-xx.xx.xx.tar.gz" is replaced by the file name you actually downloaded. Create symbols
 How to return the previous version of win11 win11 system rollback operation guide
May 07, 2025 pm 04:21 PM
How to return the previous version of win11 win11 system rollback operation guide
May 07, 2025 pm 04:21 PM
Starting the rollback function on Windows 11 must be performed within 10 days after the upgrade. The steps are as follows: 1. Open "Settings", 2. Enter "System", 3. Find the "Recover" option, 4. Start rollback, 5. Confirm the rollback. After rollback, you need to pay attention to data backup, software compatibility and driver updates.
 How to configure the character set and collation rules of MySQL
Apr 29, 2025 pm 04:06 PM
How to configure the character set and collation rules of MySQL
Apr 29, 2025 pm 04:06 PM
Methods for configuring character sets and collations in MySQL include: 1. Setting the character sets and collations at the server level: SETNAMES'utf8'; SETCHARACTERSETutf8; SETCOLLATION_CONNECTION='utf8_general_ci'; 2. Create a database that uses specific character sets and collations: CREATEDATABASEexample_dbCHARACTERSETutf8COLLATEutf8_general_ci; 3. Specify character sets and collations when creating a table: CREATETABLEexample_table(idINT
