


The key to setting up a dual monitor is the connection method, system settings and multi-screen utilization. First, confirm the interface type between the computer and the monitor, select HDMI or DP cable connection. If the interface is not unified, you need to use adapters or different wire combinations. Note that the thin and light notebook may only support single-screen expansion; then switch the display mode through Win P in Windows, drag the monitor icon to adjust the position and set the main screen, enter the system settings in macOS to adjust the arrangement and resolution; finally, reasonable layout improves efficiency, such as Excel and Word in one side during office work, code and debug information are displayed on split screen during programming, and Discord and other applications are mounted on the other screen during gaming, making full use of the advantages of dual screens.

Setting up dual monitors is actually not difficult. Just prepare the hardware and understand the system settings and it will be done in a few minutes. The key lies in the connection method, system settings and the rational use of multi-screen space.

Select the right connection cable and interface
First, you need to confirm which interface types your computer and monitor support, such as HDMI, DisplayPort, USB-C, or VGA (old style). Most of the mainstream devices today use HDMI or DP cables, which have stable transmission and support high resolution.
- If both monitors have the same interface, they can be connected separately using the same wire.
- If the interface is not uniform, an adapter may be required or a different wire combination may be used.
- Note that some thin and light notebooks only support one external screen. Check the graphics card output capability before buying.
For example, a common scenario is: a laptop with an HDMI interface monitor and a USB-C interface monitor. At this time, you may need to use an HDMI cable and a USB-C to HDMI cable or dock.

Adjust display settings in the system
After connecting the cable, the next step is to set the dual monitor mode in the operating system. Both Windows and macOS have intuitive settings interfaces.
On Windows:
- Press the
Win Pshortcut key to quickly switch the display mode (copy, expansion, second screen only, etc.). - Right-click the desktop → Display Settings → Enter the "Show" page and you can see two monitor icons.
- Drag the monitor icons to adjust their relative positions so that the mouse moves more naturally.
- Resolution and home screen settings are also important, and it is recommended to place common operations on the home screen.
On macOS:
- Open System Settings → Monitor, press and hold Option Click "Zoom" to bring up more resolution options.
- Hold down the mouse and drag the monitor arrangement diagram to set the position of the home screen.
- If you want the menu bar to appear only on a certain screen, you can check "Mirror Display" in the "Display" settings.
Rationally use dual screens to improve efficiency
Many people have set up dual monitors but are not really used. In fact, its biggest advantage is to improve work efficiency. For example, you can write documents while reading reference materials; edit pictures while keeping the palette open.
- Office scene: Excel table on the left and Word report on the right.
- Programming development: The code editor is on one side, debug information or browser documents are on the other side.
- Game Entertainment: The game is full screen on one screen, and the other screen has a Discord or web page.
Some software also supports cross-screen drag and drop windows and split-screen functions. Remember to enable these detailed settings to give you a better experience.
Basically that's it. The setup process is not complicated, but it is easy to ignore some small details, such as interface compatibility, home screen settings and work layout arrangements. Just figure out these points, the dual monitors can truly serve you.
The above is the detailed content of how to set up dual monitors. For more information, please follow other related articles on the PHP Chinese website!

Hot AI Tools

Undress AI Tool
Undress images for free

Undresser.AI Undress
AI-powered app for creating realistic nude photos

AI Clothes Remover
Online AI tool for removing clothes from photos.

Clothoff.io
AI clothes remover

Video Face Swap
Swap faces in any video effortlessly with our completely free AI face swap tool!

Hot Article
Hot Tools

Notepad++7.3.1
Easy-to-use and free code editor

SublimeText3 Chinese version
Chinese version, very easy to use

Zend Studio 13.0.1
Powerful PHP integrated development environment

Dreamweaver CS6
Visual web development tools

SublimeText3 Mac version
God-level code editing software (SublimeText3)
Hot Topics


 How to set the scheduled time for publishing works on Douyin? How does it set the video duration?
Mar 27, 2024 pm 06:11 PM
How to set the scheduled time for publishing works on Douyin? How does it set the video duration?
Mar 27, 2024 pm 06:11 PM
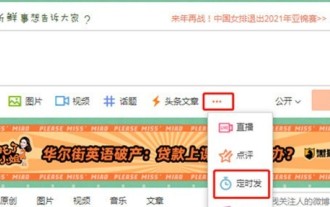
Publishing works on Douyin can attract more attention and likes, but sometimes it may be difficult for us to publish works in real time. In this case, we can use Douyin's scheduled release function. Douyin’s scheduled release function allows users to automatically publish works at a scheduled time, which can better plan the release plan and increase the exposure and influence of the work. 1. How to set the scheduled time for publishing works on Douyin? To set a scheduled release time, first go to Douyin's personal homepage, find the "+" button in the upper right corner, and click to enter the release page. There is a clock icon in the lower right corner of the publishing page. Click to enter the scheduled publishing interface. In the interface, you can choose the type of work you want to publish, including short videos, long videos, and live broadcasts. Next, you need to set a time for your work to be published. TikTok provides
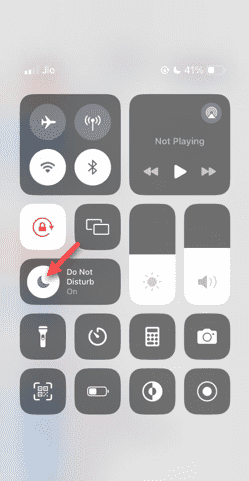 Do Not Disturb Mode Not Working in iPhone: Fix
Apr 24, 2024 pm 04:50 PM
Do Not Disturb Mode Not Working in iPhone: Fix
Apr 24, 2024 pm 04:50 PM
Even answering calls in Do Not Disturb mode can be a very annoying experience. As the name suggests, Do Not Disturb mode turns off all incoming call notifications and alerts from emails, messages, etc. You can follow these solution sets to fix it. Fix 1 – Enable Focus Mode Enable focus mode on your phone. Step 1 – Swipe down from the top to access Control Center. Step 2 – Next, enable “Focus Mode” on your phone. Focus Mode enables Do Not Disturb mode on your phone. It won't cause any incoming call alerts to appear on your phone. Fix 2 – Change Focus Mode Settings If there are some issues in the focus mode settings, you should fix them. Step 1 – Open your iPhone settings window. Step 2 – Next, turn on the Focus mode settings
 How to set the Enter key to send messages in QQ
Mar 25, 2024 pm 07:10 PM
How to set the Enter key to send messages in QQ
Mar 25, 2024 pm 07:10 PM
1. First, click on the mobile phone desktop to enter QQ, and click on the avatar in the upper left corner. 2. Click [Settings] in the lower left corner. 3. Click to open [Accessibility]. 4. Then we only need to click to turn on the [Enter key to send message] switch.
 How to set up scheduled publishing on Weibo_Tutorial on how to set up scheduled publishing on Weibo
Mar 29, 2024 pm 03:51 PM
How to set up scheduled publishing on Weibo_Tutorial on how to set up scheduled publishing on Weibo
Mar 29, 2024 pm 03:51 PM
1. Open the Weibo client, click the three little dots on the editing page, and then click Scheduled Post. 2. After clicking on scheduled posting, there will be a time option on the right side of the publishing time. Set the time, edit the article, and click on the yellow words in the lower right corner to schedule posting. 3. The mobile version of Weibo does not currently support scheduled publishing. This function can only be used on the PC client!
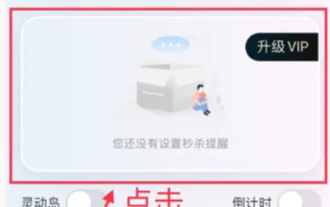 How to set the countdown to grab tickets in Damai
Apr 01, 2024 pm 07:01 PM
How to set the countdown to grab tickets in Damai
Apr 01, 2024 pm 07:01 PM
When buying tickets on Damai.com, in order to ensure that the ticket purchase time can be accurately grasped, users can set a floating clock to grab tickets. The detailed setting method is below, let us learn together. How to bind the floating clock to Damai 1. Click to open the floating clock app on your phone to enter the interface, and click on the location where the flash sale check is set, as shown in the figure below: 2. After coming to the page of adding new records, click on Damai.com Copy the ticket purchase link page copied in. 3. Next, set the flash sale time and notification time below, turn on the switch button behind [Save to Calendar], and click [Save] below. 4. Click to turn on [Countdown], as shown in the figure below: 5. When the reminder time comes, click the [Start Picture-in-Picture] button below. 6. When the ticket purchase time comes
 How to set Douyin playback to automatically close? Why does the playback process automatically exit?
Apr 01, 2024 pm 12:06 PM
How to set Douyin playback to automatically close? Why does the playback process automatically exit?
Apr 01, 2024 pm 12:06 PM
Douyin is one of the most popular short video platforms today. While enjoying the fun of short videos, users also hope to have better control over their time. Recently, some users reported that Douyin would automatically close during playback, which troubled them very much. 1. How to set the Douyin playback to automatically turn off? 1. Check the Douyin version. Please make sure that the Douyin version you are using is the latest. Douyin will be updated regularly to fix known issues. If your version of TikTok is too old, it may automatically close. You can check and update TikTok in the App Store. 2. Check the mobile phone system version. The automatic shutdown of Douyin playback may also be related to the mobile phone system version. Please make sure your mobile phone system version is the latest. If the mobile phone system version is too old, it may cause Douyin to run unstable. you can
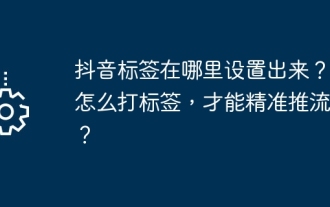 Where is the Douyin tag set? How can it be tagged so that it can be pushed accurately?
Mar 27, 2024 am 11:01 AM
Where is the Douyin tag set? How can it be tagged so that it can be pushed accurately?
Mar 27, 2024 am 11:01 AM
As one of the most popular short video platforms in the world, Douyin allows everyone to become a creator and share every moment of life. For Douyin users, tags are a very important function. It can help users better classify and retrieve content, and also allows the platform to push appropriate content to users more accurately. So, where are the Douyin tags set? This article will explain in detail how to set up and use tags on Douyin. 1. Where is the Douyin tag set? Using tags on Douyin can help users better classify and label their works, making it easier for other users to find and follow them. The method to set the label is as follows: 1. Open the Douyin APP and log in to your account. 2. Click the "+" sign at the bottom of the screen and select the "Publish" button. 3.
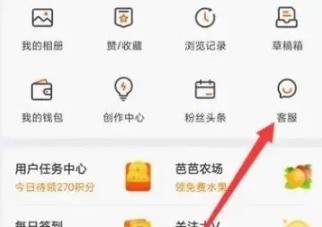 How to set the watermark in the middle on Weibo_How to set the watermark in the middle on Weibo
Mar 29, 2024 pm 03:31 PM
How to set the watermark in the middle on Weibo_How to set the watermark in the middle on Weibo
Mar 29, 2024 pm 03:31 PM
1. First enter Weibo, then click on me in the lower right corner and select [Customer Service]. 2. Then enter [Watermark] in the search box and select [Set Weibo Image Watermark]. 3. Then click [Link] in the interface. 4. Then click [Image Watermark Settings] in the newly opened window. 5. Finally, check [Picture Center] and click [Save].
