


The steps to install Docker and Docker Compose are as follows: 1. Update the system package; 2. Install dependencies; 3. Add the official Docker repository; 4. Install the Docker engine; 5. Start Docker and set up power-on; 6. Verify Docker installation; 7. Download the Docker Compose binary file; 8. Give execution permissions; 9. Verify Docker Compose installation. Also, be careful to join the user to the docker group to resolve permission issues and adjust the firewall or SELinux settings as needed. Follow the above steps to complete the installation smoothly.
Installing Docker and Docker Compose is the basic operation of building a containerized environment on CentOS. Although the steps are not complicated, some details can easily get stuck if you are not careful. Here are some steps to explain how to install.
Install Docker
Docker is a container runtime platform, and you must first install it.
-
Update system package
Before you start, update the system:sudo yum update -y
Install dependencies
Docker relies on some tools and libraries that can be installed through the following command:sudo yum install -y yum-utils device-mapper-persistent-data lvm2
Add Docker official repository
It is recommended to install it through the official source, so that the version is more stable:sudo yum-config-manager --add-repo https://download.docker.com/linux/centos/docker-ce.repo
Install Docker Engine
Installing Community Edition (CE) will meet most needs:sudo yum install -y docker-ce docker-ce-cli containerd.io
Start Docker and set up power-on
After the installation is completed, start the service and set it to start automatically:sudo systemctl start docker sudo systemctl enable docker
Verify that the installation is successful
You can run a test container to see:sudo docker run hello-world
If you output "Hello from Docker!", it means that the installation has been successful.
Install Docker Compose
Docker Compose is a tool used to manage multi-container applications, usually used with the docker-compose.yml file.
Download Docker Compose binary file
The latest version is available from GitHub. It is recommended to use the following command to download and install it in the/usr/local/bindirectory:sudo curl -L "https://github.com/docker/compose/releases/download/v2.23.0/docker-compose-$(uname -s)-$(uname -m)" -o /usr/local/bin/docker-compose
Grant execution permissions
After downloading, you need to add executable permissions to it:sudo chmod x /usr/local/bin/docker-compose
Verify installation
Run the following command to check whether the installation is successful:docker-compose --version
Under normal circumstances, information similar to
docker-compose version v2.23.0, build ...will be displayed.
Note: If you are using an older version of CentOS or encounter permission problems, you may need to use
sudo docker-composeto execute.
Frequently Asked Questions and Precautions
Permission issue : By default, only the root user can execute Docker commands. You can add ordinary users to
dockergroup to solve this problem:sudo usermod -aG docker your_username
Then log out of the current terminal and log in again to take effect.
Firewall or SELinux Blocking : If there is a problem with the container network access, you can try to temporarily turn off the firewall:
sudo systemctl stop firewalld
Or adjust the SELinux settings (recommended to set to permissive mode test).
Version selection : The installation method above is to install the latest stable version. If you have specific version requirements, you can use
yum list docker-ce --showduplicatesto view the available version and then specify the installation.
Basically that's it. The whole process is not difficult, but some permissions and dependencies are easy to ignore, especially when you are new to it. As long as you take it step by step, there should be no major problems.
The above is the detailed content of How to install Docker and Docker Compose on CentOS?. For more information, please follow other related articles on the PHP Chinese website!

Hot AI Tools

Undress AI Tool
Undress images for free

Undresser.AI Undress
AI-powered app for creating realistic nude photos

AI Clothes Remover
Online AI tool for removing clothes from photos.

Clothoff.io
AI clothes remover

Video Face Swap
Swap faces in any video effortlessly with our completely free AI face swap tool!

Hot Article
Hot Tools

Notepad++7.3.1
Easy-to-use and free code editor

SublimeText3 Chinese version
Chinese version, very easy to use

Zend Studio 13.0.1
Powerful PHP integrated development environment

Dreamweaver CS6
Visual web development tools

SublimeText3 Mac version
God-level code editing software (SublimeText3)
Hot Topics


 Hadoop pseudo-distributed cluster construction
May 07, 2025 pm 04:45 PM
Hadoop pseudo-distributed cluster construction
May 07, 2025 pm 04:45 PM
Software preparation I am using a virtual machine with CentOS-6.6, with the host name repo. Refer to the steps to install a Linux virtual machine in Windows, I installed JDK in that virtual machine, refer to the guide to installing JDK in Linux. In addition, the virtual machine is configured with a key-free login itself, and the settings for configuring key-free login between each virtual machine are referenced. The download address of Hadoop installation package is: https://mirrors.aliyun.com/apache/hadoop/common/. I am using hadoop 2.6.5 version. Upload the Hadoop installation package to the server and unzip [root@repo~]#tarzxv
 .NET Core Quick Start Tutorial 1. The beginning: Talking about .NET Core
May 07, 2025 pm 04:54 PM
.NET Core Quick Start Tutorial 1. The beginning: Talking about .NET Core
May 07, 2025 pm 04:54 PM
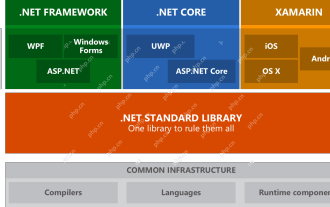
1. The Origin of .NETCore When talking about .NETCore, we must not mention its predecessor .NET. Java was in the limelight at that time, and Microsoft also favored Java. The Java virtual machine on the Windows platform was developed by Microsoft based on JVM standards. It is said to be the best performance Java virtual machine at that time. However, Microsoft has its own little abacus, trying to bundle Java with the Windows platform and add some Windows-specific features. Sun's dissatisfaction with this led to a breakdown of the relationship between the two parties, and Microsoft then launched .NET. .NET has borrowed many features of Java since its inception and gradually surpassed Java in language features and form development. Java in version 1.6
 Postman Integrated Application on CentOS
May 19, 2025 pm 08:00 PM
Postman Integrated Application on CentOS
May 19, 2025 pm 08:00 PM
Integrating Postman applications on CentOS can be achieved through a variety of methods. The following are the detailed steps and suggestions: Install Postman by downloading the installation package to download Postman's Linux version installation package: Visit Postman's official website and select the version suitable for Linux to download. Unzip the installation package: Use the following command to unzip the installation package to the specified directory, for example /opt: sudotar-xzfpostman-linux-x64-xx.xx.xx.tar.gz-C/opt Please note that "postman-linux-x64-xx.xx.xx.tar.gz" is replaced by the file name you actually downloaded. Create symbols
 How to develop a complete Python Web application?
May 23, 2025 pm 10:39 PM
How to develop a complete Python Web application?
May 23, 2025 pm 10:39 PM
To develop a complete Python Web application, follow these steps: 1. Choose the appropriate framework, such as Django or Flask. 2. Integrate databases and use ORMs such as SQLAlchemy. 3. Design the front-end and use Vue or React. 4. Perform the test, use pytest or unittest. 5. Deploy applications, use Docker and platforms such as Heroku or AWS. Through these steps, powerful and efficient web applications can be built.
 How to view process information inside Docker container
May 19, 2025 pm 09:06 PM
How to view process information inside Docker container
May 19, 2025 pm 09:06 PM
There are three ways to view the process information inside the Docker container: 1. Use the dockertop command to list all processes in the container and display PID, user, command and other information; 2. Use dockerexec to enter the container, and then use the ps or top command to view detailed process information; 3. Use the dockerstats command to display the usage of container resources in real time, and combine dockertop to fully understand the performance of the container.
 How to optimize HDFS configuration on CentOS
May 19, 2025 pm 08:18 PM
How to optimize HDFS configuration on CentOS
May 19, 2025 pm 08:18 PM
Optimizing the performance of Hadoop distributed file system (HDFS) on CentOS systems can be achieved through a variety of methods, including adjusting system kernel parameters, optimizing HDFS configuration files, and improving hardware resources. The following are detailed optimization steps and suggestions: Adjust the system kernel parameters to increase the limit on the number of files opened by a single process: Use the ulimit-n65535 command to temporarily adjust. If it needs to take effect permanently, please edit the /etc/security/limits.conf and /etc/pam.d/login files. Optimize TCP parameters: Edit /etc/sysctl.conf file, add or modify the following content: net.ipv4.tcp_tw
 How to deploy a PyTorch app on Ubuntu
May 29, 2025 pm 11:18 PM
How to deploy a PyTorch app on Ubuntu
May 29, 2025 pm 11:18 PM
Deploying a PyTorch application on Ubuntu can be done by following the steps: 1. Install Python and pip First, make sure that Python and pip are already installed on your system. You can install them using the following command: sudoaptupdatesudoaptinstallpython3python3-pip2. Create a virtual environment (optional) To isolate your project environment, it is recommended to create a virtual environment: python3-mvenvmyenvsourcemyenv/bin/activatet
 Performance Tuning of Jenkins Deployment on Debian
May 28, 2025 pm 04:51 PM
Performance Tuning of Jenkins Deployment on Debian
May 28, 2025 pm 04:51 PM
Deploying and tuning Jenkins on Debian is a process involving multiple steps, including installation, configuration, plug-in management, and performance optimization. Here is a detailed guide to help you achieve efficient Jenkins deployment. Installing Jenkins First, make sure your system has a Java environment installed. Jenkins requires a Java runtime environment (JRE) to run properly. sudoaptupdatesudoaptininstallopenjdk-11-jdk Verify that Java installation is successful: java-version Next, add J
