After the phpstudy2018 upgrade, the site and phpmyadmin open the 404 solution
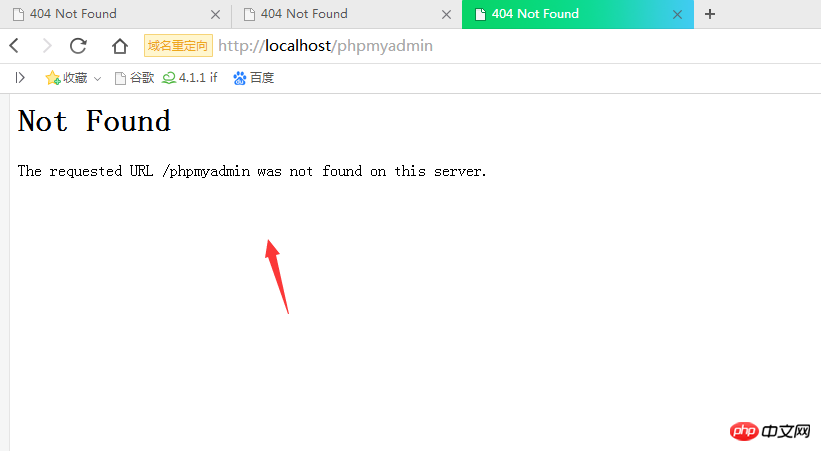
Jun 30, 2018 pm 04:21 PM??? Regarding this update of phpstudy2018, some users open localhost, 127.0.0.1, phpmyadmin, and the domain name configured by the site, and prompt 404 after opening, as shown in the figure below:

The solution is as follows:
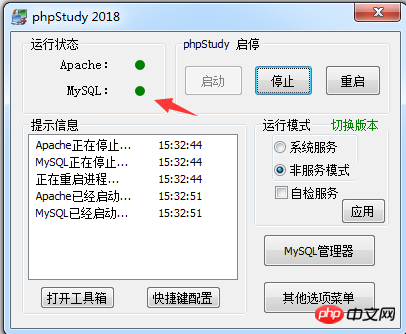
??????????? 1. Check whether apache or nginx, and the Mysql service are opened normally, and they can all be opened normally , that is, the green light will light up, as shown below:
? ? ? ? ? ? ? ? ? ? ? ? ? ? ?  ## ? ? ? ? ? ? ? ? ? ? ? ? ? ? ? ? ? ? ? ? ? ? ? off ’ s ’ s ’ s ’ s ’ ’ to ’ ’ ’ ’ ’ ’ ’ ’ ’ ’ ’ ’ ’ ’ ’ ’ ’ ’ ’ ’ ’ ’ ’ ’ ’ ’ ’ ’ ’ ’ ’ ’ ’ ’ ’ ’ ’ ” green light The error log file, example: Apache error log file position: D: \ phpstudy2018 \ phptutorial \ apache \ logs \ error.log
See the prompt in the error log file, according to the prompts according to the prompt to troubleshoot the reason why it cannot be opened.
2. When all services can be opened normally.
# check the site configuration file of the web server: vhosts.conf
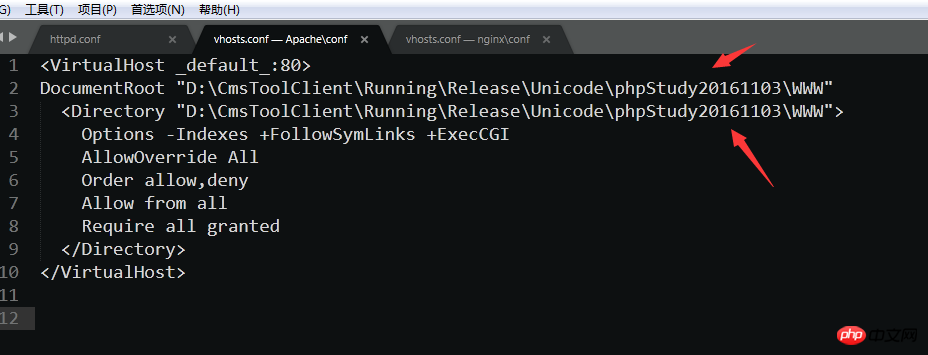
##The following takes apache as an example: (nginx has not found such a problem yet) The main thing to check is: whether the site configuration path behind DocumentRoot is correct.
?????????????????????????????????????????????????????????????????????????????????????????????????????????????????????????????????????????????????????????????????????????????? After opening http://localhost/phpmyadmin, it is displayed as Not Found
?????????????Check that the path configured for the DocumentRoot site is incorrect
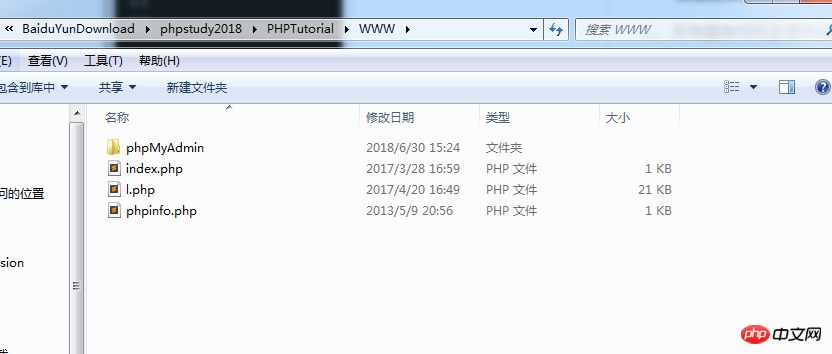
Open the local environment directory as follows:
## Show the local environment installation directory: D: \ baiduyundownload \ phpstudy2018 \ phptutorial \ www
Open the vhosts.conf configuration file, as follows: 
## This is displayed.
## The above solution: Just change the address to the directory where you installed phpstudy2018 locally, and then restart the service, you can access it normally, as shown in the figure below: 
??????????????????????????????????????????????????????????????????????????????????????????????????????????????????????????????????????????????????????????????????????????????????????????????????????????????????????????????????????????????????????????????????????????????????? since the above solutions cannot solve your problem, You can go to the official QQ communication group of php Chinese website and contact the administrator Xiaoshu

Hot AI Tools

Undress AI Tool
Undress images for free

Undresser.AI Undress
AI-powered app for creating realistic nude photos

AI Clothes Remover
Online AI tool for removing clothes from photos.

Clothoff.io
AI clothes remover

Video Face Swap
Swap faces in any video effortlessly with our completely free AI face swap tool!

Hot Article

Hot Tools

Notepad++7.3.1
Easy-to-use and free code editor

SublimeText3 Chinese version
Chinese version, very easy to use

Zend Studio 13.0.1
Powerful PHP integrated development environment

Dreamweaver CS6
Visual web development tools

SublimeText3 Mac version
God-level code editing software (SublimeText3)

Hot Topics
 How to set primary key in phpmyadmin
Apr 07, 2024 pm 02:54 PM
The primary key of a table is one or more columns that uniquely identify each record in the table. Here are the steps to set a primary key: Log in to phpMyAdmin. Select database and table. Check the column you want to use as the primary key. Click "Save Changes". Primary keys provide data integrity, lookup speed, and relationship modeling benefits.
 How to add foreign keys in phpmyadmin
Apr 07, 2024 pm 02:36 PM
Adding a foreign key in phpMyAdmin can be achieved by following these steps: Select the parent table that contains the foreign key. Edit the parent table structure and add new columns in "Columns". Enable foreign key constraints and select the referencing table and key. Set update/delete operations. save Changes.
 How to delete data table in phpmyadmin
Apr 07, 2024 pm 03:00 PM
Steps to delete a data table in phpMyAdmin: Select the database and data table; click the "Action" tab; select the "Delete" option; confirm and perform the deletion operation.
 Where does the wordpress database exist?
Apr 15, 2024 pm 10:39 PM
The WordPress database is housed in a MySQL database that stores all website data and can be accessed through your hosting provider’s dashboard, FTP, or phpMyAdmin. The database name is related to the website URL or username, and access requires the use of database credentials, including name, username, password, and hostname, which are typically stored in the "wp-config.php" file.
 How to set foreign keys in phpmyadmin
Apr 07, 2024 pm 03:03 PM
How to set up foreign keys? Create main table and sub-table. Open the phpMyAdmin dashboard. Select the main table. Open the "Structure" tab. Add a foreign key column and select the related column in the child table. Select the foreign key type (such as "CASCADE"). save Changes.
 What should I do if navicat cannot connect?
Apr 23, 2024 am 10:00 AM
When Navicat cannot connect, you can try the following solutions in order: Check whether the connection information is correct, such as database name, host name, port number, user name and password. Make sure the database is up and running. Check the firewall rules to confirm that Navicat and related services are not blocked. Try using the ping command to test your network connection. Update Navicat client software to the latest version. Check the server logs for error messages related to failed connections. Try connecting using other database tools to troubleshoot Navicat-specific issues.
 What to do if the installation of phpmyadmin fails
Apr 07, 2024 pm 03:15 PM
Troubleshooting steps for failed phpMyAdmin installation: Check system requirements (PHP version, MySQL version, web server); enable PHP extensions (mysqli, pdo_mysql, mbstring, token_get_all); check configuration file settings (host, port, username, password); Check file permissions (directory ownership, file permissions); check firewall settings (whitelist web server ports); view error logs (/var/log/apache2/error.log or /var/log/nginx/error.log); seek Technical support (phpMyAdmin
 How to change the default password of Empire CMS
Apr 16, 2024 pm 03:21 PM
Reset the Empire CMS default password through the following steps: Log in to the database and find the user table. Edit the administrator user (username is admin). Modify the value in the password field. Save the changes and use the new password to log in to the management backend.


