


How to apply the premiere template: first create a new project and import the video data into the newly created PR project; then select the graphical interface window and select the special effects template; then parse the fonts and templates and move them to the video track Go up; finally change the properties.
The operating environment of this article: Windows 7 system, Adobe Premiere Pro 2020 version, Dell G3 computer.
Recommended (free): premiere tutorial
How to apply premiere template:
1. Start the Premiere software, choose to create a new PR video editing project, and then set the project name, storage location and related properties in the new project window.

2. Import the video material into the newly created PR project, drag the video material into the timeline to automatically create a sequence, and then place the video material on the timeline on video track 1.

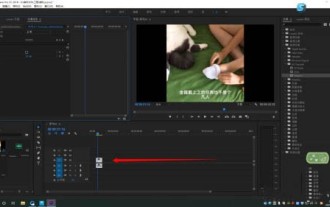
#3. Select the graphical interface window, and then find the basic graphics in the graphics. In Basic Graphics, you can see that there are many built-in templates, including text templates, MG animation templates, and transition effects.

4. Select a favorite text effects template from the templates that come with PR, select, move and drag it to video track 2, and wait for the template to load and parse the font.

5. After loading the text special effects template and parsing the font, you can play the timeline and view the template effect. However, this is the effect of the template. Next, change the template. .

6. Select the text special effects template in the screen, and the corresponding options will appear in the basic graphics editing. Select the text first, and the corresponding text attributes will appear, and you can edit the text. Content change and attribute change operations;

#7. When selecting another layer, you can also change the corresponding parameters. Finally, the built-in template was changed to the desired effect.

The above is the detailed content of How to apply premiere template. For more information, please follow other related articles on the PHP Chinese website!

Hot AI Tools

Undress AI Tool
Undress images for free

Undresser.AI Undress
AI-powered app for creating realistic nude photos

AI Clothes Remover
Online AI tool for removing clothes from photos.

Clothoff.io
AI clothes remover

Video Face Swap
Swap faces in any video effortlessly with our completely free AI face swap tool!

Hot Article
Hot Tools

Notepad++7.3.1
Easy-to-use and free code editor

SublimeText3 Chinese version
Chinese version, very easy to use

Zend Studio 13.0.1
Powerful PHP integrated development environment

Dreamweaver CS6
Visual web development tools

SublimeText3 Mac version
God-level code editing software (SublimeText3)
Hot Topics


 Recommended desktop computer configuration for video editing
Apr 22, 2024 am 10:07 AM
Recommended desktop computer configuration for video editing
Apr 22, 2024 am 10:07 AM
Install a computer mainly used for video editing: Lenovo ThinkPad X1: X1 has a built-in active stylus, the keyboard automatically retracts in tablet mode, and supports fast charging. The X1 has a solid black appearance and a 4KHDR screen, making it easy to edit videos, program software, etc. The downside is that the Ethernet port requires a dedicated adapter. Regarding memory issues: It is recommended to use memory modules of 16G or above. Because in order for the computer to edit high-definition videos without lagging, large memory is a necessary configuration. On the hard drive issue: Two hard drives can be installed. Monitor: Choose a high-resolution monitor for clearer viewing and editing of video footage. A monitor with 4k resolution or above is recommended. Operating system: Common editing software such as Adobe Premiere
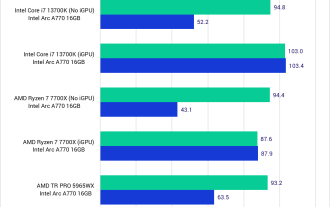 Arc A770 surpasses RTX 4060 in Adobe Premiere Pro 2024 Beta, adding Intel independent graphics hardware codec support
Aug 18, 2023 pm 01:49 PM
Arc A770 surpasses RTX 4060 in Adobe Premiere Pro 2024 Beta, adding Intel independent graphics hardware codec support
Aug 18, 2023 pm 01:49 PM
Intel launched the first-generation Arc A770 and A750 discrete graphics cards in October 2022, but software support will take some time to catch up. According to Pugetsystems’ findings, the latest Adobe Premiere Pro 2024 Beta Build 22 beta version has officially supported Intel Arc GPU hardware encoding and decoding, including H.264 And full support for HEVC, although we don't recommend the beta version for daily use, for those who don't like NVIDIA and AMD graphics cards, especially the Intel Arc series graphics cards which have stronger codec support than NVIDIA and AMD. This is very important. Adobe has officially released this series of work
 What is the solution to jitter and shaking in video editing? Why is the screen shaking?
May 02, 2024 am 11:37 AM
What is the solution to jitter and shaking in video editing? Why is the screen shaking?
May 02, 2024 am 11:37 AM
Video editing has become a very important industry. During the video editing process, screen jitter and shaking are a common problem, which has a great impact on the quality of the video. So, what is the solution to screen jitter and shaking? 1. What is the solution to jitter and shaking in video editing? 1. Use a stabilizer. A stabilizer is an important piece of equipment during video shooting. It can effectively reduce the shake and shaking of the picture. During the video editing process, if the original video image is jittery and shaking, you can use a stabilizer to process the image to make it more stable. Use a stabilizer to make the picture more stable. 2. Stabilization function in video editing software Nowadays, most video editing software has the function of stabilizing the picture.
 How to make dynamic watermark in Premiere_How to make dynamic watermark in Premiere
Apr 29, 2024 pm 04:30 PM
How to make dynamic watermark in Premiere_How to make dynamic watermark in Premiere
Apr 29, 2024 pm 04:30 PM
1. Open the PR software, create a new project, import the video material and put it on the track. 2. Use the text tool to add watermark text. I used XXX instead. You can also put a pre-made watermark LOGO picture. 3. In the opacity, lower the parameters appropriately so that the watermark is not too eye-catching. 4. Add key frames to the position. From the beginning to the end, move the watermark position every once in a while. The parameters are arbitrary and key frames are created every time. 5. Click play and you can see the dynamic watermark moving around the screen.
 Sora comes to Adobe video editing software! The new version of Premiere Pro opens the era of AI editing
Apr 16, 2024 pm 03:20 PM
Sora comes to Adobe video editing software! The new version of Premiere Pro opens the era of AI editing
Apr 16, 2024 pm 03:20 PM
Sora is going to be integrated into Adobe video editing software. In the newly released PremierPro concept demonstration, Adobe showed the results of its cooperation with OpenAI: in addition to the main lens, a B-roll auxiliary lens was completely generated by Sora. In addition to Sora, other popular AI video tools Runway and Pika will also be available as options. Runway is used similarly to Sora in the demonstration and can generate a new auxiliary shot. Pika can naturally extend existing lenses for several seconds. It should be emphasized that these features are still in the early preview and research stage, and it has not yet been revealed when they will be released. In comparison, Adobe’s own AI product Firefly
 How to blur video edges in Premiere_How to set feathered video edges in Premiere
May 08, 2024 pm 02:16 PM
How to blur video edges in Premiere_How to set feathered video edges in Premiere
May 08, 2024 pm 02:16 PM
1. First, let’s import a piece of material for demonstration. 2. Drag the material into the timeline panel. 3. Let’s take a look at the material. We can find that the edges of the fallen leaves in the lower half are stiff, which is not ideal for blending into such a scene. So I'm going to blur the edges of it. 4. Find it in the effects panel and double-click the feather edge to add the effect. 5. Adjust the blur amount so that the edges can achieve a blurred effect. 6. Take a look at the effect after processing. You can find that the edges of the fallen leaves have been blurred. Similarly, this method can be used in different scenarios. Friends can use this example to draw inferences. 7. Finally, let’s take a look at the finished animation effect.
 How to create star glow effect in Premiere_Steps to create star glow effect in Premiere
Apr 29, 2024 pm 01:46 PM
How to create star glow effect in Premiere_Steps to create star glow effect in Premiere
Apr 29, 2024 pm 01:46 PM
1. Open PR and select the material video that needs to be processed. 2. Find [starglow] in the effects. 3. Drag the effect directly to add it to the material. 4. In the preset, select a more suitable style. 5. Adjust the lighting parameters appropriately. That’s it
 How to create text disappearing effect in Premiere PR text disappearing animation
May 08, 2024 pm 02:49 PM
How to create text disappearing effect in Premiere PR text disappearing animation
May 08, 2024 pm 02:49 PM
First add a rough edge effect to the text. Then set the keyframes to create a text dissolve effect. Import particle dissipation material. Place the particle dispersion material on the track above the text. Set the blending mode to [Screen]. Adjust the size and position of the material. Adjust the time when the material appears and disappears. In this way, the text dissipation effect is created.
