

5 Ways to Disable Delivery Optimization Service in Windows
May 17, 2023 am 09:31 AM
There are many reasons why you might consider disabling the Delivery Optimization service on your Windows computer. However, our readers complained about not knowing the correct steps to follow.
This guide will discuss ways to disable the Delivery Optimization Service in a few steps. If you need to know more about services, we recommend checking out our guide: How to open services.msc.
What does delivery optimization service do?
Delivery Optimization Service is an HTTP downloader with a cloud hosting solution. It allows Windows devices to download Windows updates, upgrades, applications, and other large package files from alternate sources.
Additionally, it helps reduce bandwidth consumption as it allows these packages to be downloaded on multiple devices in a deployment. Plus, with transfer optimization, Windows PCs can update system and Store apps faster.
When using a metered connection, you should be aware that the delivery optimization service may cause issues such as increased data usage. Therefore, you should disable it on your PC for better performance.
How to turn off/disable delivery optimization service?
1. Via Window Settings
- Press the key to open the Windows Settings application. WindowsI
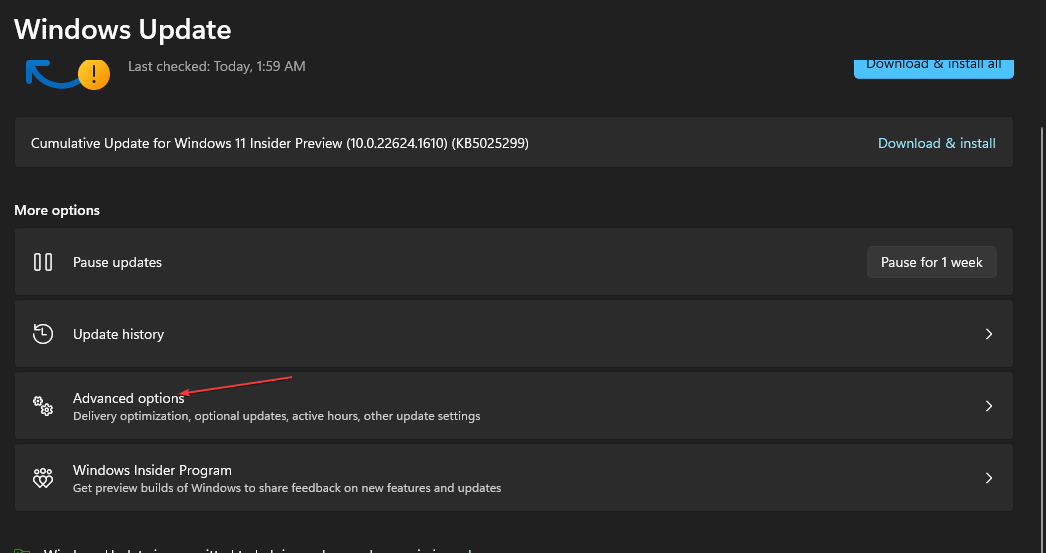
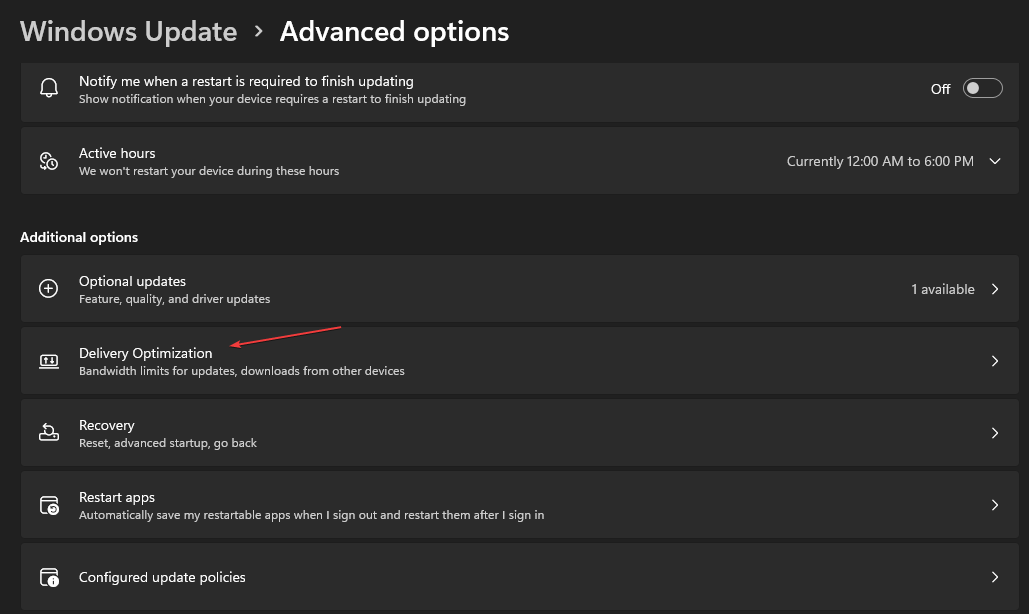
- Select Windows Update Options from the left pane of the screen and click the Advanced Options button.

- Scroll down to the Add Options section and click the Delivery Optimization button.
- Go to the Allow downloads from other PCs option and turn off the switch.
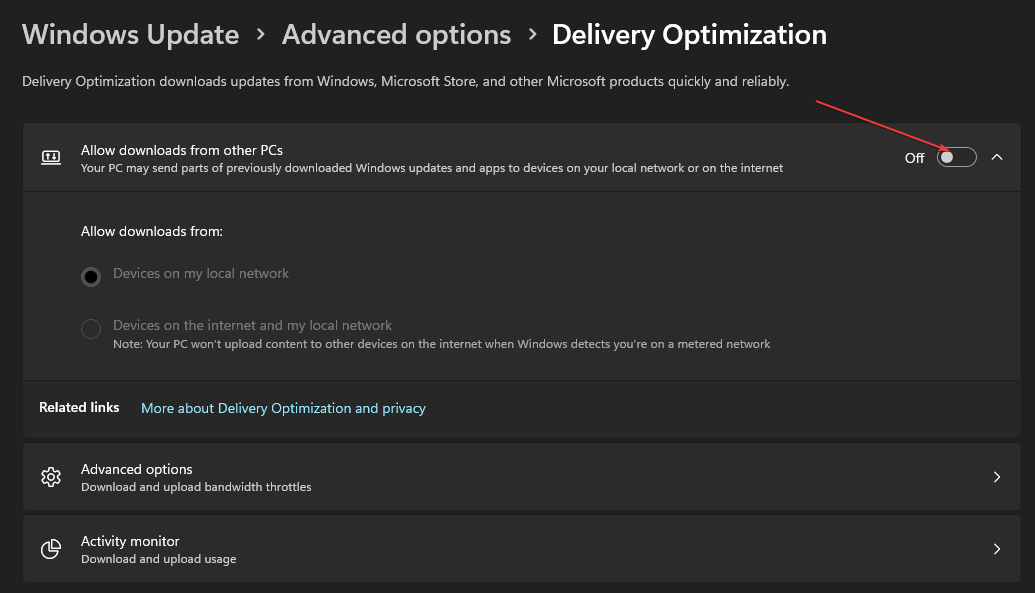
Turning off the switch for the "Allow downloads from other computers" option will disable delivery optimization from working during Windows Updates.
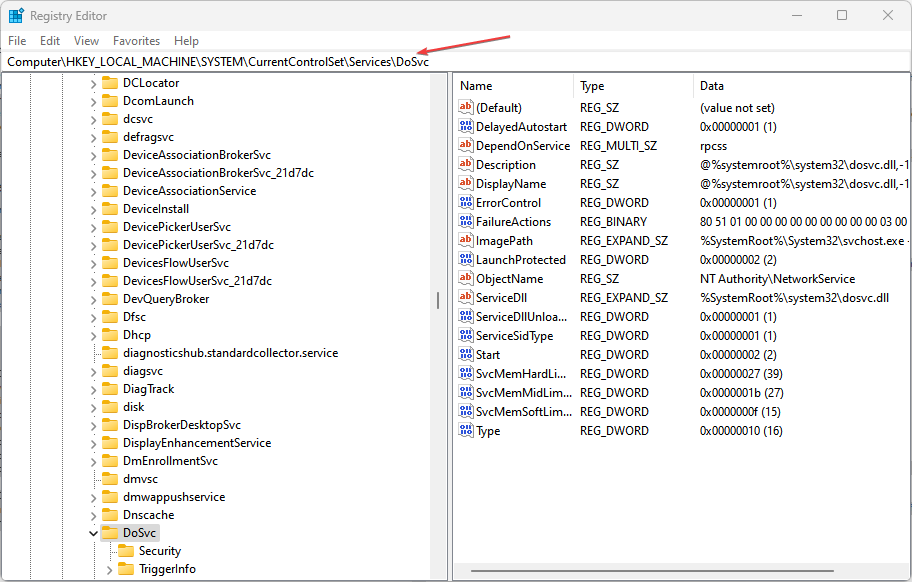
2. Through the Registry Editor
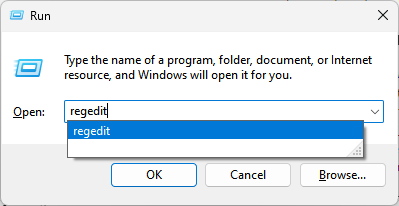
- Press the button to open the "Run" dialog box, type regedit, and then press to open the Registry Editor . WindowsREnter
- Copy and paste the following path and press: Enter
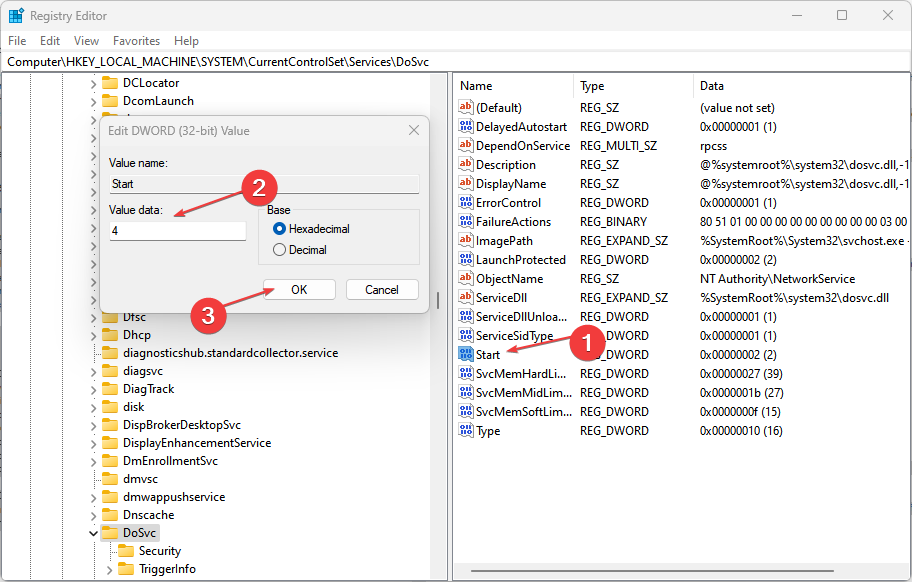
<strong>Computer\HKEY_LOCAL_MACHINE\SYSTEM\CurrentControlSet\Services\DoSvc</strong>##Double-click the - "Start" key in the right pane and change The hexadecimal value data is set to 4. Close Registry Editor and restart your computer for the changes to take effect.
? Obtain Fortress
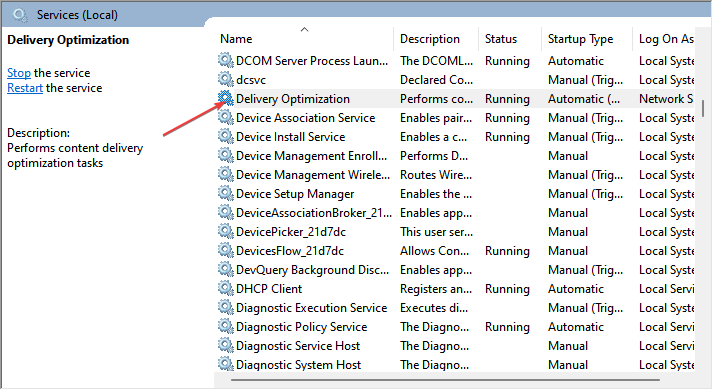
3. Turn off using Windows services- Press the "Run" dialog box and type # in the text bar ##services.msc
- and press to open Services. WindowsREnter Find and double-click Delivery Optimization from the list of services.
-
On the Delivery Optimization Properties page, click Startup Type
- and set it to Disabled. Then, click the Apply button. Restart your computer for the changes to take effect.
- Disabling the Delivery Optimization Service will prevent its activities from running on your computer.
 On the Delivery Optimization Properties page, click
 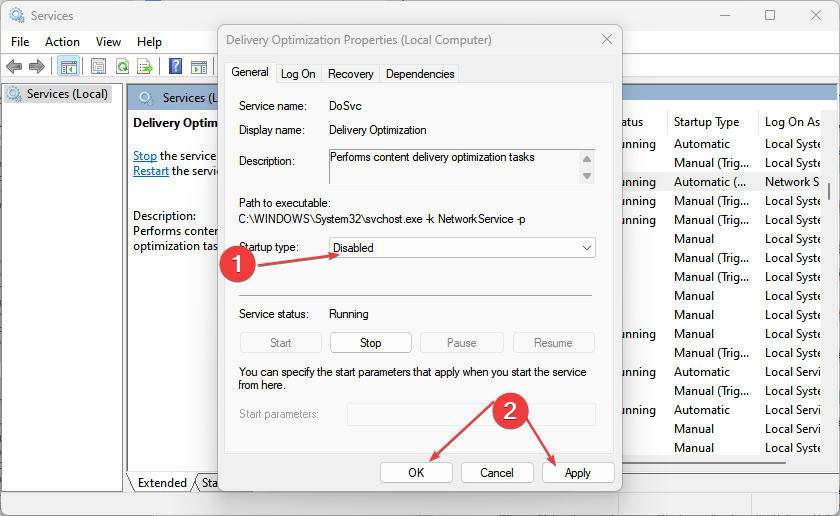 Restart your computer for the changes to take effect.
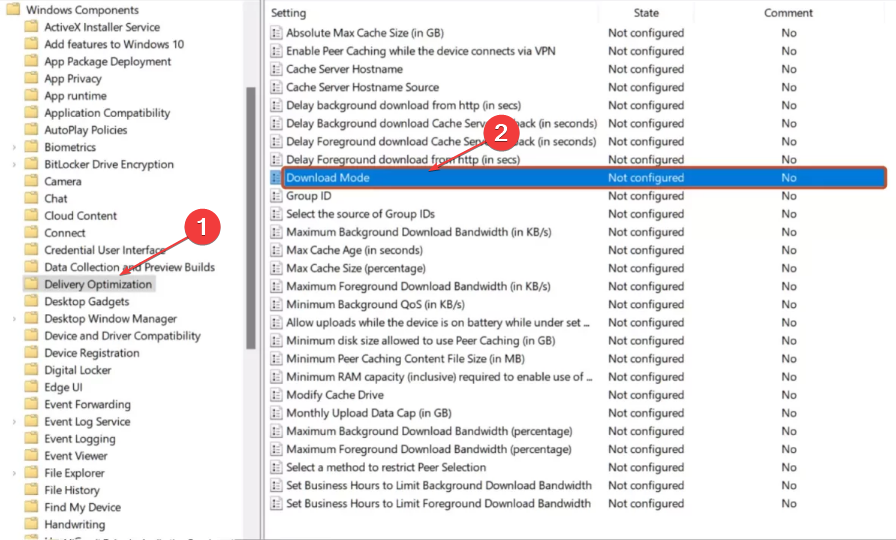
 4. Through Group Policy
- Press the key to open the "Run" dialog box, type gpedit.msc, and then press to open Group Policy. WindowsREnter
- Navigate to the following path:
<strong>Computer Configuration\Administrative Templates\Windows Components\ Delivery Optimization</strong> - Double-click the Download Mode option in the right pane.
- Check the radio button Enable the option, then select the Simple (99) option from the drop-down menu and click the Apply button.
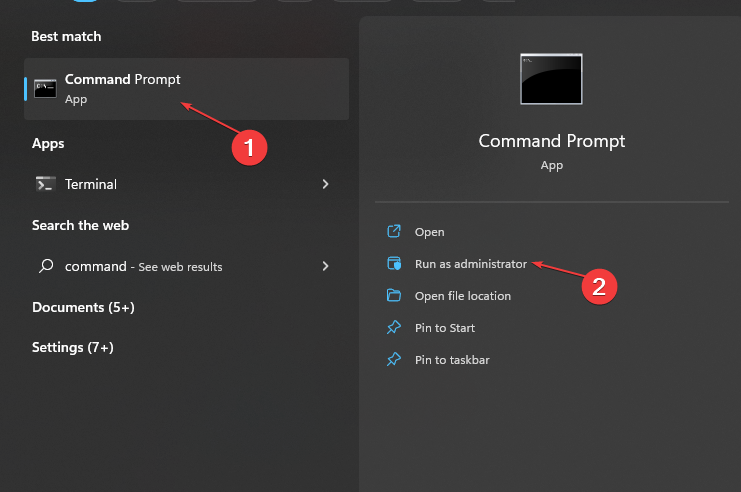
- Turn off Windows Group Policy.
- Left-click the "Start" button, type "Command Prompt", and then select "Run as administrator".
- Select "Yes" on the "User Account Control" interface.
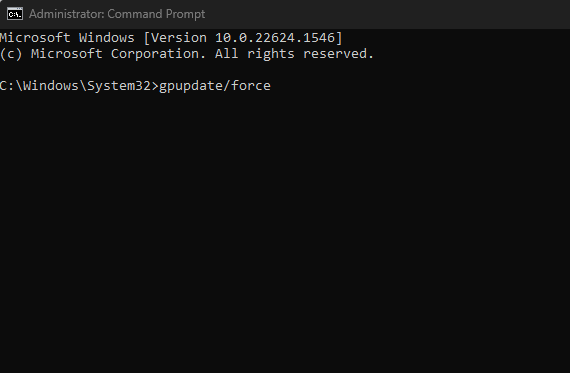
- Type the following and press: Enter
<strong>gpupdate/force</strong>
- Restart your computer for it to take effect .
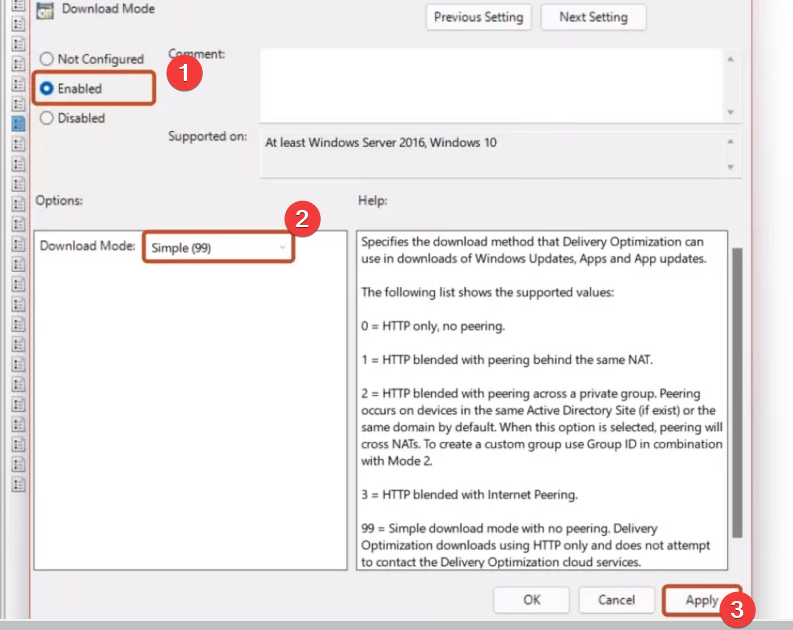
Enabling simple 99 download mode will remove peer support and allow only HTTP download delivery optimization to be used.
Check out our guide to learn how to fix Group Policy errors in Windows operating systems.
5. Close
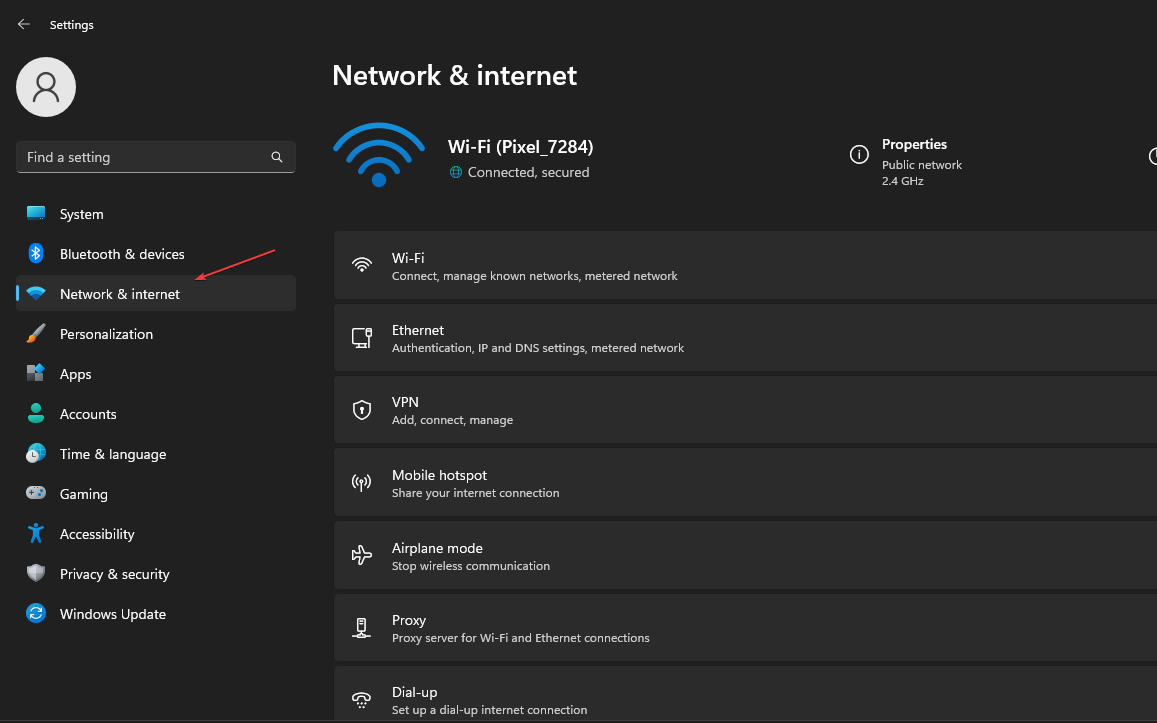
- by enabling metered connections. Press the key to open the "Settings" application. WindowsI
- Select the Network & Internet option from the left sidebar. In the right pane, click the network that you want to set up as a metered connection.
- Go to "Authentication Settings" and turn on the "Metered Connections" switch.
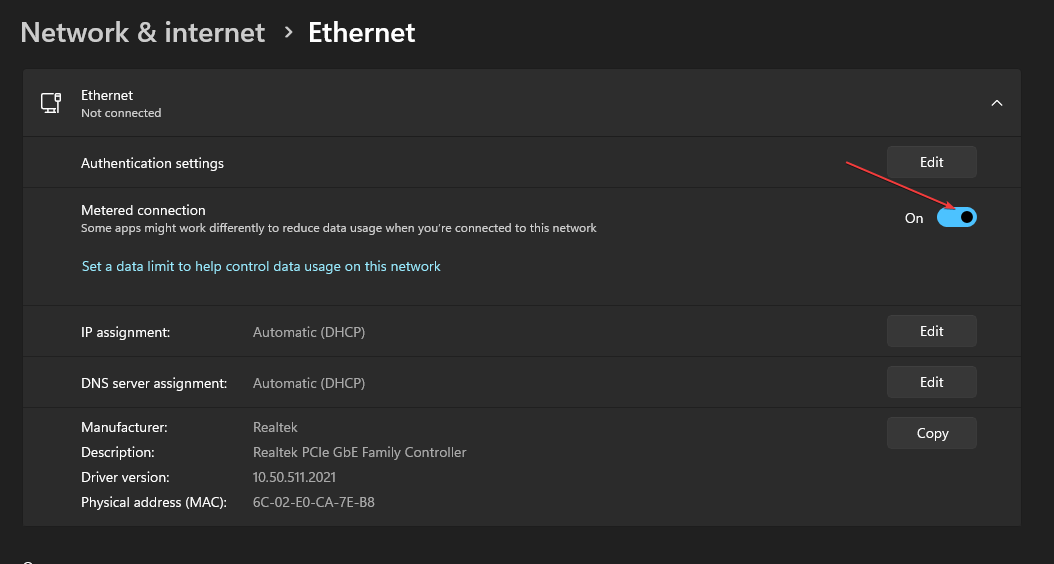
Windows does not use the Delivery Optimization Service to upload or download updates when a metered connection is open.
The above is the detailed content of 5 Ways to Disable Delivery Optimization Service in Windows. For more information, please follow other related articles on the PHP Chinese website!

Hot AI Tools

Undress AI Tool
Undress images for free

Undresser.AI Undress
AI-powered app for creating realistic nude photos

AI Clothes Remover
Online AI tool for removing clothes from photos.

Clothoff.io
AI clothes remover

Video Face Swap
Swap faces in any video effortlessly with our completely free AI face swap tool!

Hot Article
Hot Tools

Notepad++7.3.1
Easy-to-use and free code editor

SublimeText3 Chinese version
Chinese version, very easy to use

Zend Studio 13.0.1
Powerful PHP integrated development environment

Dreamweaver CS6
Visual web development tools

SublimeText3 Mac version
God-level code editing software (SublimeText3)
Hot Topics


 How to Fix Error Code 1132 in Zoom on Windows PC
May 30, 2023 am 11:08 AM
How to Fix Error Code 1132 in Zoom on Windows PC
May 30, 2023 am 11:08 AM
Zoom's video conferencing capabilities have made it popular among users while working from home. Many Zoom desktop client users have reported seeing error code 1132 along with an “Unknown error has occurred” message on their Windows PCs. Usually, this error code pops up when users try to log into their account and join any meeting in Zoom. In the error window, the user has the option to open a browser and join the meeting. However, some users reported that they were unable to open the meeting even on the browser. Windows firewall settings, outdated Zoom installation, or Zoom blacklisting your account could be some of the possible reasons for this error. Are you encountering an error code while using the Zoom app
 How to disable display scaling for high DPI settings in Windows 11 or 10
May 22, 2023 pm 10:11 PM
How to disable display scaling for high DPI settings in Windows 11 or 10
May 22, 2023 pm 10:11 PM
The default display scaling feature on Windows 10 or later is a core component of the Windows operating system. But sometimes, this feature of certain apps can cause compatibility issues, unreadable text, blurry logos, and ultimately, app crashes. This can be a huge headache if you're dealing with 2160p or higher resolutions. There are many ways to disable the default display scaling feature on high DPI settings. We've selected the best ones and detailed step-by-step instructions for each process. How to Disable Display Scaling on High DPI Settings There is a way, all you have to do is disable high DPI scaling for a single application, and there is a way to do it for the entire Window
 0x80070246 Windows Update Error: 6 Fixes
May 20, 2023 pm 06:28 PM
0x80070246 Windows Update Error: 6 Fixes
May 20, 2023 pm 06:28 PM
According to several Windows 10 and Windows 11 users, they encountered error 0x80070246 while trying to install Windows updates. This error prevents them from upgrading their PC and enjoying the latest features. Thankfully, in this guide, we have listed some of the best solutions to help you fix Windows update installation error 80070246x11 on Windows0PC. We'll also discuss what might be causing the problem in the first place. Let's jump right into it. Why am I getting Windows Update installation error 0x80070246? There may be multiple reasons why you are receiving Windows 11 installation error 0x80070246 on your PC.
 Fix: Windows Driver Foundation missing error
Jun 02, 2023 pm 09:15 PM
Fix: Windows Driver Foundation missing error
Jun 02, 2023 pm 09:15 PM
It's really frustrating when your Windows PC lags or runs slowly while playing games or performing resource-intensive tasks. Your PC may have all the processing power to handle these tasks, but if certain drivers fail to load, then your PC will experience multiple issues. One such error is WindowsDriverFoundation missing issue. When this error pops up, you should know that some important system-related drivers fail to load on your Windows PC. Since drivers are one of the most important components that allow the hardware to communicate with your PC, any issues with the drivers can cause the hardware process to malfunction. Several users reported that Window
 Tiny10 makes Windows 10 durable on (very old) PCs
May 22, 2023 pm 04:02 PM
Tiny10 makes Windows 10 durable on (very old) PCs
May 22, 2023 pm 04:02 PM
Tiny10 is one developer's attempt to make Microsoft's Windows 10 operating system usable on both older PC systems and modern systems. When Microsoft released Windows 10 in 2015, it ensured that the operating system had the same system requirements as previous versions of Windows. That changes with the release of Windows 11 in 2021. Still, Windows 10 felt noticeably heavier than previous Windows versions, and users began looking for ways to improve the usability of the operating system. Faster hard drive, more memory, faster and more powerful CP
![Event ID 157: Disk has been removed unexpectedly [Fixed]](https://img.php.cn/upload/article/000/887/227/168576249277516.jpg?x-oss-process=image/resize,m_fill,h_207,w_330) Event ID 157: Disk has been removed unexpectedly [Fixed]
Jun 03, 2023 am 11:21 AM
Event ID 157: Disk has been removed unexpectedly [Fixed]
Jun 03, 2023 am 11:21 AM
Disk has been accidentally deleted is an error in the system event log on Windows devices. This is an unusual issue on the virtual disk that all XBOX Live PC and Microsoft PC installations rely on. Typically, this problem occurs when something disrupts the system's communication with the disk. Event ID157 in Event Viewer The disk has been accidentally deleted, preventing the user from installing the game using the specified virtual drive. This virtual drive will not be visible in File Explorer like other drives. You may also encounter VMWare issues where the disk has been accidentally deleted. The solution below will fix the problem, but you must make changes directly in VMWare's emulated operating system. Depend on
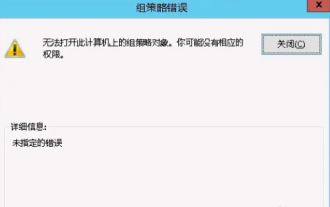 Unable to open the Group Policy object on this computer
Feb 07, 2024 pm 02:00 PM
Unable to open the Group Policy object on this computer
Feb 07, 2024 pm 02:00 PM
Occasionally, the operating system may malfunction when using a computer. The problem I encountered today was that when accessing gpedit.msc, the system prompted that the Group Policy object could not be opened because the correct permissions may be lacking. The Group Policy object on this computer could not be opened. Solution: 1. When accessing gpedit.msc, the system prompts that the Group Policy object on this computer cannot be opened because of lack of permissions. Details: The system cannot locate the path specified. 2. After the user clicks the close button, the following error window pops up. 3. Check the log records immediately and combine the recorded information to find that the problem lies in the C:\Windows\System32\GroupPolicy\Machine\registry.pol file
 How to reset your Xbox Series S or X controller
Jun 03, 2023 pm 08:19 PM
How to reset your Xbox Series S or X controller
Jun 03, 2023 pm 08:19 PM
The Xbox gaming console is a favorite among gamers. With the new SeriesX and SeriesS, gaming is almost a lifelike experience. The Xbox controller is your primary tool for experiencing gaming effects. Sometimes the controller connection gets cut off or some errors are encountered while trying to connect the controller to the main console. This may be due to various issues related to pairing. This can be overcome with a few simple steps. Reset your Xbox Series S or Xbox Series X controller Step 1: Press and hold the Xbox button on your controller for a few seconds to turn off the controller. Step 2: On the screen, go to Turn off controller and press button A to select that option. NOTE: If you keep pressing X