
 Operation and Maintenance
Linux Operation and Maintenance
Teach you step by step the detailed steps of setting up a web server on CentOS
Operation and Maintenance
Linux Operation and Maintenance
Teach you step by step the detailed steps of setting up a web server on CentOS
Teach you step by step the detailed steps of setting up a web server on CentOS
Aug 07, 2023 pm 03:25 PM
Teach you the detailed steps of setting up a Web server on CentOS step by step
- Introduction
Web server is a software that supports HTTP protocol and is used to provide web pages and Web services. You can use common software such as Apache and Nginx to build a web server on CentOS. This article will use Apache as an example to introduce the detailed steps of building a web server on CentOS. - Install Apache
First, open the terminal and enter the following command to install Apache:
sudo yum install httpd
After the installation is complete, start the Apache service:
sudo systemctl start httpd
In order to ensure that the Apache service starts automatically when the system starts, enter the following command:
sudo systemctl enable httpd
- Configure the firewall
In order to allow Apache to access normally, you need to configure firewall rules. Enter the following command to start the HTTP service:
sudo firewall-cmd --permanent --zone=public --add-service=http
Then reload the firewall configuration:
sudo firewall-cmd --reload
- Test Apache
Enter the server's address in the browser address bar IP address, if you see Apache's welcome page, the installation is successful. You can view the IP address of the server through the following command:
hostname -I
- Configure the website directory
By default, Apache’s website directory is /var/www/html . Can be modified as needed.
First, back up the default website directory and enter the following command:
sudo mv /var/www/html /var/www/html_backup
Then create a new website directory and enter the following command:
sudo mkdir /var/www/mywebsite
Set directory permissions and enter the following Command:
sudo chown -R apache:apache /var/www/mywebsite
Next, open the Apache configuration file and enter the following command:
sudo nano /etc/httpd/conf/httpd.conf
Find the following line:
DocumentRoot "/var/www/html"
Change it to the path of the new website directory :
DocumentRoot "/var/www/mywebsite"
Save the file and exit.
- Create a test page
In the new website directory /var/www/mywebsite, create a page named index.html file, enter the following:
<!DOCTYPE html> <html> <head> <title>My Website</title> </head> <body> <h1>Welcome to My Website!</h1> </body> </html>
Save the file and exit.
- Restart Apache
Enter the following command to restart the Apache service:
sudo systemctl restart httpd
- Test website
is browsing Enter the server's IP address into the server and you should see the welcome message displayed on the test page.
At this point, the steps to build a web server on CentOS have been completed.
Summary:
This article takes Apache as an example and details the steps to build a web server on CentOS, including installing Apache, configuring the firewall, testing Apache, configuring the website directory, creating a test page and restarting Apache. By following the above steps, you can successfully set up a web server on CentOS and start publishing your own website.
The above is the detailed content of Teach you step by step the detailed steps of setting up a web server on CentOS. For more information, please follow other related articles on the PHP Chinese website!

Hot AI Tools

Undress AI Tool
Undress images for free

Undresser.AI Undress
AI-powered app for creating realistic nude photos

AI Clothes Remover
Online AI tool for removing clothes from photos.

Clothoff.io
AI clothes remover

Video Face Swap
Swap faces in any video effortlessly with our completely free AI face swap tool!

Hot Article
Hot Tools

Notepad++7.3.1
Easy-to-use and free code editor

SublimeText3 Chinese version
Chinese version, very easy to use

Zend Studio 13.0.1
Powerful PHP integrated development environment

Dreamweaver CS6
Visual web development tools

SublimeText3 Mac version
God-level code editing software (SublimeText3)
Hot Topics


 Difference between centos and ubuntu
Apr 14, 2025 pm 09:09 PM
Difference between centos and ubuntu
Apr 14, 2025 pm 09:09 PM
The key differences between CentOS and Ubuntu are: origin (CentOS originates from Red Hat, for enterprises; Ubuntu originates from Debian, for individuals), package management (CentOS uses yum, focusing on stability; Ubuntu uses apt, for high update frequency), support cycle (CentOS provides 10 years of support, Ubuntu provides 5 years of LTS support), community support (CentOS focuses on stability, Ubuntu provides a wide range of tutorials and documents), uses (CentOS is biased towards servers, Ubuntu is suitable for servers and desktops), other differences include installation simplicity (CentOS is thin)
 Centos shutdown command line
Apr 14, 2025 pm 09:12 PM
Centos shutdown command line
Apr 14, 2025 pm 09:12 PM
The CentOS shutdown command is shutdown, and the syntax is shutdown [Options] Time [Information]. Options include: -h Stop the system immediately; -P Turn off the power after shutdown; -r restart; -t Waiting time. Times can be specified as immediate (now), minutes ( minutes), or a specific time (hh:mm). Added information can be displayed in system messages.
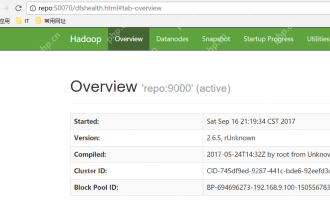 Hadoop pseudo-distributed cluster construction
May 07, 2025 pm 04:45 PM
Hadoop pseudo-distributed cluster construction
May 07, 2025 pm 04:45 PM
Software preparation I am using a virtual machine with CentOS-6.6, with the host name repo. Refer to the steps to install a Linux virtual machine in Windows, I installed JDK in that virtual machine, refer to the guide to installing JDK in Linux. In addition, the virtual machine is configured with a key-free login itself, and the settings for configuring key-free login between each virtual machine are referenced. The download address of Hadoop installation package is: https://mirrors.aliyun.com/apache/hadoop/common/. I am using hadoop 2.6.5 version. Upload the Hadoop installation package to the server and unzip [root@repo~]#tarzxv
 Centos configuration IP address
Apr 14, 2025 pm 09:06 PM
Centos configuration IP address
Apr 14, 2025 pm 09:06 PM
Steps to configure IP address in CentOS: View the current network configuration: ip addr Edit the network configuration file: sudo vi /etc/sysconfig/network-scripts/ifcfg-eth0 Change IP address: Edit IPADDR= Line changes the subnet mask and gateway (optional): Edit NETMASK= and GATEWAY= Lines Restart the network service: sudo systemctl restart network verification IP address: ip addr
 Centos stops maintenance 2024
Apr 14, 2025 pm 08:39 PM
Centos stops maintenance 2024
Apr 14, 2025 pm 08:39 PM
CentOS will be shut down in 2024 because its upstream distribution, RHEL 8, has been shut down. This shutdown will affect the CentOS 8 system, preventing it from continuing to receive updates. Users should plan for migration, and recommended options include CentOS Stream, AlmaLinux, and Rocky Linux to keep the system safe and stable.
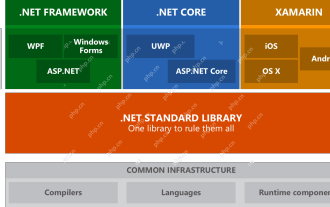 .NET Core Quick Start Tutorial 1. The beginning: Talking about .NET Core
May 07, 2025 pm 04:54 PM
.NET Core Quick Start Tutorial 1. The beginning: Talking about .NET Core
May 07, 2025 pm 04:54 PM
1. The Origin of .NETCore When talking about .NETCore, we must not mention its predecessor .NET. Java was in the limelight at that time, and Microsoft also favored Java. The Java virtual machine on the Windows platform was developed by Microsoft based on JVM standards. It is said to be the best performance Java virtual machine at that time. However, Microsoft has its own little abacus, trying to bundle Java with the Windows platform and add some Windows-specific features. Sun's dissatisfaction with this led to a breakdown of the relationship between the two parties, and Microsoft then launched .NET. .NET has borrowed many features of Java since its inception and gradually surpassed Java in language features and form development. Java in version 1.6
 IIS: An Introduction to the Microsoft Web Server
May 07, 2025 am 12:03 AM
IIS: An Introduction to the Microsoft Web Server
May 07, 2025 am 12:03 AM
IIS is a web server software developed by Microsoft to host websites and applications. 1. Installing IIS can be done through the "Add Roles and Features" wizard in Windows. 2. Creating a website can be achieved through PowerShell scripts. 3. Configure URL rewrites can be implemented through web.config file to improve security and SEO. 4. Debugging can be done by checking IIS logs, permission settings and performance monitoring. 5. Optimizing IIS performance can be achieved by enabling compression, configuring caching and load balancing.
 Postman Integrated Application on CentOS
May 19, 2025 pm 08:00 PM
Postman Integrated Application on CentOS
May 19, 2025 pm 08:00 PM
Integrating Postman applications on CentOS can be achieved through a variety of methods. The following are the detailed steps and suggestions: Install Postman by downloading the installation package to download Postman's Linux version installation package: Visit Postman's official website and select the version suitable for Linux to download. Unzip the installation package: Use the following command to unzip the installation package to the specified directory, for example /opt: sudotar-xzfpostman-linux-x64-xx.xx.xx.tar.gz-C/opt Please note that "postman-linux-x64-xx.xx.xx.tar.gz" is replaced by the file name you actually downloaded. Create symbols
