 Software Tutorial
 Mobile Application
 How to solve the problem that DHCP is not enabled in the local connection. Recommended solutions to the problem that the computer cannot access the Internet and prompts that the DHCP service is not enabled.
How to solve the problem that DHCP is not enabled in the local connection. Recommended solutions to the problem that the computer cannot access the Internet and prompts that the DHCP service is not enabled.
Mar 13, 2024 pm 12:07 PMThe prompt "DHCP is not enabled for local connection" appears in the network connection, which may cause the problem of being unable to access the Internet. PHP editor Strawberry will introduce you to the solution: First, open the "Control Panel" and enter the "Network and Sharing Center", click "Change Adapter Settings", find the local connection and right-click "Properties", select "Internet Protocol Version 4 ( TCP/IPv4)" properties, select "Obtain IP address automatically" and "Obtain DNS server address automatically" in the properties window, and save the settings. If the problem is still not resolved, try restarting the router or contact your network service provider for help.
When many users use computers to connect to Ethernet, the prompt "DHCP is not enabled" will appear. They don't know what to do. This is because the DHCP function is not turned on on the router. This article teaches you how to solve this problem. question.


1. Check login information
To solve the problem of "DHCP is not enabled on the Ethernet", you need to log in first router. When logging in to a router, you usually need to obtain the router's gateway, username, and password information. This information is usually marked on the back of the router.


The IP of the router is the so-called gateway address. The default gateway address of some routers is 192.168.1.1 or 192.168.0.1, and login The account generally defaults to admin, and the password is admin or 123456.
2. Log in to the router management interface
After obtaining the router’s login information, open any browser on your computer and enter the router’s gateway address in the browser. As shown below:
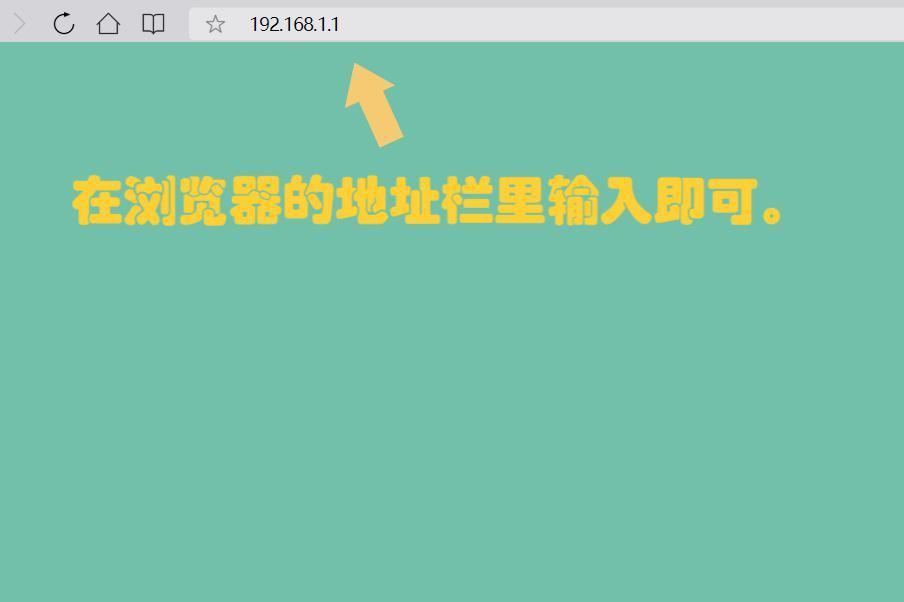

After completing the input, press Enter. The interface will automatically switch to the login interface of the router. Enter the account number and password. If you have logged into the router before, you do not need to enter your account again. As shown below:

 3. Turn on DHCP
After logging in to the router management system, find DHCP in the pop-up interface server. As shown below:
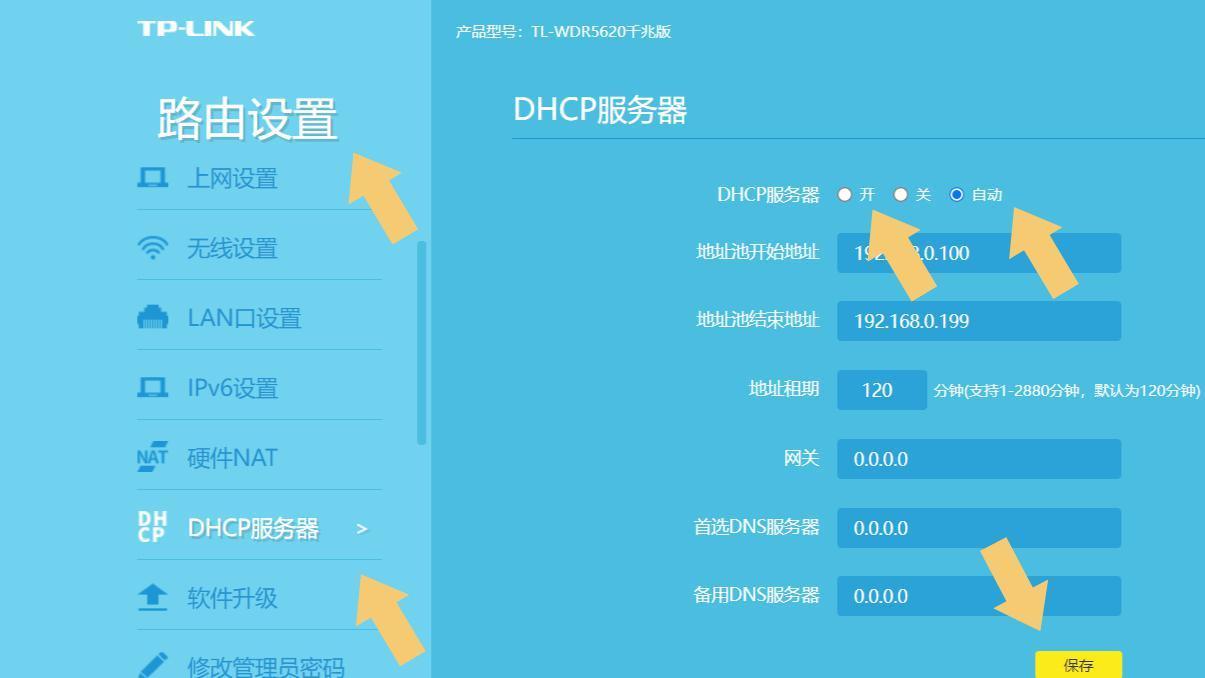
 Then set it to On or Automatic, and then click Save. It should be noted that based on different brands and models of routers, the internal setting names are also somewhat different. As long as it is marked with the word DHCP, it is the DHCP function. After turning it on and then connecting to the network, there will be no "DHCP is not enabled on Ethernet". situation.
Digression: If the prompt "DHCP is not enabled for Ethernet" appears when the computer is connected to the Internet, it proves that a user has touched their own router. All home routers have the DHCP function turned on by default. If the setting still persists after the settings are completed, If it doesn't work, the router may be damaged.
Note: The computer model used in the demonstration in this article is ASUS TUF Dash FX516PM, the computer system version is Wdindows 10 Professional Edition, the QQ browser version is 11.3.0, and the router model is TL-WDR5620 Gigabit Edition.
The above is the detailed content of How to solve the problem that DHCP is not enabled in the local connection. Recommended solutions to the problem that the computer cannot access the Internet and prompts that the DHCP service is not enabled.. For more information, please follow other related articles on the PHP Chinese website!

Hot AI Tools

Undress AI Tool
Undress images for free

Undresser.AI Undress
AI-powered app for creating realistic nude photos

AI Clothes Remover
Online AI tool for removing clothes from photos.

Clothoff.io
AI clothes remover

Video Face Swap
Swap faces in any video effortlessly with our completely free AI face swap tool!

Hot Article

Hot Tools

Notepad++7.3.1
Easy-to-use and free code editor

SublimeText3 Chinese version
Chinese version, very easy to use

Zend Studio 13.0.1
Powerful PHP integrated development environment

Dreamweaver CS6
Visual web development tools

SublimeText3 Mac version
God-level code editing software (SublimeText3)

Hot Topics
 Do laptop graphics card drivers need to be up to date?
May 10, 2024 am 12:54 AM
Yes, laptop graphics card driver updates are necessary because it improves performance, resolves glitches, and supports new technologies. Update methods include: 1. Manually visit the official website of the graphics card to download and install the driver; 2. Use driver update software to automatically scan and install the latest driver. When updating, pay attention to driver compatibility and create system restore points. You need to restart the computer after updating.
 Solutions to the errors reported by MySQL on a specific system version
Apr 08, 2025 am 11:54 AM
The solution to MySQL installation error is: 1. Carefully check the system environment to ensure that the MySQL dependency library requirements are met. Different operating systems and version requirements are different; 2. Carefully read the error message and take corresponding measures according to prompts (such as missing library files or insufficient permissions), such as installing dependencies or using sudo commands; 3. If necessary, try to install the source code and carefully check the compilation log, but this requires a certain amount of Linux knowledge and experience. The key to ultimately solving the problem is to carefully check the system environment and error information, and refer to the official documents.
 What systems does oracle database support?
May 10, 2024 am 02:06 AM
Operating systems supported by Oracle Database include Unix systems (such as Linux, Solaris), Windows systems (such as Windows Server, Windows 11), z/OS, and macOS, with specific requirements varying by database version and operating system. Supported platforms include x86, x86-64, ARM, SPARC, and POWER, depending on database version and compatibility. Factors such as hardware compatibility, performance, security, usability, and budget constraints should be considered when selecting an operating system.
 oracle database cpu requirements
May 10, 2024 am 02:12 AM
Oracle Database CPU requirements include: support for x86 and SPARC processor types; CPU with 8 or more physical cores recommended; CPU with clock speed of 2.5 GHz or higher recommended; CPU with 32 MB or more recommended L3 cache CPU; need to support the following instruction sets: x86: SSE4.2, AVX, AVX2; SPARC: UltraSPARC III, UltraSPARC T5. In addition, factors such as hyper-threading (not supported), virtualization (caution required), operating system requirements, etc. should also be considered.
 What to do if nginx restart fails
Apr 14, 2025 am 11:27 AM
Reasons and solutions for the failure of nginx restart: Configuration file error: Check nginx configuration file to ensure that the syntax is correct and the instructions are valid. Open port conflict: Check whether the port is occupied, close the occupied process or change the nginx port configuration. Process is running: manually terminate or stop nginx process using service command. Missing dependencies: Install or update required nginx dependencies such as openssl, zlib, pcre. File permissions issue: Grant nginx users to read and write permissions to files and directories. Memory leak or high load: monitor memory and CPU usage of nginx processes, upgrade nginx version or reconfigure worker processes. External factors: Check for prevention
 How to check Debian OpenSSL configuration
Apr 12, 2025 pm 11:57 PM
This article introduces several methods to check the OpenSSL configuration of the Debian system to help you quickly grasp the security status of the system. 1. Confirm the OpenSSL version First, verify whether OpenSSL has been installed and version information. Enter the following command in the terminal: If opensslversion is not installed, the system will prompt an error. 2. View the configuration file. The main configuration file of OpenSSL is usually located in /etc/ssl/openssl.cnf. You can use a text editor (such as nano) to view: sudonano/etc/ssl/openssl.cnf This file contains important configuration information such as key, certificate path, and encryption algorithm. 3. Utilize OPE
 Huobi Digital Currency Trading App Download Official Website. Correct Address. Domestic
Apr 30, 2025 pm 07:21 PM
Huobi Digital Currency Trading App is one of the world's leading digital asset trading platforms and is favored by the majority of users. In order to facilitate users to quickly and safely download and install Huobi app, this article will provide you with detailed download and installation tutorials. Please note that this article provides a download link to Huobi official app. Use the download link to this article to download safely to avoid mistakenly entering a copycat website or downloading to unofficial versions. Next, let us download and install Huobi app step by step.
 How to update phpstorm in centos
Apr 14, 2025 pm 03:33 PM
Updating PhpStorm on CentOS system, follow these steps: Prepare to back up existing configurations: Before updating, be sure to back up PhpStorm's configuration files and plug-ins to prevent data loss due to failure. Download the latest version: Download the latest version of PhpStorm for Linux system from the official website of JetBrains. Update step Unzip the installation package: Unzip the downloaded installation package to the specified directory (for example, /opt/). Command example: tar-zxvfPhpStorm-2024.1.tar.gz-C/opt/(Please replace PhpStorm-2024.1.tar.gz


