


By default, iPhone takes photos from the camera in HEIC format. HEIC stands for High Efficiency Image Container and can hold more pixel data than a PNG or JPG file, taking up significantly less space on iPhone storage compared to other formats. These files work best on iPhones, but are not widely accepted on the internet because they often result in blurry/grainy pictures when you share them with non-Apple devices.
To ensure that HEIC images are compatible on other devices, you may need to convert them to JPG format. This article will introduce how to convert HEIC images to JPG on Mac.
How to Convert HEIC Photos to JPG on Mac [3 Methods]
Method 1: Using Preview on Mac
The easiest way to convert HEIC files to JPG is to use your Mac’s native Machine Image Viewer – Preview application.
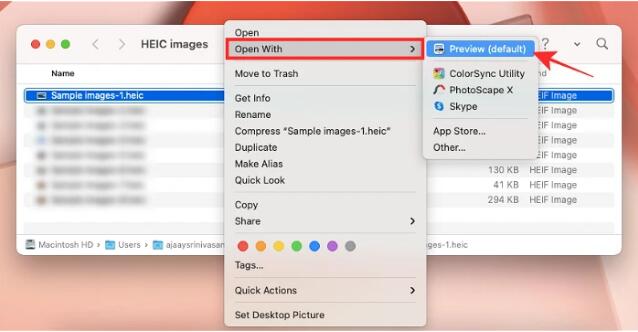
1. Open the Finder application and find the HEIC file you want to convert.
2. Once found, right-click or Control-click the file and go to Open With > Preview.
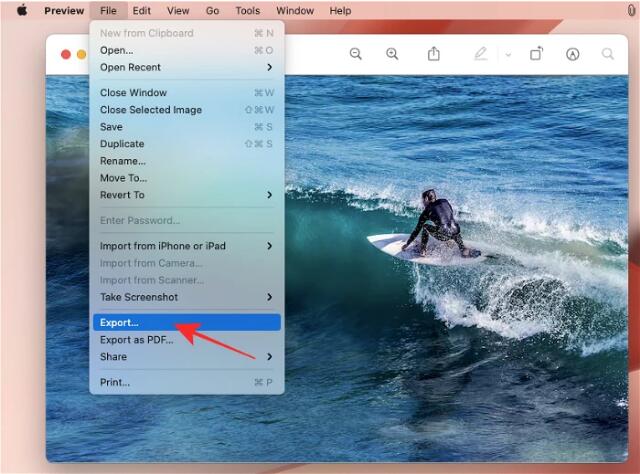
3. The selected file will now be loaded into the preview application. To convert a file, go to File > Export on the menu bar.
4. A new pop-up window will appear on the screen. Here, select JPEG as the file format instead of "HEIC".
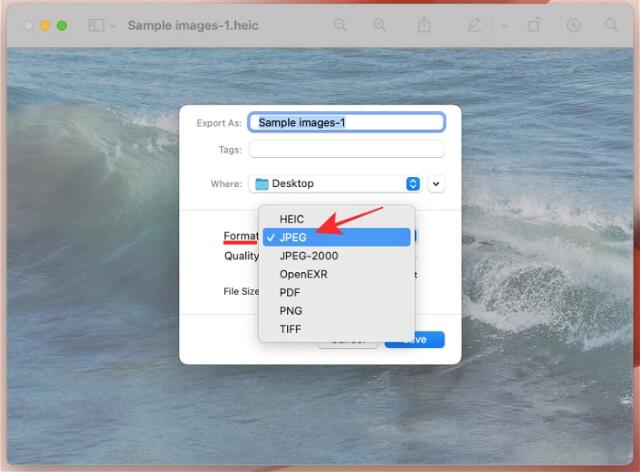
Additionally, you can change the name, save location and image quality of the converted file in the same window.
5. After confirming all changes, you can click "Save" to save the file in JPEG format.
The newly created JPEG file will now be saved in the location of your choice. This method can also be used to convert images to other formats such as PNG, TIFF, and PDF.
Method 2: Using Automator on Mac
The method we explained above works for converting a single image to a JPEG file, but what if you want to convert a large number of images at once? Enter the automaton. It is a native macOS program that allows you to automate built-in actions and change multiple files your way. You can use the program's "Change Image Type" feature to convert multiple images to different formats at the same time.
The selected HEIC image will now be converted to a JPG file and saved to the desktop on your Mac.
Method 3: Using Photos on Mac
One app that comes pre-installed on iPhone and Mac is the Photos app, which not only allows you to interact with HEIC files, but also allows you to convert them as JPG or other image format.
The newly created JPG file will now appear within the selected location.
This is how to convert HEIC photos to JPG files on Mac.
The above is the detailed content of 3 Ways to Convert HEIC Photos to JPG on Mac. For more information, please follow other related articles on the PHP Chinese website!

Hot AI Tools

Undress AI Tool
Undress images for free

Undresser.AI Undress
AI-powered app for creating realistic nude photos

AI Clothes Remover
Online AI tool for removing clothes from photos.

Clothoff.io
AI clothes remover

Video Face Swap
Swap faces in any video effortlessly with our completely free AI face swap tool!

Hot Article
Hot Tools

Notepad++7.3.1
Easy-to-use and free code editor

SublimeText3 Chinese version
Chinese version, very easy to use

Zend Studio 13.0.1
Powerful PHP integrated development environment

Dreamweaver CS6
Visual web development tools

SublimeText3 Mac version
God-level code editing software (SublimeText3)
Hot Topics


 What to do if the Apple phone cannot be turned on? Solution to the Apple phone cannot be turned on
May 29, 2025 pm 08:24 PM
What to do if the Apple phone cannot be turned on? Solution to the Apple phone cannot be turned on
May 29, 2025 pm 08:24 PM
If the iPhone cannot be turned on, you can solve the following methods: 1. Forced restart: For iPhone 8 and later models, quickly press and release the volume up key, then quickly press and release the volume down key, and finally press and hold the side button until you see the Apple logo. 2. Check the battery level: Connect the phone to the charger for at least 15 minutes, and then try to turn it on. 3. Contact Apple customer service or go to Apple's authorized service center for repairs. 4. Use recovery mode: Connect your computer, use iTunes or Finder, press and hold the side button until the logo connected to iTunes appears, and select "Recover". 5. Check for physical damage: Check for cracks, depressions or other damage to the phone. If so, it is recommended to go to the maintenance center for treatment as soon as possible.
 Binance Exchange app official download Binance latest download tutorial
May 23, 2025 pm 05:36 PM
Binance Exchange app official download Binance latest download tutorial
May 23, 2025 pm 05:36 PM
The official Binance app can be downloaded from Android and iOS devices. Android users need to visit Binance official website to download the apk file and install it; iOS users can search and download it in the App Store. After downloading, users can log in to the app through their email or mobile phone number.
 Solution to the application cannot be installed after iOS system update
May 29, 2025 pm 08:42 PM
Solution to the application cannot be installed after iOS system update
May 29, 2025 pm 08:42 PM
To solve the problem that the app cannot be installed after the iOS system is updated, you can use the following steps: 1. Clean the system cache: Go to "Settings" > "General" > "IPhone Storage", uninstall infrequently used apps and restart the device. 2. Solve through downgrade: Download the previous version of iOS firmware and use iTunes or Finder to downgrade. 3. Contact Apple customer service: provide serial number, seek professional help and backup data.
 Apple phone cannot connect to WiFi. Solve iPhone network connection failed steps
May 29, 2025 pm 09:06 PM
Apple phone cannot connect to WiFi. Solve iPhone network connection failed steps
May 29, 2025 pm 09:06 PM
If your iPhone cannot connect to WiFi, you can solve it by restarting the device, resetting network settings, or updating the iOS system. 1. Restart the phone: Press and hold the power button, slide to shut down, and restart later. 2. Reset network settings: Go to "Settings" > "General" > "Reset", and select "Reset Network Settings". 3. Update iOS system: Go to "Settings" > "General" > "Software Update", download and install the update.
 How to retrieve Apple phones if they lose them? Introduction to how to retrieve Apple phones if they lose them
May 29, 2025 pm 09:00 PM
How to retrieve Apple phones if they lose them? Introduction to how to retrieve Apple phones if they lose them
May 29, 2025 pm 09:00 PM
If your iPhone is lost, you can retrieve it through the "Find My iPhone" feature. The specific operations are: 1. Visit the "Find My iPhone" website or use the "Find" app, enter the Apple ID and password to view the location of the phone; 2. If the phone is nearby, select play sound; 3. If it is not nearby, select "Lost Mode" to lock the phone and display contact information; 4. If it cannot be found, select "Erase Device" to clear the data, but the phone can no longer be located. If this function is not enabled, contact Apple customer service, report the IMEI number to the operator, and change the relevant password to protect the information security.
 The latest tutorial on downloading Ouyi okx exchange app Ouyi okx exchange app new guide
Apr 28, 2025 pm 06:27 PM
The latest tutorial on downloading Ouyi okx exchange app Ouyi okx exchange app new guide
Apr 28, 2025 pm 06:27 PM
To download the Ouyi OKX Exchange APP, you must ensure that the device supports iOS or Android and is connected to the network. iOS users search and download through the App Store, and Android users download through the Google Play Store. You need to set the language and register or log in for the first time to start. It is recommended to enable two-factor authentication, set a transaction password and bind your email and mobile phone number to ensure the security of your account.
 How to install Okx Ouyi
May 08, 2025 pm 06:06 PM
How to install Okx Ouyi
May 08, 2025 pm 06:06 PM
Install OKX: iOS users search and download through the App Store, Android users install through the Google Play Store, PC users can download the desktop app and register and log in.
 Ouyi Exchange app download official website Apple version
Apr 28, 2025 pm 06:48 PM
Ouyi Exchange app download official website Apple version
Apr 28, 2025 pm 06:48 PM
Download the Apple version of the Ouyi Exchange app, visit the official website, select the iOS download option, and obtain it for free through the App Store to ensure device and app updates, and enable 2FA to protect the security of your account.
