

Handle API authentication with Laravel Passport
Apr 03, 2024 pm 01:50 PM
php editor Xiaoxin will take you to explore using Laravel Passport to handle API authentication. Laravel Passport is a complete OAuth2 server implementation that can help developers easily implement API authentication and provides Many convenient features. Through this article, you will learn how to use Laravel Passport to manage API user authentication and ensure the security of the API interface.
Step 1. Install Laravel
We need to use the following command to create the latest Laravel application, so please open the terminal and execute:
laravel new auth
Step 2. Install Laravel Passport package
Laravel Passport can implement a complete OAuth2 server for your application in minutes.
composer require laravel/passport
Step 3. Run DatabaseMigration
Passport's migration will create the tables your application uses to store clients and Access Tokens.
PHP artisan migrate
Step 4. Generate a secret key
This command will create a secret key to generate a secure Access Token. In addition, it will also create personal access and passWord grant used to generate Access Token:
php artisan passport:install
After execution , add Laravel\Passport\HasApiTokens trait to your App\User model. This trait will add a series of helper functions to the model to verify the user's secret key and scope:
Step 5. Passport configuration
<?php

namespace App;

use Illuminate\Notifications\Notifiable;
use Illuminate\Foundation\Auth\User as Authenticatable;
use Laravel\Passport\HasApiTokens;

class User extends Authenticatable
{
    use Notifiable, HasApiTokens;
}
Next, you should AuthServiceProvider The Passport::routes method is called in the boot method in . This method will register the necessary routes to issue access tokens, revoke access tokens, client and personal tokens:
<?php
namespace App\Providers;
use Laravel\Passport\Passport;
use Illuminate\Support\Facades\Gate;
use Illuminate\Foundation\Support\Providers\AuthServiceProvider as ServiceProvider;
class AuthServiceProvider extends ServiceProvider
{
protected $policies = [
'App\Model' => 'App\Policies\ModelPolicy',
];
public function boot()
{
$this->reGISterPolicies();
Passport::routes();
}
}Finally, in the config/auth.php configuration file, You should set the api permission authentication guard's driver option to passport. When an API request that requires permission authentication comes in, your application will be told to use Passport's TokenGuard.
'guards' => [
    'WEB' => [
        'driver' => 'session',
        'provider' => 'users',
    ],
    'api' => [
        'driver' => 'passport',
        'provider' => 'users',
    ],
],
Step 6. Add API routing
Laravel provides the routes/api.php file for us to write web routes, so add a new route in this file That’s it.
<?php
use Illuminate\Http\Request;
Route::group([
'prefix' => 'auth'
], function () {
Route::post('login', 'AuthController@login');
Route::post('signup', 'AuthController@signup');
Route::group([
'middleware' => 'auth:api'
], function() {
Route::get('loGout', 'AuthController@logout');
Route::get('user', 'AuthController@user');
});
});Step 7: Create the controller
In the last step we must create a new controller and api method. So we first create AuthController and put the code in it:
<?php
namespace App\Http\Controllers;
use Illuminate\Http\Request;
use Illuminate\Support\Facades\Auth;
use Carbon\Carbon;
use App\User;
class AuthController extends Controller
{
public function signup(Request $request)
{
$request->validate([
'name' => 'required|string',
'email' => 'required|string|email|unique:users',
'password' => 'required|string|confirmed'
]);
$user = new User([
'name' => $request->name,
'email' => $request->email,
'password' => bcrypt($request->password)
]);
$user->save();
return response()->JSON([
'message' => 'Successfully created user!'
], 201);
}
public function login(Request $request)
{
$request->validate([
'email' => 'required|string|email',
'password' => 'required|string',
'remember_me' => 'boolean'
]);
$credentials = request(['email', 'password']);
if(!Auth::attempt($credentials))
return response()->json([
'message' => 'Unauthorized'
], 401);
$user = $request->user();
$tokenResult = $user->createToken('Personal Access Token');
$token = $tokenResult->token;
if ($request->remember_me)
$token->expires_at = Carbon::now()->addWeeks(1);
$token->save();
return response()->json([
'access_token' => $tokenResult->accessToken,
'token_type' => 'Bearer',
'expires_at' => Carbon::parse(
$tokenResult->token->expires_at
)->toDateTimeString()
]);
}
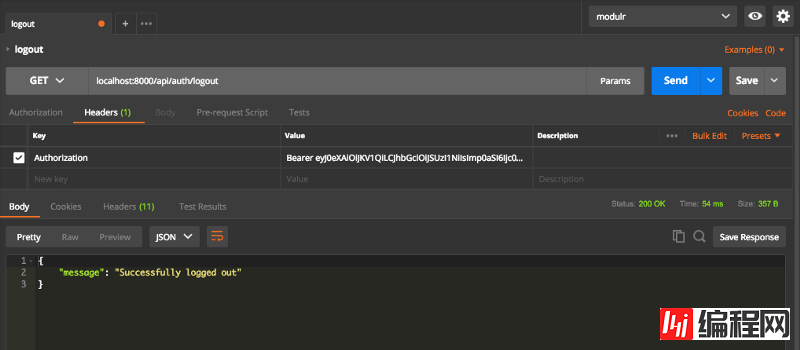
public function logout(Request $request)
{
$request->user()->token()->revoke();
return response()->json([
'message' => 'Successfully logged out'
]);
}
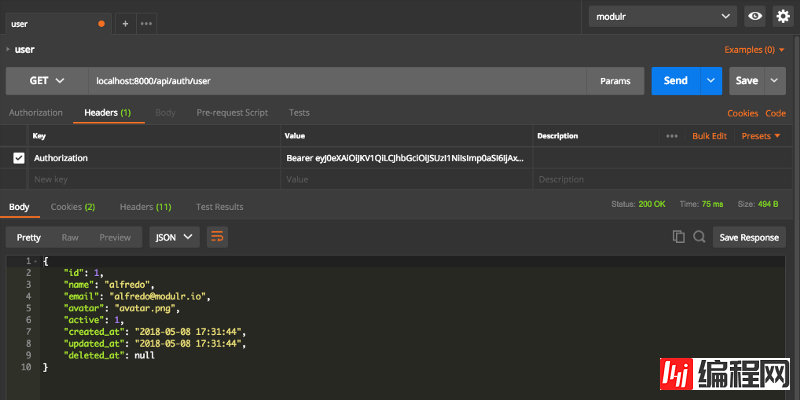
public function user(Request $request)
{
return response()->json($request->user());
}
}Now we are ready to run our example, run the following command to quickly run:
php artisan serve
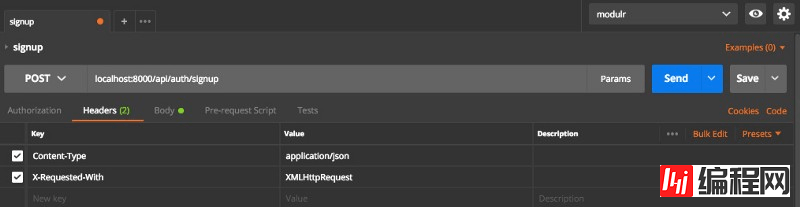
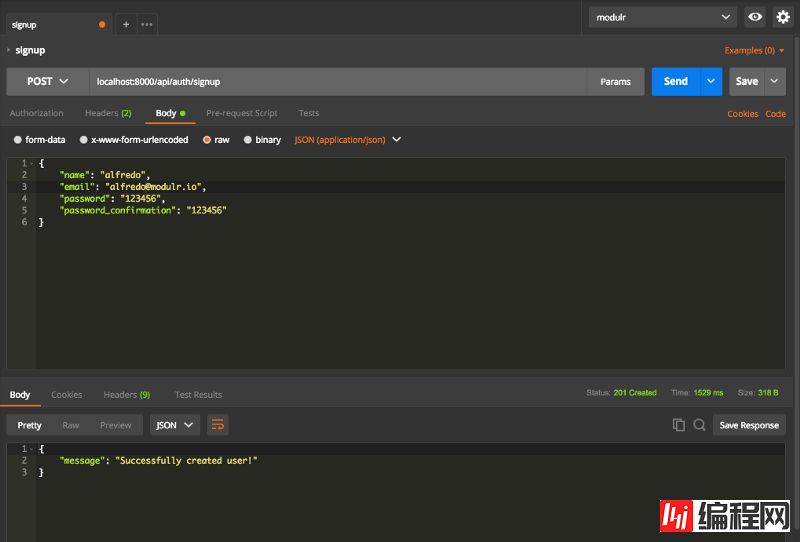
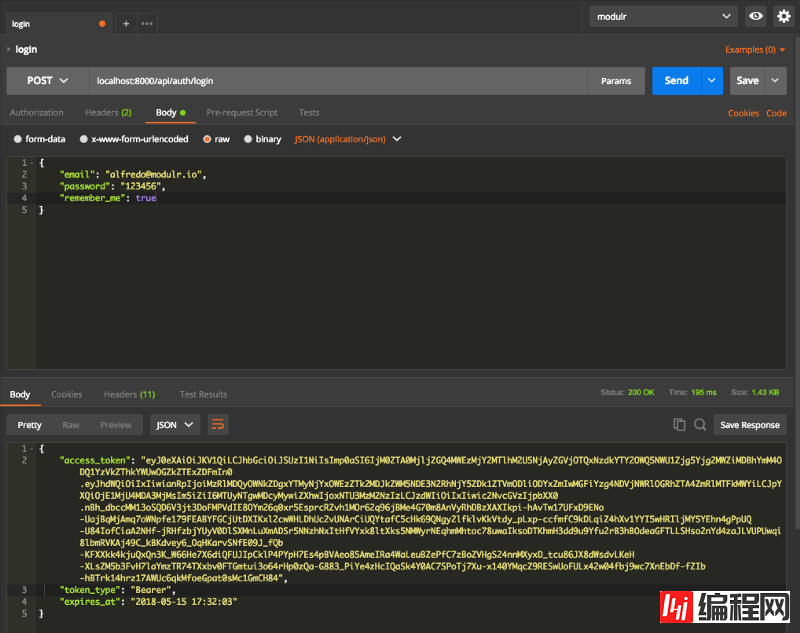
Testing
Now, we can use REST client tools to simplify testing, such as Postman. I ran the test and you can see the screenshot below.
You need to set the following two header information for this API:
Content-Type: application/json
X-Requested-With: XMLHttpRequest
Registration
Login
Logout
Thanks for reading!Resources
- GitHub ##Postman collections
The above is the detailed content of Handle API authentication with Laravel Passport. For more information, please follow other related articles on the PHP Chinese website!

Hot AI Tools

Undress AI Tool
Undress images for free

Undresser.AI Undress
AI-powered app for creating realistic nude photos

AI Clothes Remover
Online AI tool for removing clothes from photos.

Clothoff.io
AI clothes remover

Video Face Swap
Swap faces in any video effortlessly with our completely free AI face swap tool!

Hot Article
Hot Tools

Notepad++7.3.1
Easy-to-use and free code editor

SublimeText3 Chinese version
Chinese version, very easy to use

Zend Studio 13.0.1
Powerful PHP integrated development environment

Dreamweaver CS6
Visual web development tools

SublimeText3 Mac version
God-level code editing software (SublimeText3)
Hot Topics


 Usage of typedef struct in c language
May 09, 2024 am 10:15 AM
Usage of typedef struct in c language
May 09, 2024 am 10:15 AM
typedef struct is used in C language to create structure type aliases to simplify the use of structures. It aliases a new data type to an existing structure by specifying the structure alias. Benefits include enhanced readability, code reuse, and type checking. Note: The structure must be defined before using an alias. The alias must be unique in the program and only valid within the scope in which it is declared.
 Advantages and disadvantages of closures in js
May 10, 2024 am 04:39 AM
Advantages and disadvantages of closures in js
May 10, 2024 am 04:39 AM
Advantages of JavaScript closures include maintaining variable scope, enabling modular code, deferred execution, and event handling; disadvantages include memory leaks, increased complexity, performance overhead, and scope chain effects.
 What does include mean in c++
May 09, 2024 am 01:45 AM
What does include mean in c++
May 09, 2024 am 01:45 AM
The #include preprocessor directive in C++ inserts the contents of an external source file into the current source file, copying its contents to the corresponding location in the current source file. Mainly used to include header files that contain declarations needed in the code, such as #include <iostream> to include standard input/output functions.
 C++ smart pointers: a comprehensive analysis of their life cycle
May 09, 2024 am 11:06 AM
C++ smart pointers: a comprehensive analysis of their life cycle
May 09, 2024 am 11:06 AM
Life cycle of C++ smart pointers: Creation: Smart pointers are created when memory is allocated. Ownership transfer: Transfer ownership through a move operation. Release: Memory is released when a smart pointer goes out of scope or is explicitly released. Object destruction: When the pointed object is destroyed, the smart pointer becomes an invalid pointer.
 The difference between let and var in vue
May 08, 2024 pm 04:21 PM
The difference between let and var in vue
May 08, 2024 pm 04:21 PM
In Vue, there is a difference in scope when declaring variables between let and var: Scope: var has global scope and let has block-level scope. Block-level scope: var does not create a block-level scope, let creates a block-level scope. Redeclaration: var allows redeclaration of variables in the same scope, let does not.
 C++ Smart Pointers: From Basics to Advanced
May 09, 2024 pm 09:27 PM
C++ Smart Pointers: From Basics to Advanced
May 09, 2024 pm 09:27 PM
Smart pointers are C++-specific pointers that can automatically release heap memory objects and avoid memory errors. Types include: unique_ptr: exclusive ownership, pointing to a single object. shared_ptr: shared ownership, allowing multiple pointers to manage objects at the same time. weak_ptr: Weak reference, does not increase the reference count and avoid circular references. Usage: Use make_unique, make_shared and make_weak of the std namespace to create smart pointers. Smart pointers automatically release object memory when the scope ends. Advanced usage: You can use custom deleters to control how objects are released. Smart pointers can effectively manage dynamic arrays and prevent memory leaks.
 Function name definition in c language
Apr 03, 2025 pm 10:03 PM
Function name definition in c language
Apr 03, 2025 pm 10:03 PM
The C language function name definition includes: return value type, function name, parameter list and function body. Function names should be clear, concise and unified in style to avoid conflicts with keywords. Function names have scopes and can be used after declaration. Function pointers allow functions to be passed or assigned as arguments. Common errors include naming conflicts, mismatch of parameter types, and undeclared functions. Performance optimization focuses on function design and implementation, while clear and easy-to-read code is crucial.
 Memory leaks in PHP applications: causes, detection and resolution
May 09, 2024 pm 03:57 PM
Memory leaks in PHP applications: causes, detection and resolution
May 09, 2024 pm 03:57 PM
A PHP memory leak occurs when an application allocates memory and fails to release it, resulting in a reduction in the server's available memory and performance degradation. Causes include circular references, global variables, static variables, and expansion. Detection methods include Xdebug, Valgrind and PHPUnitMockObjects. The resolution steps are: identify the source of the leak, fix the leak, test and monitor. Practical examples illustrate memory leaks caused by circular references, and specific methods to solve the problem by breaking circular references through destructors.
