 Applet WeChat
 Développement WeChat
 Exemples de mini-programmes pratiques du mini-programme WeChat

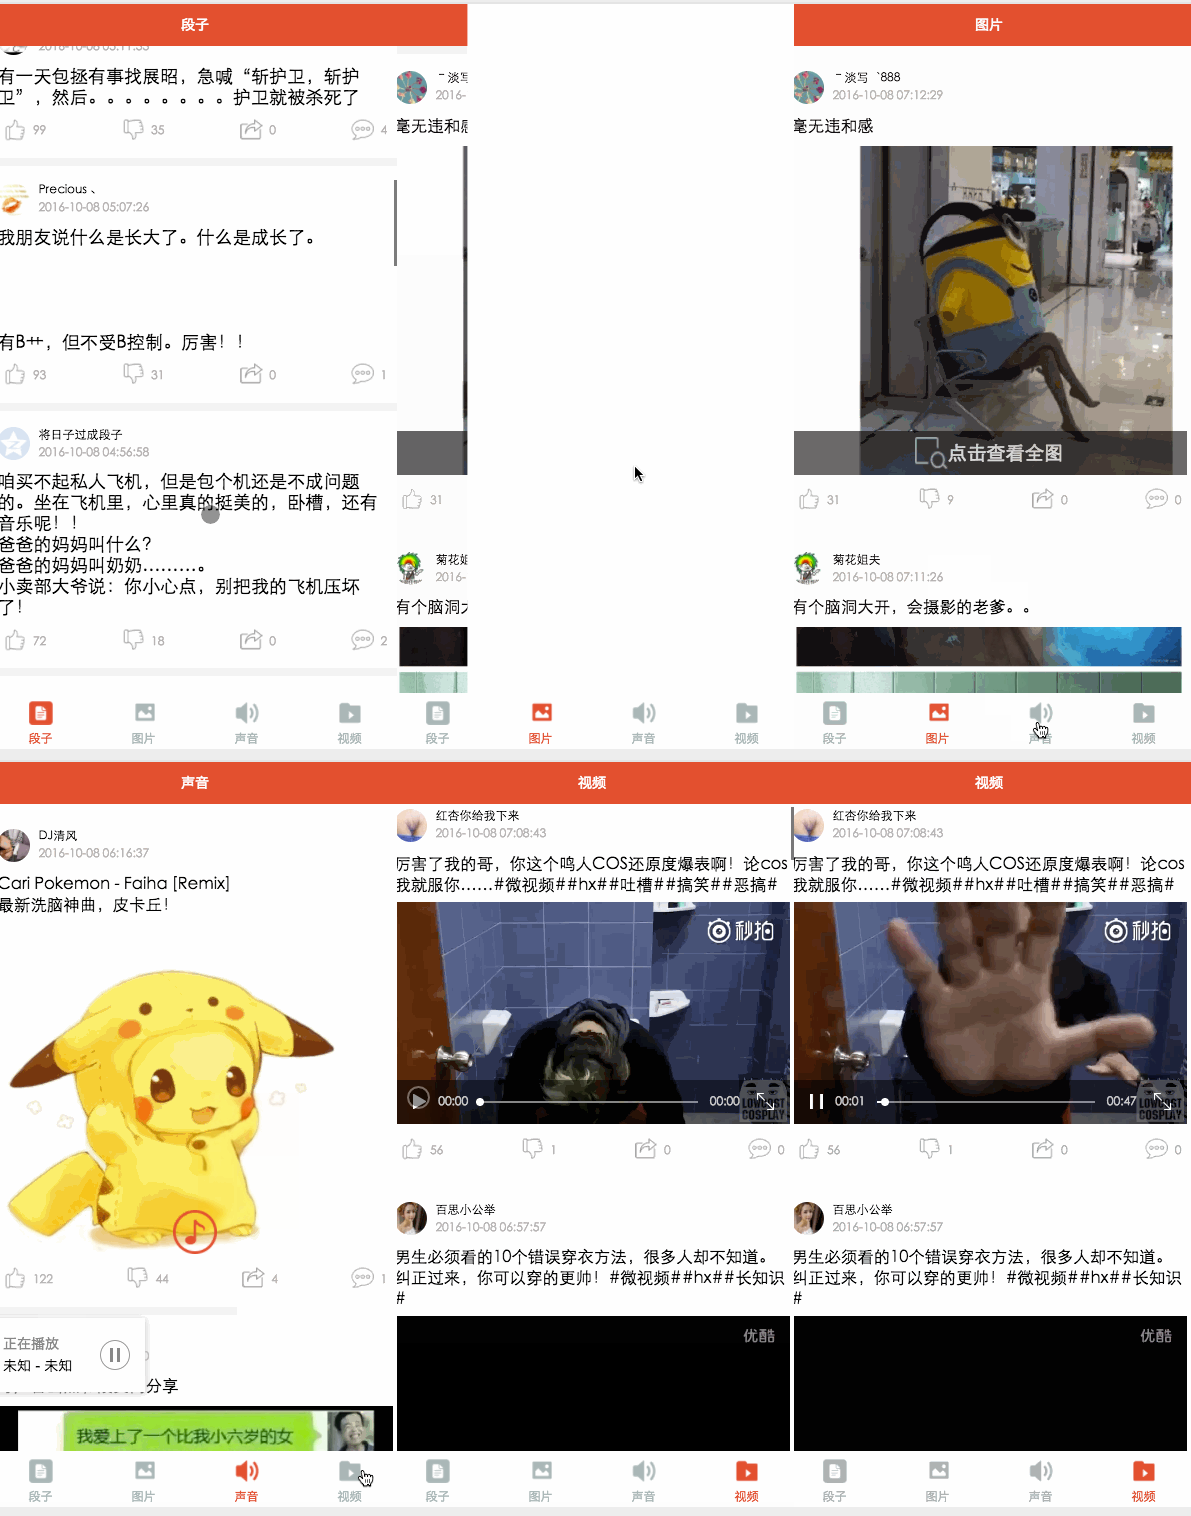
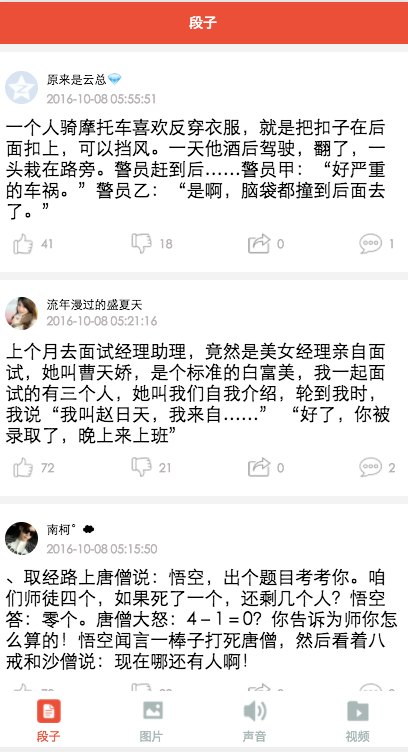
Les composants de base et l'API du mini programme WeChat sont terminés, et nous devons revenir au sujet. J'ai passé la majeure partie de la journée à créer une version simplifiée de Baisi Bujie, comprenant des blagues et des images, audio, vidéo, quatre modules. Cet article vous donnera une brève introduction à cette petite application. Le code source sera mis sur GitHub et vous êtes invités à commencer.
Que puis-je apprendre du projet??
Comment utiliser la barre d'onglets
Interface réelle d'appel réseau
le chargement utilise
la vue par défilement pour implémenter l'actualisation déroulante et le chargement pull-up
composant d'image Traitement des images,
utilisation de composants musicaux et vidéo
utilisation du passage de valeur de saut
et ainsi de suite. . . .
fichier de configuration globale app.json
{
 "pages":[
  "pages/word/word",
  "pages/image/image",
  "pages/voice/voice",
  "pages/video/video",
  "pages/detail/detail"
 ],
 "tabBar": {
  "color": "#a9b7b7",
  "selectedColor": "#eb4f38",
  "borderStyle": "white",
  "backgroundColor": "#ffffff",
  "list": [
   {
    "pagePath": "pages/word/word",
    "text": "段子",
    "iconPath": "image/wordN.png",
    "selectedIconPath": "image/wordS.png"
   },
   {
    "pagePath": "pages/image/image",
    "text": "圖片",
    "iconPath": "image/imageN.png",
    "selectedIconPath": "image/imageS.png"
   },
   {
    "pagePath": "pages/voice/voice",
    "text": "聲音",
    "iconPath": "image/voiceN.png",
    "selectedIconPath": "image/voiceS.png"
   },
   {
    "pagePath": "pages/video/video",
    "text": "視頻",
    "iconPath": "image/videoN.png",
    "selectedIconPath": "image/videoS.png"
   }

  ]
 },
 "window":{
  "backgroundTextStyle":"light",
  "navigationBarBackgroundColor": "#eb4f38",
  "navigationBarTextStyle":"white"
 }
}
Ici, il suffit de configurer les propriétés globales du programme. Chaque page doit être introduite dans. l'attribut pags. Parfois, la barre d'onglets ne s'affiche pas, c'est peut-être à cause de cela. L'élément de navigation inférieur de la barre d'onglets est divisé en quatre, qui sont dans la liste. La configuration principale ici est la couleur sélectionnée et non sélectionnée, l'arrière-plan. couleur et l'introduction de la page et l'introduction de l'image de chaque page d'option inférieure. L'attribut window configure principalement la couleur globale, la couleur du texte et la couleur d'arrière-plan du formulaire. L'attribut window sera ici remplacé par l'attribut window de chaque page.
app.wxss
/*整體view樣式*/
.containsView{
 padding: 15rpx 15rpx 15rpx 15rpx;
 margin-top: 15rpx;
 margin-bottom: 15rpx;
 background-color: white;
}
/*頭部整體樣式*/
.topContainsView{
 display: flex;
 flex-direction: row;
 align-items: center;
 margin-bottom: 18rpx;
}

/**
 * 頭像樣式
*/
.profileImage{
 width: 60rpx;
 height: 60rpx;
 border-radius: 30rpx;
}

/*頭部顯示名字和時(shí)間整體樣式*/
.topRightView{
 margin-left: 15rpx;
 display: flex;
 flex-direction: column;
}
/*用戶名稱樣式*/
.topRightName{
 font-size: 18rpx;
}
/*時(shí)間樣式*/
.topRightTime{
 font-size: 14rpx;
 color: #b8b2b2;
 margin-top: 10rpx;
}

/*因?yàn)橹虚g部分不一樣不放在整體樣式中*/

/*底部view整體樣式*/
.bottomView{
 display: flex;
 flex-direction: row;
 justify-content: space-between;
 align-items: center;
}
/*每個(gè)Item樣式*/
.bottomItemView{
 display: flex;
 flex-direction: row;
 align-items: center;
 justify-content: center;
 margin-top: 18rpx;
 padding-left: 10rpx;
 padding-right: 10rpx;
}
/*Item樣式中的圖標(biāo)樣式 頂 踩 分享 評(píng)論*/
.bottomItemImage{
 width: 45rpx;
 height: 45rpx;
}
/*Item中的文字樣式 頂 踩 分享 評(píng)論*/
.bottomItemText{
 font-size: 15rpx;
 color: #b8b2b2;
 margin-left: 10rpx;
 margin-top: 8rpx;
}

/*分割線樣式*/
.divLine{
 background: #f3f3f3;
 width: 100%;
 height: 15rpx;
}
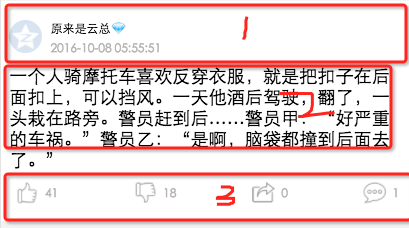
app.wxss J'ai divisé les quatre modules en trois parties : tête, zone de contenu, bas car chacun L'en-tête et le bas de la page ont le même style mais la partie médiane est différente, donc j'ai mis 1 et 3 dans le global, et les commentaires sont plus clairs
Module paragraphe
word.wxml
<loading hidden="{{loadingHidden}}">正在加載...</loading>
<scroll-view scroll-y="true" bindscrolltoupper="bindscrolltoupper" bindscrolltolower="bindscrolltolower" style="height: 100%">
 <block wx:for-items="{{list}}">
  <!-- 分割線 -->
  <view class="divLine"></view>
  <!-- 整體item樣式 -->
  <view class="containsView">
   <view class="topContainsView">
    <image class="profileImage" src="{{item.profile_image}}" />
    <view class="topRightView">
     <text class="topRightName">{{item.name}}</text>
     <text class="topRightTime">{{item.passtime}}</text>
    </view>
   </view>
   <!-- 中間內(nèi)容 -->
   <text class="centerContent">{{item.text}}</text>
   <!-- 底部view樣式 -->
   <view class="bottomView">
    <view class="bottomItemView">
     <image class="bottomItemImage" src="../../image/ding.png" />
     <text class="bottomItemText">{{item.ding}}</text>
    </view>
    <view class="bottomItemView">
     <image class="bottomItemImage" src="../../image/cai.png" />
     <text class="bottomItemText">{{item.cai}}</text>
    </view>
    <view class="bottomItemView">
     <image class="bottomItemImage" src="../../image/share.png" />
     <text class="bottomItemText">{{item.repost}}</text>
    </view>
    <view class="bottomItemView">
     <image class="bottomItemImage" src="../../image/comment.png" />
     <text class="bottomItemText">{{item.comment}}</text>
    </view>
   </view>
  </view>
 </block>
</scroll-view>
Nous utilisons scroll-view pour envelopper la couche externe afin d'en charger davantage et de tirer vers le haut pour actualiser bindscrolltoupper="bindscrolltoupper" Cet attribut appellera cette méthode lors du glissement vers le haut bindscrolltolower="bindscrolltolower" Lors du glissement vers le bas, il s'appellera, commencez ici. Vous pouvez également extraire les mises en page d'en-tête et de bas et les utiliser via la méthode d'introduction, vous n'avez donc pas besoin d'écrire les quatre pages. Vous pouvez obtenir
word.js
Page({
 data: {
  list: [],
  maxtime: '',
  loadingHidden: false
 },
 onLoad: function (options) {
  // 頁(yè)面初始化 options為頁(yè)面跳轉(zhuǎn)所帶來(lái)的參數(shù)
  //加載最新
  this.requestData('newlist');
 },

 /**
  * 上拉刷新
  */
 bindscrolltoupper: function () {
  //加載最新
  // this.requestData('newlist');
 },

 /**
  * 加載更多
  */
 bindscrolltolower: function () {
  console.log('到底部')
  //加載更多
  this.requestData('list');
 },

 /**
  * 請(qǐng)求數(shù)據(jù)
  */
 requestData: function (a) {
  var that = this;
  console.log(that.data.maxtime)
  wx.request({
   url: 'http://api.budejie.com/api/api_open.php',
   data: {
    a: a,
    c: 'data',
    maxtime: that.data.maxtime,
    type: '29',
   },
   method: 'GET',
   success: function (res) {
    console.log(res)
    console.log('上一頁(yè)', that.data.list)
    that.setData({
     // 拼接數(shù)組
     list: that.data.list.concat(res.data.list),
     loadingHidden: true,
     maxtime: res.data.info.maxtime
    })

   }
  })
 },
 onReady: function () {
  // 頁(yè)面渲染完成
 },
 onShow: function () {
  // 頁(yè)面顯示
 },
 onHide: function () {
  // 頁(yè)面隱藏
 },
 onUnload: function () {
  // 頁(yè)面關(guān)閉
 }
})
<loading hidden="{{loadingHidden}}">正在加載...</loading>
<scroll-view scroll-y="true" bindscrolltolower="bindscrolltolower" style="height: 100%">
 <block wx:for-items="{{list}}">
  <!-- 分割線 -->
  <view class="divLine"></view>
  <!-- 整體item樣式 -->
  <view class="containsView">
   <view class="topContainsView">
    <image class="profileImage" src="{{item.profile_image}}" />
    <view class="topRightView">
     <text class="topRightName">{{item.name}}</text>
     <text class="topRightTime">{{item.passtime}}</text>
    </view>
   </view>
   <text style="font-size: 30rpx">{{item.text}}</text>
   <!-- 當(dāng)時(shí)gif圖 -->
   <view wx:if="{{item.is_gif != 0}}" style="position: relative;">
    <image class="centerContent" src="{{item.cdn_img}}" mode="aspectFill" />
   </view>
   <!-- 普通大圖 可點(diǎn)擊查看全部圖片 -->
   <view data-url="{{item.cdn_img}}" data-height="{{item.height}}" data-width="{{item.width}}"
      bindtap="lookBigPicture" wx:elif="{{item.is_gif == 0}}" style="position: relative;">
    <!-- 圖片資源 -->
    <image class="centerContent" src="{{item.cdn_img}}" mode="aspectFill" />
    <!-- 圖片上浮動(dòng)的點(diǎn)擊查看詳情圖片view -->
    <view class="flexView">
     <image src="../../image/seeBigPicture.png" style="width: 60rpx; height: 60rpx;" />
     <text class="flexText">點(diǎn)擊查看全圖</text>
    </view>
   </view>
   <!-- 底部view樣式 -->
   <view class="bottomView">
    <view class="bottomItemView">
     <image class="bottomItemImage" src="../../image/ding.png" />
     <text class="bottomItemText">{{item.ding}}</text>
    </view>
    <view class="bottomItemView">
     <image class="bottomItemImage" src="../../image/cai.png" />
     <text class="bottomItemText">{{item.cai}}</text>
    </view>
    <view class="bottomItemView">
     <image class="bottomItemImage" src="../../image/share.png" />
     <text class="bottomItemText">{{item.repost}}</text>
    </view>
    <view class="bottomItemView">
     <image class="bottomItemImage" src="../../image/comment.png" />
     <text class="bottomItemText">{{item.comment}}</text>
    </view>
   </view>
  </view>
 </block>
</scroll-view>
Ici, nous regardons principalement la partie centrale. Nous distinguons et traitons l'image selon qu'il s'agit d'un gif. Si ce n'est pas un gif, vous pouvez cliquer. pour afficher l'image plus grande. Il y a un effet de suspension de vue ici, combiné avec l'interface et image.wxssimage.wxss/*中間文字樣式*/
.centerContent{
margin-top: 20rpx;
width: 100%;
height: 600rpx;
}
/*中間浮動(dòng)文字樣式*/
.flexView{
display: flex;
justify-content: center;
align-items: center;
width: 100%;
height: 80rpx;
position: absolute;
z-index: 2;
top: 540rpx;
background: #000000;
opacity: 0.6
}
/*浮動(dòng)文字*/
.flexText{
color: white;
font-size: 35rpx;
}image.jsvar detail = '../detail/detail'
Page({
data: {
list: [],
maxtime: '',
loadingHidden: false
},
onLoad: function (options) {
// 頁(yè)面初始化 options為頁(yè)面跳轉(zhuǎn)所帶來(lái)的參數(shù)
this.requestData('newlist');
},
/**
* 滾動(dòng)到底部時(shí)加載下一頁(yè)
*/
bindscrolltolower: function () {
console.log('到底部')
this.requestData('list');
},
/**
* 加載數(shù)據(jù)
*/
requestData: function (a) {
var that = this;
wx.request({
url: 'http://api.budejie.com/api/api_open.php',
data: {
a: a,
c: 'data',
// 上一頁(yè)的maxtime作為加載下一頁(yè)的條件,
maxtime: this.data.maxtime,
type: '10',
},
method: 'GET',
success: function (res) {
console.log(res)
console.log('上一頁(yè)', that.datalist)
that.setData({
// 拼接數(shù)組
list: that.data.list.concat(res.data.list),
loadingHidden: true,
maxtime: res.data.info.maxtime
})
}
})
},
/**
* 查看大圖
*/
lookBigPicture: function (e) {
console.log(e);
console.log(e.currentTarget.id)
//圖片url 對(duì)應(yīng)wxml中data-url="{{item.url}}"
var url = e.currentTarget.dataset.url;
//獲取圖片高度 對(duì)應(yīng)wxml中data-height="{{item.height}}"
var height = e.currentTarget.dataset.height;
//獲取圖片高度 對(duì)應(yīng)wxml中data-width="{{item.width}}"
var width = e.currentTarget.dataset.width;
// 傳參方式向GET請(qǐng)求
wx.navigateTo({
url: detail + '?' + 'url=' + url + "&height=" + height + "&width=" + width,
success: function (res) {
console.log(res)
},
fail: function (err) {
console.log(err)
},
})
},
onReady: function () {
// 頁(yè)面渲染完成
},
onShow: function () {
// 頁(yè)面顯示
},
onHide: function () {
// 頁(yè)面隱藏
},
onUnload: function () {
// 頁(yè)面關(guān)閉
}
})Ici, nous examinons principalement la méthode lookBigPicture view data-url=”{{item.img}}” data-height=”{{item.height}}” data-width=”{{item.width}}” sera installé dans le code logique. La syntaxe est var url = e.currentTarget.dataset url; Pour transférer par valeur, suivez simplement le format lors de l'envoi d'une requête à GET Merci d'avoir lu, j'espère. cela peut aider tout le monde, merci pour votre soutien à ce site !

Outils d'IA chauds

Undress AI Tool
Images de déshabillage gratuites

Undresser.AI Undress
Application basée sur l'IA pour créer des photos de nu réalistes

AI Clothes Remover
Outil d'IA en ligne pour supprimer les vêtements des photos.

Clothoff.io
Dissolvant de vêtements AI

Video Face Swap
échangez les visages dans n'importe quelle vidéo sans effort grace à notre outil d'échange de visage AI entièrement gratuit?!

Article chaud

Outils chauds

Bloc-notes++7.3.1
éditeur de code facile à utiliser et gratuit

SublimeText3 version chinoise
Version chinoise, très simple à utiliser

Envoyer Studio 13.0.1
Puissant environnement de développement intégré PHP

Dreamweaver CS6
Outils de développement Web visuel

SublimeText3 version Mac
Logiciel d'édition de code au niveau de Dieu (SublimeText3)


