

How to downgrade macOS Sequoia without losing data and time
Mar 11, 2025 am 10:30 AM
macOS Sequoia downgrade guide: Easily return to the Sonoma system
Difficulty: 5/10
Required Equipment: Hard drive for backup (usually at least 500GB). If you choose to downgrade using the bootable macOS installer, you need a flash drive (32GB).
Time: up to 3 hours
Tools: Time Machine. Optional: Get Backup Pro, CleanMyMac.
Every fall, my colleagues from IT security will give the same advice: “After a new operating system is released, wait a few days before upgrading. Early versions often have bugs or compatibility issues that can disrupt your work.”
I usually do this, but this year my curiosity beats everything. Not only did I skip the waiting period, I also installed the Sequoia beta. Sure enough, after a few days of testing, I had to downgrade.
If you upgraded too, and now want to roll back due to errors or other issues, you can also downgrade from macOS Sequoia to Sonoma. This guide shares my experience and tips – I hope you find it useful!
Before downgrading macOS Sequoia
The most important thing to do before you start downgrading is backing up and cleaning up your Mac.
Step 1. Prepare a backup
When you downgrade, you need to wipe the hard drive of your MacBook completely. This means a complete backup of your system (or at least the files that matter most to you).
To create a backup, you need a storage device. Ideally, it should be twice the size of a Mac hard drive.
Here is how to prepare a backup drive:
- Connect the drive to your Mac.
- Open Disk Utility and select Erashes.
- In the Format drop-down menu, select APFS or Mac OS extension (logged), and then click Eraser.
- Close Disk Utility.

Next, use Time Machine to create a backup:
- Open Time Machine by going to System Settings > General > Time Machine.
- Click Add Backup Disk, select the desired disk, and then click Set Disk.
- If needed, set a password (you will need it later to restore the backup) and click Finish.
- Click Options to configure the files you want to back up and the backup frequency, and then click Finish.
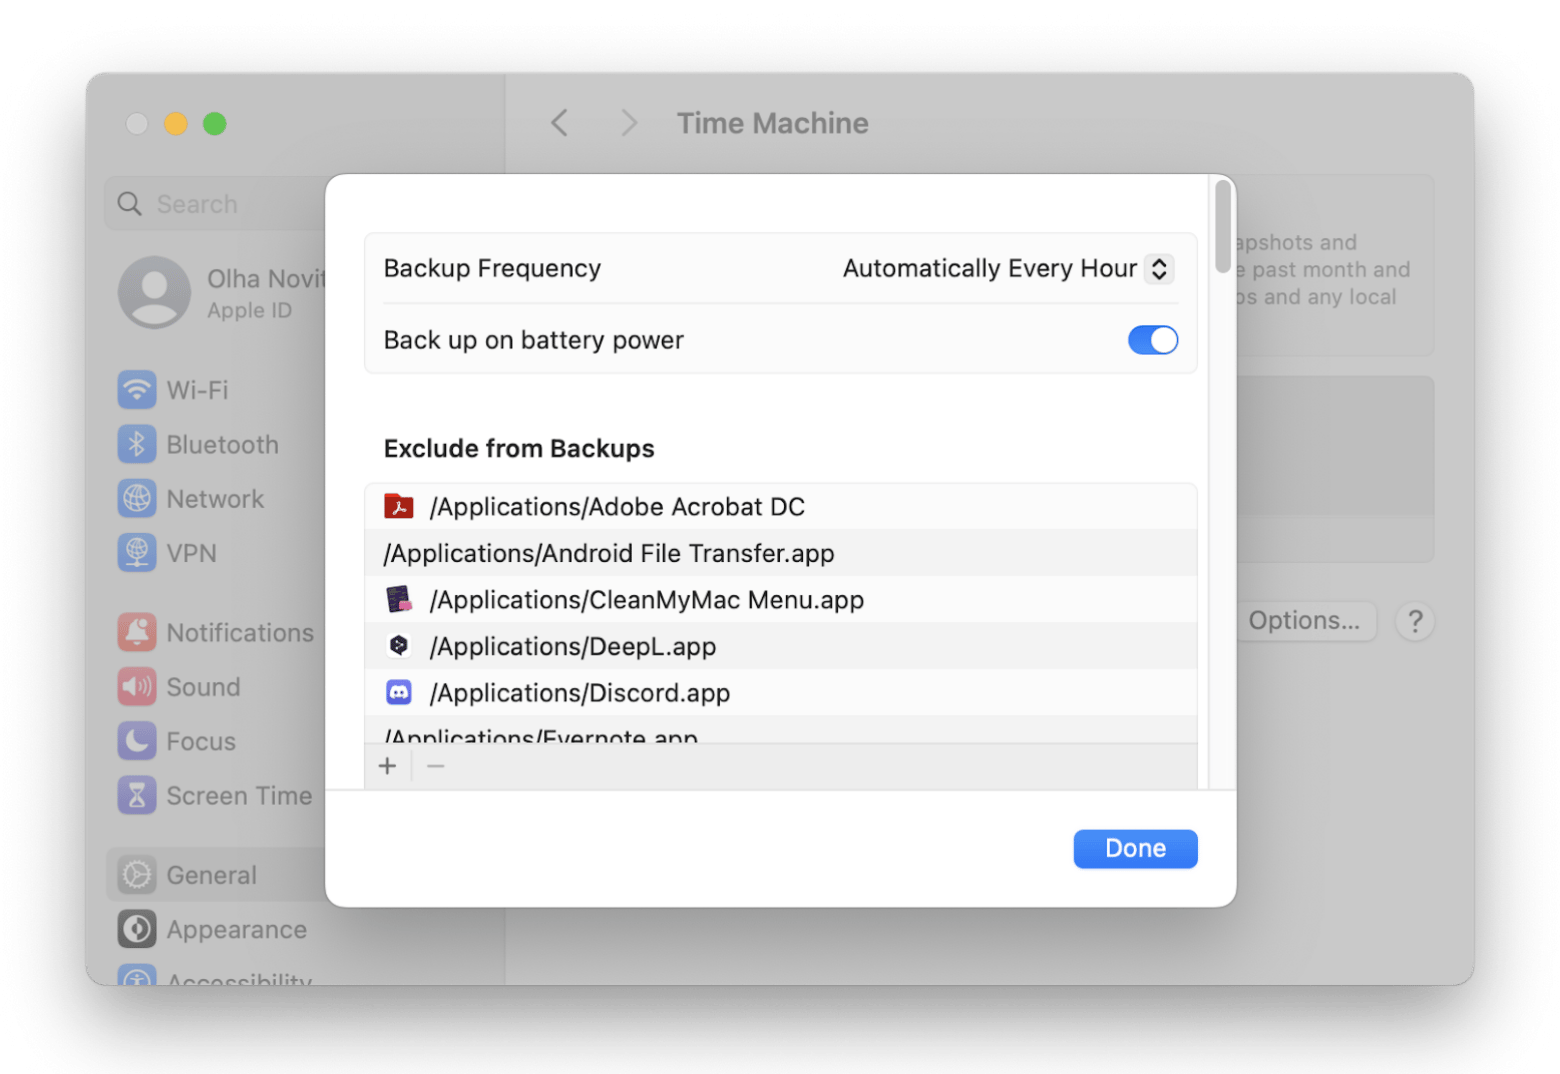
The backup should start automatically. If not, click the clock icon in the menu bar and select Backup Now. Wait for the backup to complete.
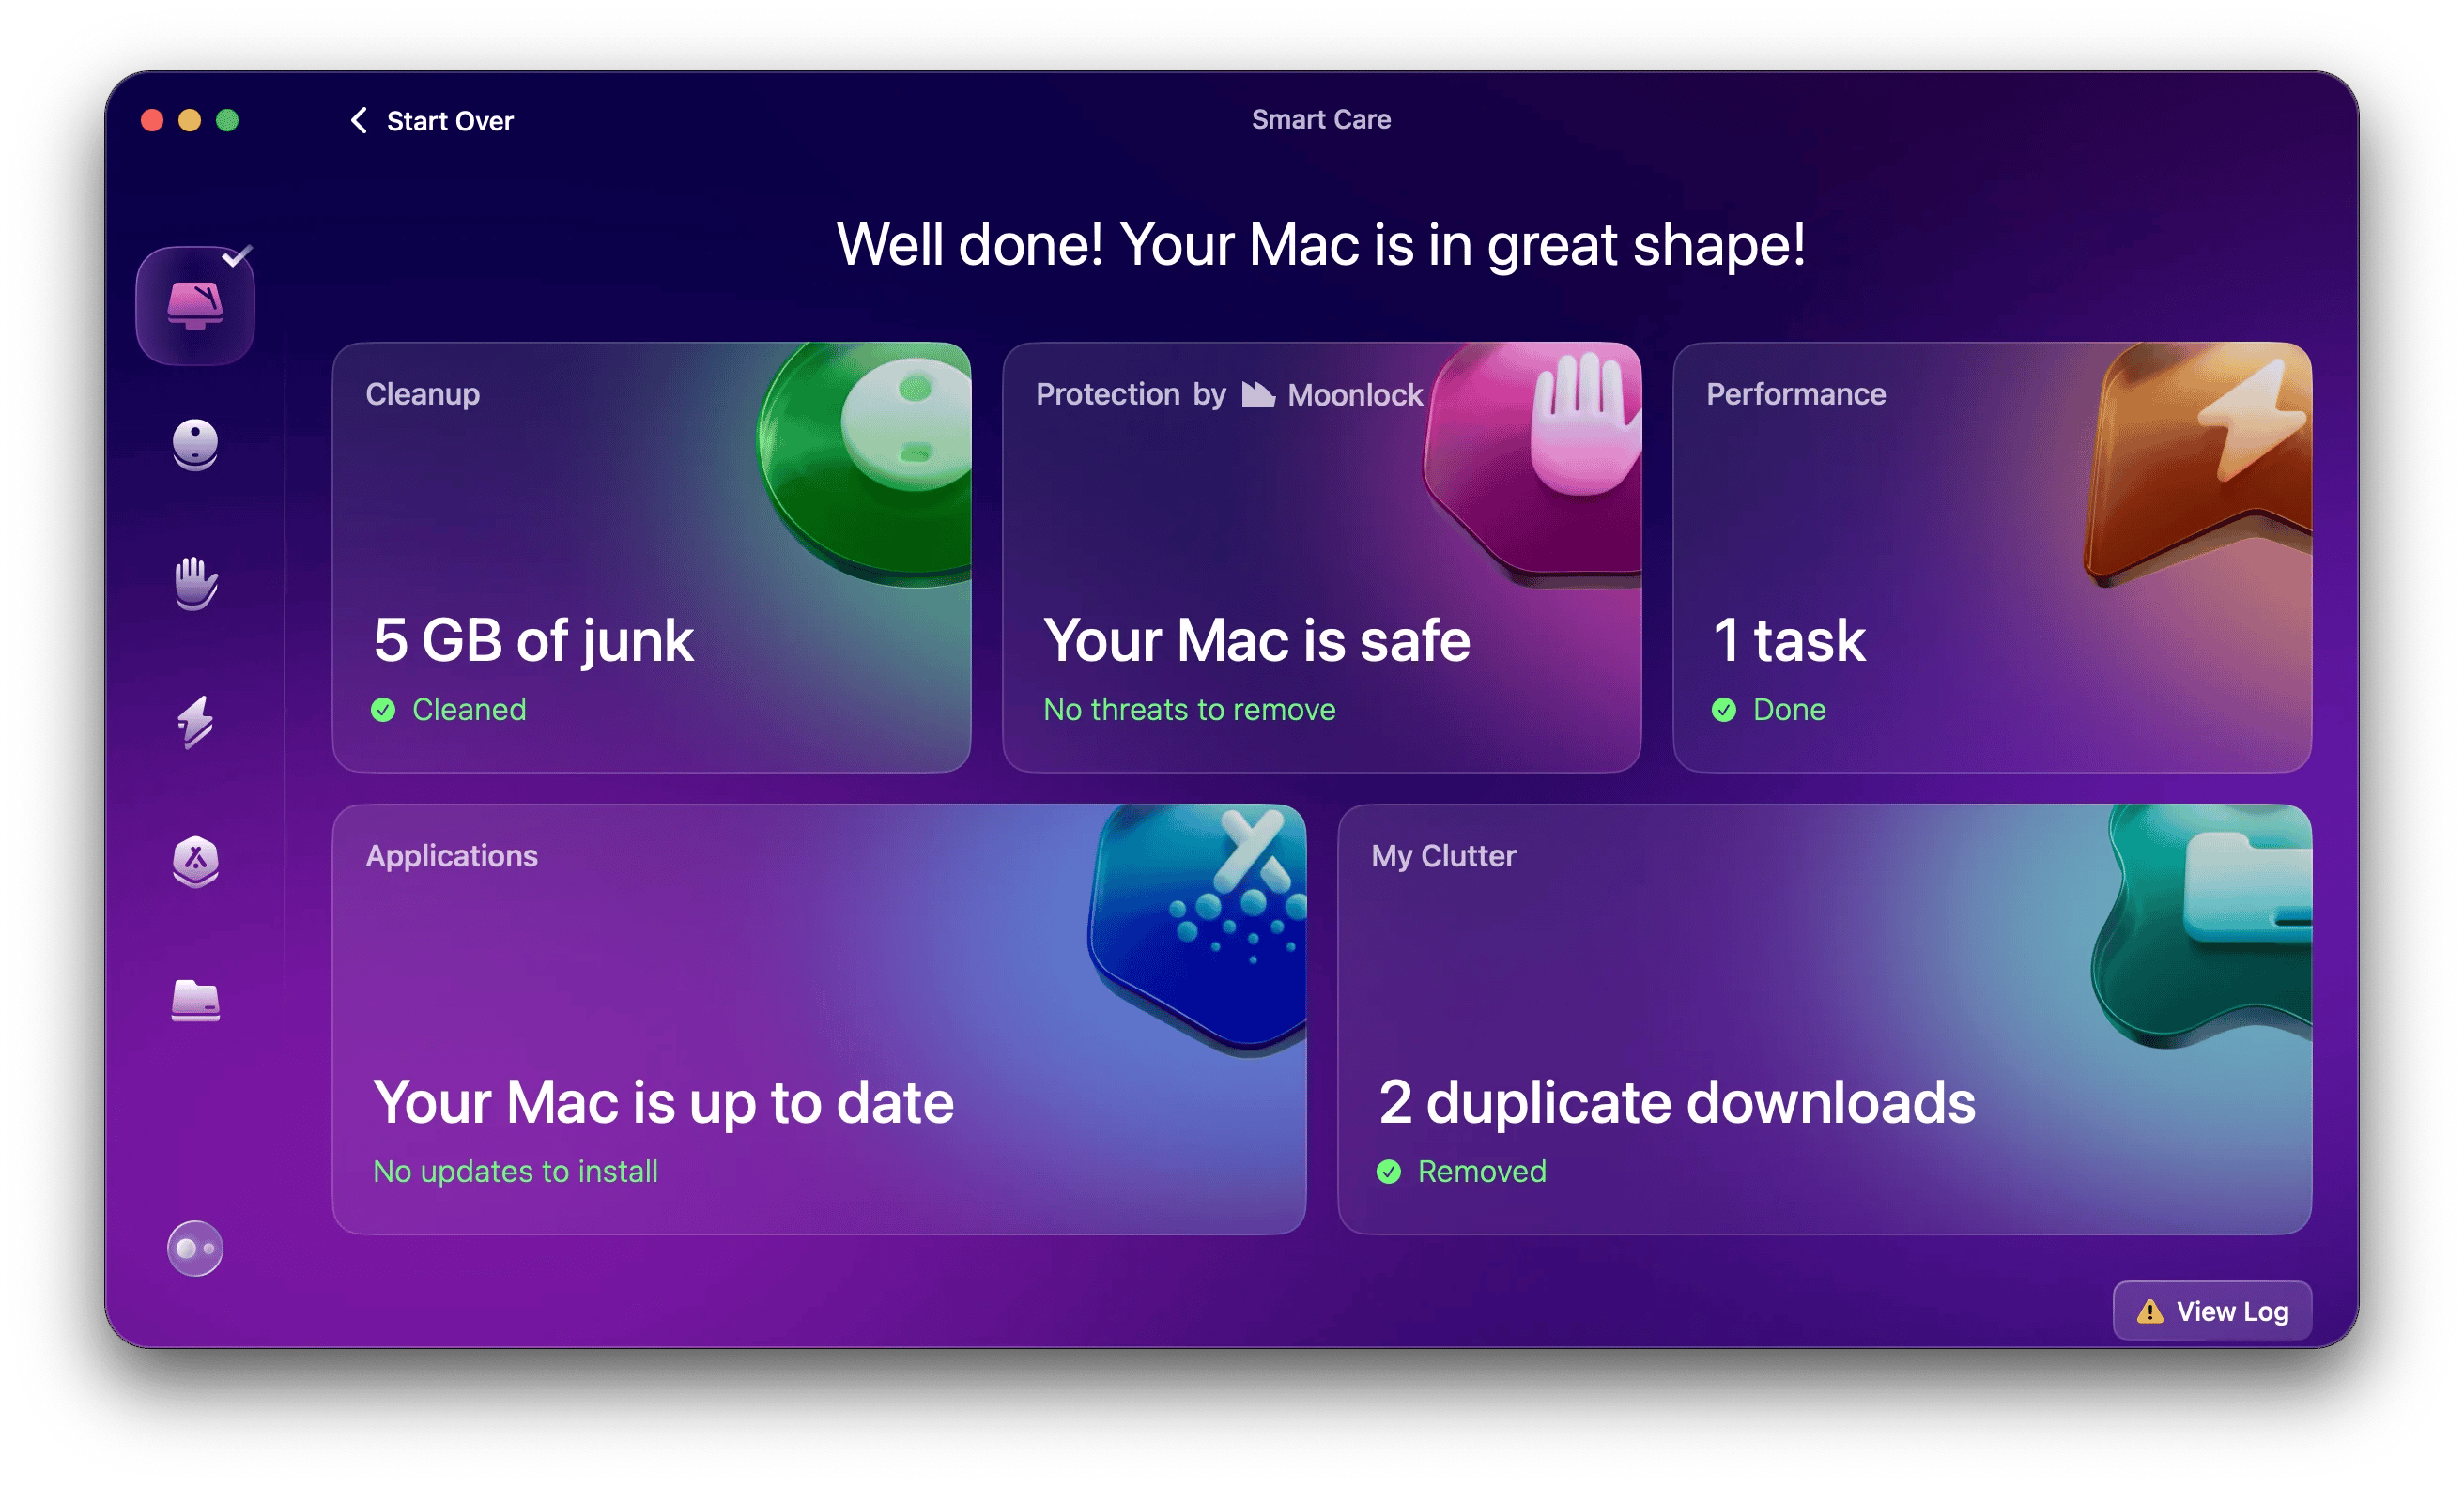
Step 2. Clean up the junk files of your Mac
I like to think of this step as cleaning up the construction site before starting a new build.
Over time, your Mac accumulates system junk files that may interfere with the smooth operation of the new operating system. Since it's nearly impossible to manually delete these junk files, I recommend using CleanMyMac. It is a Mac care app that removes system junk, removes viruses and speeds up the system.
To clean up your Mac:
- Install and open CleanMyMac.
- Click Scan.
- View the junk file found and click Run to delete it.
This process takes up to 10 minutes and can free up several GB of space. Please check my results:
How to downgrade macOS Sequoia
There are three ways to restore macOS Sequoia updates: use Time Machine, Internet Recovery, or start the macOS USB installer. Which method to choose?
| Method comparison | Time Machine | Internet recovery | Can boot the USB installer |
|---|---|---|---|
| Best choice | Have a Mac backed up on your Sonoma system and want to restore data and settings. | Need a brand new installation. | A specific version of macOS needs to be installed (not necessarily Sonoma). |
| time | 30 minutes to several hours, depending on the data size. | 1 to 3 hours or more, depending on the speed of the internet. | 30 minutes to 2 hours (extra time to create a USB). |
| Control of macOS version | No, restore from backup. | No, install the original/latest version. | Yes, you can choose a version. |
| Hardware requirements | Backup drive | none | USB drive (32GB) |
Downgrade with Time Machine
If you backed up your Mac before upgrading to Sequoia, the downgrade should be fast. You can restore your Mac to its exact state before the upgrade.

Note: If you create any important files or projects while using Sequoia, make sure you back up them as well before downgrading.
In my case, I only have some GB of files and programs, so I only backed up these. I found Time Machine inconvenient for selective backups, so I used GetBackup Pro. It's simple: you just select the file you want and the application will create a backup. In my experience, it also saves more space than the backup of Time Machine.
Here is how to downgrade from Sequoia using Time Machine:
- Connect the drive with Time Machine backup to your Mac.
- Restart your Mac in recovery mode.
- For Intel-based Macs: Hold down Command R until you see the Apple logo.
- For Apple Chip Mac: Press and hold the power button until you see the boot option.
- For Intel-based Macs: Hold down Command R until you see the Apple logo.
- Click Options > Continue > Recover from Time Machine > Continue.

- Select the Time Machine drive and in the backup list, select the backup you created before upgrading to Sequoia.
- Click Recover.
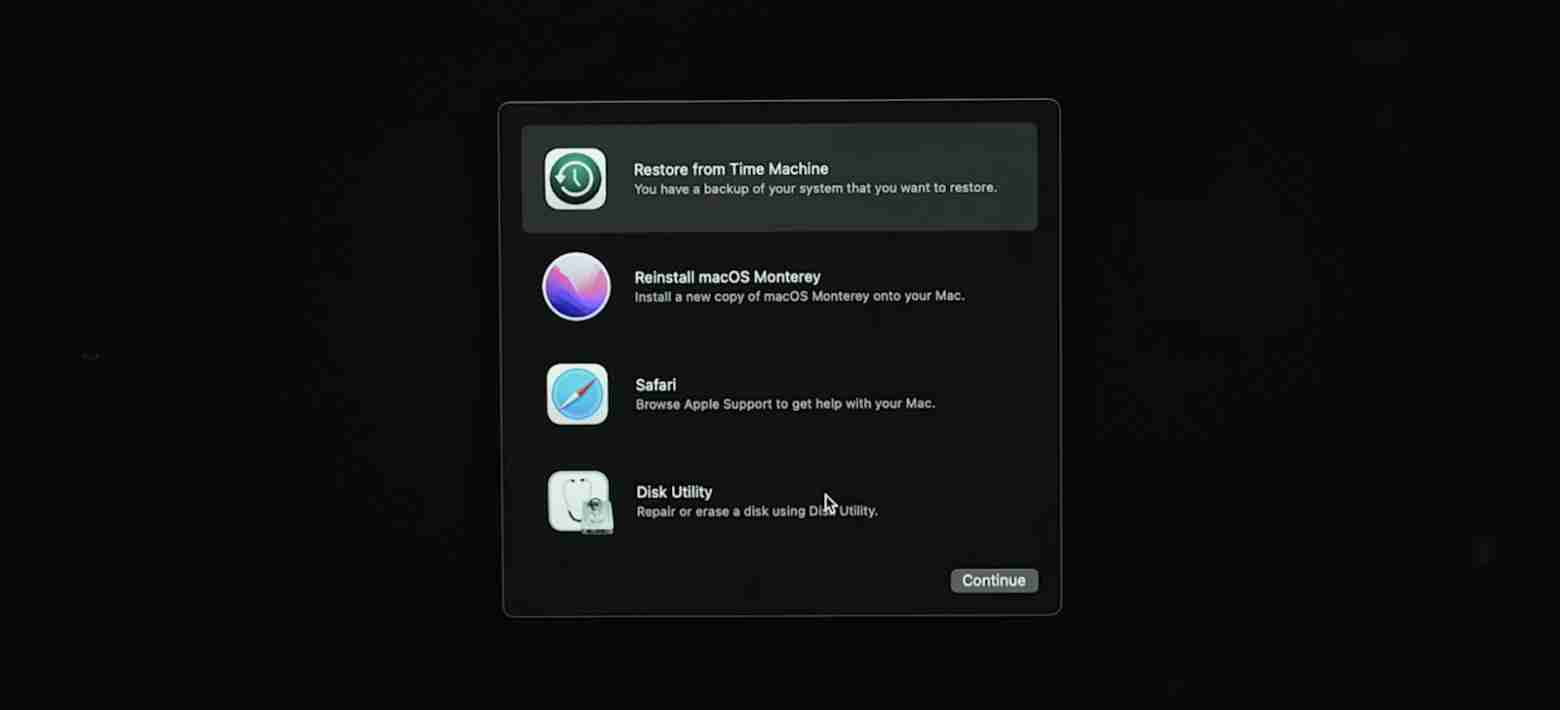
Follow the on-screen instructions and wait for the system to recover.
Use the Internet to restore downgrade
Internet Recovery will restore your Mac to the operating system it originally came with, not your previous one. Why the "Internet"? Because in this approach, your Mac downloads the operating system from Apple's servers. After that, you can upgrade to your favorite operating system.
As a reminder: You need to erase the entire Mac, so make sure you have a backup of your important files or a whole system.
Here is how to reinstall older versions of macOS using Internet Recovery:
- Turn off your Mac.
- Enter recovery mode. First, turn off your Mac. Then:
- For Intel Mac: Press and hold Shift Option Command R and press the Power button.
- For Apple chip Mac: Press and hold the power button until the Options button appears.
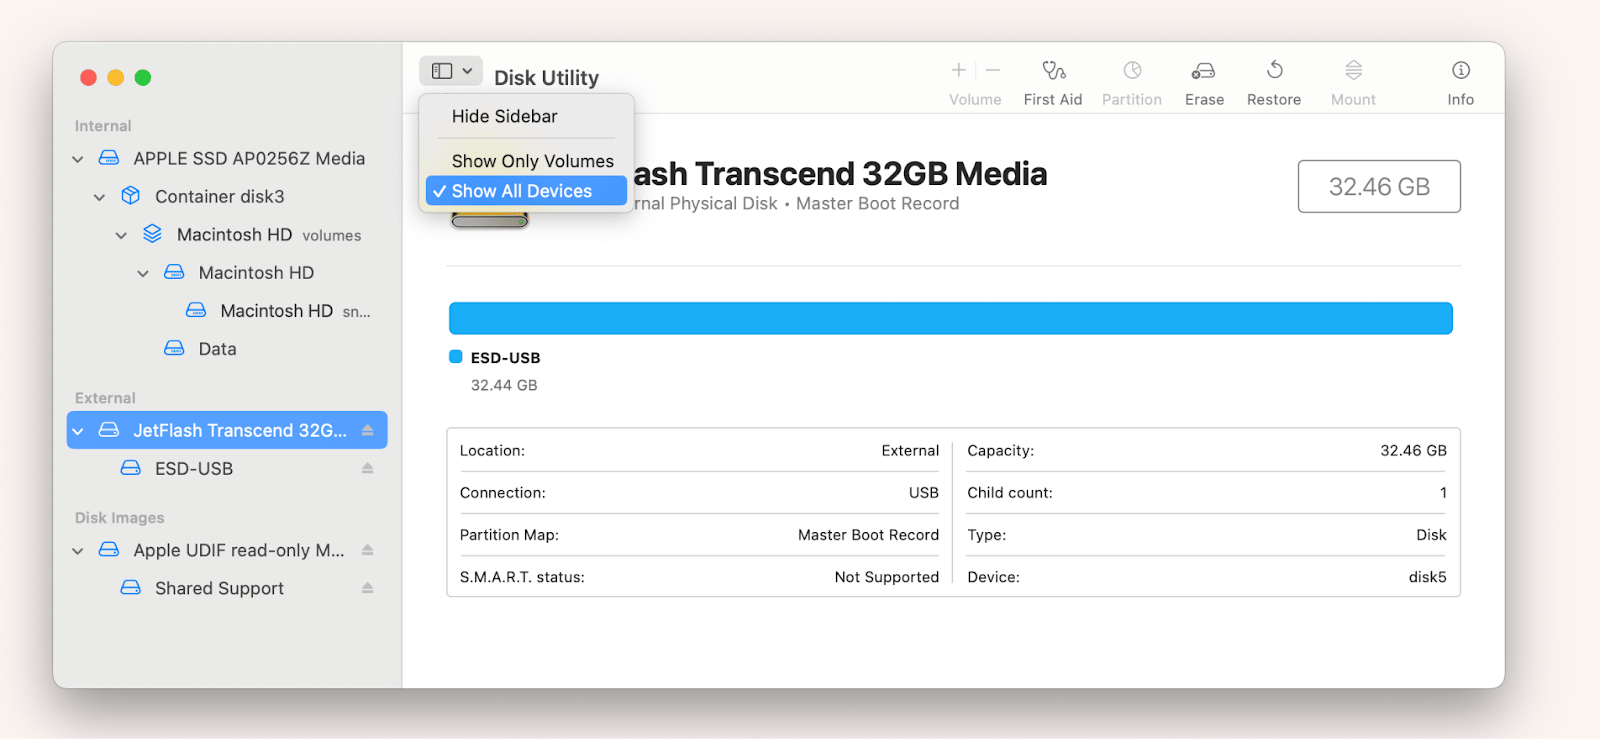
- Select Disk Utility.
- In the left pane, click your drive (usually called Macintosh HD).

Note: Make sure to select the entire disk, not just the volume. If you are not sure, click the View button on the left side of the Disk Utility and make sure Show All Devices is selected.
- Press "Erase" and confirm your action. Wait for the erase process to be completed.
- Connect to Wi-Fi.
- Click Exit Recovery.
- Click Reinstall macOS [Name] > Continue. Then, follow the on-screen instructions: Agree with the license terms, select the disk (usually Macintosh HD) to install the operating system, and wait for the installation to complete.
Downgrade using bootable macOS USB installer
For this method you need:
- A flash drive that turns it into a bootable installer. I was using a 16GB drive initially, but when I tried to burn Sonoma to it, I was missing…83MB. So I switched to 32GB USB.
- macOS Sonoma: Download it from the Apple Store. Downloading may take 1 hour or more depending on your internet speed.
Now, let's continue with the macOS Sequoia downgrade guide using the USB installer.
Step 1: Format USB
- Plug the USB drive into your Mac.
- Open Disk Utility, select your USB and click Erashes.
- In the Format drop-down menu, select Mac OS extension (log-style), and then click Eraser.
Common Errors
If you don't see Mac OS extensions (logs) in the Format drop-down menu, it may be because you're trying to format the volume instead of the physical disk. To resolve this issue, go to the upper left corner, click View > Show All Devices, and select the physical disk in the left pane.
Step 2: Make USB bootable
- Open the terminal and type
sudo /Applications/Install\ macOS\ Sonoma.app/Contents/Resources/createinstallmedia --volume /Volumes/[您的USB名稱](please replace[您的USB名稱]with the actual name of your USB drive). - Open Finder > Go to > Go to Folder, type
/Volumes, and press Return. - Select your USB drive and drag it into the terminal.
- Press Return, enter your password, and wait for the process to complete – this may take 30 minutes.
You should get the following results:

Step 3: Downgrade to macOS Sonoma
- Turn off your Mac.
- Press and hold the power button until the Startup option appears.
- Select Install macOS Sonoma > Continue.
- Select Disk Utility > Continue.
- Select your hard drive (usually called Macintosh HD) and click "Erase" in the upper right corner.

- In the Format drop-down menu, select APFS, and then click Erashes.
- Wait for the process to complete, and then close the Disk Utility window.
- Select Install macOS Sonoma > Continue.
- Agree to the license agreement and follow the on-screen instructions.
The operating system installation will begin and will take about 30 minutes.
Prepare correctly to restore macOS Sequoia updates
The rules for downgrading from macOS Sequoia to Sonoma can be summarized as follows:
- Make a backup. Back up any important files that you create on your current system or when using macOS Sequoia. If you plan to use Time Machine recovery, use this tool. Personally, I prefer Get Backup Pro because it is convenient and backups are more compressed.
- Clean up your Mac. Don't bring unnecessary junk files to the new system. Use CleanMyMac to clean up system junk files.
- Set aside time for this. This process can take 3 hours or more, so be prepared to avoid using your Mac during this period.
The apps I mentioned that help you prepare your backup are available on Setapp, a platform with over 250 macOS and iOS applications. You can try out all the features of all apps for free for 7 days.
The above is the detailed content of How to downgrade macOS Sequoia without losing data and time. For more information, please follow other related articles on the PHP Chinese website!

Hot AI Tools

Undress AI Tool
Undress images for free

Undresser.AI Undress
AI-powered app for creating realistic nude photos

AI Clothes Remover
Online AI tool for removing clothes from photos.

Clothoff.io
AI clothes remover

Video Face Swap
Swap faces in any video effortlessly with our completely free AI face swap tool!

Hot Article
Hot Tools

Notepad++7.3.1
Easy-to-use and free code editor

SublimeText3 Chinese version
Chinese version, very easy to use

Zend Studio 13.0.1
Powerful PHP integrated development environment

Dreamweaver CS6
Visual web development tools

SublimeText3 Mac version
God-level code editing software (SublimeText3)
Hot Topics


 How to Save Battery on MacBook? How to Improve It?
Jun 19, 2025 am 10:15 AM
How to Save Battery on MacBook? How to Improve It?
Jun 19, 2025 am 10:15 AM
You’ve had your Mac for a few years, and you’re starting to feel the effects of your device aging—the battery doesn’t hold up as well as it used to. To avoid getting stuck with a dead Mac, you have no choice but to take your charger e
 How to Delete Focus Modes on iPhone & iPad
Jun 18, 2025 am 10:40 AM
How to Delete Focus Modes on iPhone & iPad
Jun 18, 2025 am 10:40 AM
The Focus Modes functionality comes with several pre-set options such as Work, Driving, Sleep, and users are also free to create custom ones for any scenario imaginable. Should you find yourself not needing a multitude of Focus modes—whether because
 How to Automatically Send Messages with Siri from iPhone Without Confirmation
Jun 20, 2025 am 09:40 AM
How to Automatically Send Messages with Siri from iPhone Without Confirmation
Jun 20, 2025 am 09:40 AM
If you trust Siri to accurately transcribe your speech into text and send it as a message, you can activate a setting that lets Siri send messages automatically from your iPhone without asking for confirmation first.With the confirmation feature enab
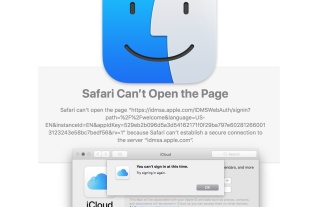 Fix iCloud Errors & “Can’t Establish Secure Connection with idmsa.apple.com” on MacOS Sierra & High Sierra
Jun 22, 2025 am 10:06 AM
Fix iCloud Errors & “Can’t Establish Secure Connection with idmsa.apple.com” on MacOS Sierra & High Sierra
Jun 22, 2025 am 10:06 AM
Some users of Mac computers running MacOS Sierra and MacOS High Sierra have reported issues when trying to log in to an Apple ID or iCloud via System Preferences, as well as problems accessing iCloud.com using Safari. In addition, Safari fails to loa
 Listen to Long Audio Messages Easier on iPhone with This Trick
Jun 23, 2025 am 09:44 AM
Listen to Long Audio Messages Easier on iPhone with This Trick
Jun 23, 2025 am 09:44 AM
Have you ever received a long audio message on your iPhone and while listening, the screen turns off, interrupting the playback and forcing you to start over? It's pretty frustrating, isn't it?Next time you receive a lengthy voice message on your iPh
 7 of the Best iOS 16 Features to Check Out Right Away
Jun 22, 2025 am 09:56 AM
7 of the Best iOS 16 Features to Check Out Right Away
Jun 22, 2025 am 09:56 AM
iOS 16 is now available for iPhone users, offering a solid update packed with practical features you're sure to enjoy.The most noticeable and exciting addition is the ability to personalize your lock screen. However, there are also plenty of smaller
 Data Breach Reports Archive — 2017
Jun 24, 2025 am 09:51 AM
Data Breach Reports Archive — 2017
Jun 24, 2025 am 09:51 AM
In this blog post, we’ve gathered the 22 most significant breaches that happened back in 2017. All of the reports were conducted by Chris Vickery — a data breach hunter, who had partnered with MacKeeper to provide repor
 How to Rename Mac Computer Name in MacOS Sonoma & Ventura
Jun 17, 2025 pm 04:53 PM
How to Rename Mac Computer Name in MacOS Sonoma & Ventura
Jun 17, 2025 pm 04:53 PM
Customizing your Mac by renaming it helps set it apart from other devices, especially when using AirDrop, and makes it easier to identify on a network.In macOS Ventura 13 and later versions, the method for changing the computer name has changed compa
