
 Software Tutorial
Office Software
How to make Gantt chart in Excel (step-by-step guidance and templates)
Software Tutorial
Office Software
How to make Gantt chart in Excel (step-by-step guidance and templates)
How to make Gantt chart in Excel (step-by-step guidance and templates)
May 21, 2025 am 09:20 AM
If you were asked to name three key components of Microsoft Excel, what would they be? Likely, you'd mention spreadsheets for data entry, formulas for calculations, and charts for visual data representation.
It's common knowledge among Excel users what a chart is and how to create one. However, the Gantt chart often remains a mystery to many. This brief guide will clarify the essential aspects of the Gantt diagram, demonstrate how to create a basic Gantt chart in Excel, provide sources for advanced Gantt chart templates, and explain how to use an online Project Management Gantt Chart creator.
What is a Gantt chart? ----------------------The Gantt chart is named after Henry Gantt, an American mechanical engineer and management consultant who developed this chart in the early 1910s. In Excel, a Gantt diagram displays projects or tasks as a series of horizontal bar charts. It breaks down the project structure by illustrating start and finish dates, as well as inter-task relationships, aiding in tracking tasks against their scheduled timelines or milestones.

How to create a Gantt chart in Excel
Unfortunately, Microsoft Excel does not come with a built-in Gantt chart template. However, you can quickly construct a Gantt chart using the bar graph feature with some formatting adjustments.
Follow these steps carefully to create a simple Gantt chart in less than 3 minutes. We'll use Excel 2010 for this example, but you can apply these instructions to any version from Excel 2013 to Excel 365.
1. Create a project table
Begin by entering your project data into an Excel spreadsheet. List each task in a separate row and organize your project plan with Start date, End date, and Duration—the number of days needed to complete the tasks.
Tip. You only need the Start date and Duration columns to create a Gantt chart in Excel. If you have Start Dates and End Dates, use one of these formulas to calculate Duration:
Duration = End Date - Start Date
Duration = End date - Start date 1

2. Create a standard Excel Bar chart based on Start date
Start your Gantt chart creation in Excel with a regular Stacked Bar chart.
- Select the range of your Start Dates including the column header, in our example, B1:B11. Ensure you select only data cells, not the entire column.
- Go to the Insert tab > Charts group and click Bar.
- In the 2-D Bar section, choose Stacked Bar.

You will see a Stacked bar chart added to your worksheet:

Note. Some online Gantt Chart tutorials suggest starting with an empty bar chart and then adding data. However, this method is more efficient because Excel will automatically include one data series, saving you time.
3. Add Duration data to the chart
Now, you need to add another series to your potential Gantt chart.
-
Right-click within the chart area and select Select Data from the context menu.

The Select Data Source window will appear. As shown below, Start Date is already listed under Legend Entries (Series). You need to add Duration as well.
Click the Add button to include the Duration data in your Gantt chart.
-
In the Edit Series window, do the following:
Enter "Duration" or another name in the Series name field. Alternatively, click the column header in your spreadsheet to autofill this field.
-
Click the range selection icon
next to the Series Values field.
A smaller Edit Series window will open. Select your project Duration data by clicking the first Duration cell (D2 in our example) and dragging down to the last duration (D11). Ensure you do not include the header or any empty cells.
Click the Collapse Dialog icon to return to the previous Edit Series window, where Series name and Series values are filled in. Click OK.
-
Back at the Select Data Source window, with both Start Date and Duration added under Legend Entries (Series), click OK to add the Duration data to your Excel chart.
Your resulting bar chart should look similar to this:


4. Add task descriptions to the Gantt chart
Next, replace the days on the left side of the chart with your task list.
Right-click within the chart plot area (where the blue and orange bars are) and select Select Data to reopen the Select Data Source window.
Ensure Start Date is selected in the left pane, then click the Edit button under Horizontal (Category) Axis Labels in the right pane.
-
In the small Axis Label window, select your tasks similarly to how you selected Durations—click the range selection icon
, then click the first task in your table and drag down to the last task. Do not include the column header. When finished, exit the window by clicking the range selection icon again.
Click OK twice to close the open windows.
-
Remove the chart labels by right-clicking them and choosing Delete from the context menu.
At this stage, your Gantt chart should display task descriptions on the left and look like this:


5. Transform the bar graph into the Excel Gantt chart
Your chart is still a stacked bar chart. To make it resemble a Gantt chart, you'll need to format it correctly. The goal is to hide the blue bars, leaving only the orange bars representing your project's tasks visible.
Click any blue bar to select them all, right-click, and choose Format Data Series from the context menu.
-
In the Format Data Series window:
- Go to the Fill tab and select No Fill.
- Switch to the Border Color tab and select No Line.
Note. Keep the dialog open for the next step.
-
Notice the tasks on your Gantt chart are in reverse order. To correct this, click the task list on the left side of your chart to bring up the Format Axis dialog. Select the Categories in reverse order option under Axis Options, then click the Close button to save changes.
The changes you've made result in:
- Properly ordered tasks on the Gantt chart.
- Date markers moved from the bottom to the top of the graph.
Your Excel chart is beginning to resemble a typical Gantt chart, like this example:


6. Enhance the design of your Excel Gantt chart
Although your Gantt chart is taking shape, you can refine it further for a more polished look.
-
Eliminate the empty space on the left side of the Gantt chart. Initially, the starting date blue bars occupied the left side of your Gantt chart. Now, remove that space to align your tasks closer to the left vertical axis.
- Right-click the first Start Date in your data table, select Format Cells > General. Note the number shown—this represents the date numerically (e.g., 41730). Excel stores dates as numbers based on days since 1-Jan-1900. Click Cancel without making changes.
- Click any date above the task bars in your Gantt chart. A single click selects all dates; right-click and choose Format Axis.
- In Axis Options, set Minimum to Fixed and enter the number noted in the previous step.
- Right-click the first Start Date in your data table, select Format Cells > General. Note the number shown—this represents the date numerically (e.g., 41730). Excel stores dates as numbers based on days since 1-Jan-1900. Click Cancel without making changes.
-
Adjust the number of dates on your Gantt chart. In the same Format Axis window, change Major unit and Minor unit to Fixed, then input your desired date intervals. Shorter project timelines typically require smaller numbers. For example, to show every other date, enter 2 in Major unit. See my settings below. Note. In Excel 365, Excel 2021 - 2013, there are no Auto and Fixed radio buttons; simply type the number in the box.
Tip. Experiment with different settings to find what works best. You can revert to default settings by switching back to Auto in Excel 2010 and 2007, or clicking Reset in Excel 2013 and later.
-
Reduce excess white space between the bars. Compacting the task bars enhances your Gantt chart's appearance.
- Click any orange bar to select them all, right-click, and select Format Data Series.
- In the Format Data Series dialog, set Separated to 100% and Gap Width to 0% (or near 0%).
Here's the result—a simple yet effective Excel Gantt chart:
Remember, your Excel chart, while closely simulating a Gantt diagram, retains key features of a standard Excel chart:
- The Gantt chart will resize as you add or remove tasks.
- Changes to Start dates or Durations will automatically update the chart.
- You can save your Gantt chart as an image or convert it to HTML for online publication.
Tips:
- Customize your Gantt chart's appearance by altering fill color, border color, shadow, or applying 3-D formatting. These options are available in the Format Data Series window (right-click the bars and select Format Data Series).
- After perfecting your design, consider saving your Gantt chart as a template for future use. Click the chart, go to the Design tab, and click Save as Template.


Excel Gantt chart templates
Creating a basic Gantt chart in Excel is straightforward. But for a more advanced Gantt diagram with features like percent-complete shading and vertical Milestone or Checkpoint lines, you might want to use an Excel Gantt chart template. Here's a brief overview of several project management Gantt chart templates for various Excel versions.
Gantt chart template for Microsoft Excel
The Gantt Project Planner template is designed to track your project by various activities including Plan Start and Actual Start, Plan Duration and Actual Duration, and Percent Complete.
For Excel 2013 - 2021, navigate to File > New and search for "Gantt". If it's not available, download it from Microsoft's website - Gantt Project Planner template. This template requires no learning curve; simply click and use.

Online Gantt chart template
The Interactive Online Gantt Chart Creator from smartsheet.com is user-friendly and quick to use. They offer a 30-day free trial, allowing you to sign in with your Google account and start creating your first Gantt chart online immediately.
The process is simple: enter your project details in the left-hand table, and watch the Gantt Chart build in real-time on the right.

Gantt chart template for Excel, Google Sheets, and OpenOffice Calc
The Gantt chart template from vertex42.com is a free resource compatible with Excel, OpenOffice Calc, and Google Sheets. Use it like any regular Excel spreadsheet: enter start dates and durations for each task, and set percentages in the Complete column. Adjust the date range displayed in the Gantt chart area using the scroll bar.

Lastly, consider another Gantt chart Excel template:
Project Manager Gantt Chart template
The Project Manager Gantt Chart from professionalexcel.com is a free project management Gantt chart template for Excel, designed to monitor tasks against their scheduled times. Choose between a weekly or daily view, depending on your project's duration.
Hopefully, one of these templates meets your needs. If not, you can create your own Gantt chart as shown in the first part of this guide and save it as an Excel template.
Now that you understand the key features of the Gantt diagram, you can explore further and create sophisticated Gantt charts in Excel to impress your boss and colleagues : )
Practice workbook for download
Gantt chart example (.xlsx file)
The above is the detailed content of How to make Gantt chart in Excel (step-by-step guidance and templates). For more information, please follow other related articles on the PHP Chinese website!

Hot AI Tools

Undress AI Tool
Undress images for free

Undresser.AI Undress
AI-powered app for creating realistic nude photos

AI Clothes Remover
Online AI tool for removing clothes from photos.

Clothoff.io
AI clothes remover

Video Face Swap
Swap faces in any video effortlessly with our completely free AI face swap tool!

Hot Article
Hot Tools

Notepad++7.3.1
Easy-to-use and free code editor

SublimeText3 Chinese version
Chinese version, very easy to use

Zend Studio 13.0.1
Powerful PHP integrated development environment

Dreamweaver CS6
Visual web development tools

SublimeText3 Mac version
God-level code editing software (SublimeText3)
Hot Topics


 How to Use Parentheses, Square Brackets, and Curly Braces in Microsoft Excel
Jun 19, 2025 am 03:03 AM
How to Use Parentheses, Square Brackets, and Curly Braces in Microsoft Excel
Jun 19, 2025 am 03:03 AM
Quick Links Parentheses: Controlling the Order of Opera
 Outlook Quick Access Toolbar: customize, move, hide and show
Jun 18, 2025 am 11:01 AM
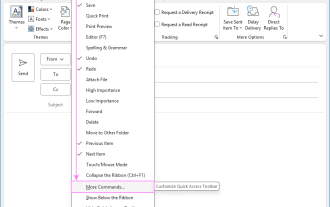
Outlook Quick Access Toolbar: customize, move, hide and show
Jun 18, 2025 am 11:01 AM
This guide will walk you through how to customize, move, hide, and show the Quick Access Toolbar, helping you shape your Outlook workspace to fit your daily routine and preferences. The Quick Access Toolbar in Microsoft Outlook is a usefu
 Google Sheets IMPORTRANGE: The Complete Guide
Jun 18, 2025 am 09:54 AM
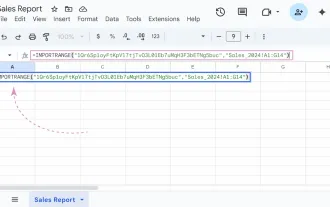
Google Sheets IMPORTRANGE: The Complete Guide
Jun 18, 2025 am 09:54 AM
Ever played the "just one quick copy-paste" game with Google Sheets... and lost an hour of your life? What starts as a simple data transfer quickly snowballs into a nightmare when working with dynamic information. Those "quick fixes&qu
 Don't Ignore the Power of F9 in Microsoft Excel
Jun 21, 2025 am 06:23 AM
Don't Ignore the Power of F9 in Microsoft Excel
Jun 21, 2025 am 06:23 AM
Quick LinksRecalculating Formulas in Manual Calculation ModeDebugging Complex FormulasMinimizing the Excel WindowMicrosoft Excel has so many keyboard shortcuts that it can sometimes be difficult to remember the most useful. One of the most overlooked
 6 Cool Right-Click Tricks in Microsoft Excel
Jun 24, 2025 am 12:55 AM
6 Cool Right-Click Tricks in Microsoft Excel
Jun 24, 2025 am 12:55 AM
Quick Links Copy, Move, and Link Cell Elements
 How to recover unsaved Word document
Jun 27, 2025 am 11:36 AM
How to recover unsaved Word document
Jun 27, 2025 am 11:36 AM
1. Check the automatic recovery folder, open "Recover Unsaved Documents" in Word or enter the C:\Users\Users\Username\AppData\Roaming\Microsoft\Word path to find the .asd ending file; 2. Find temporary files or use OneDrive historical version, enter ~$ file name.docx in the original directory to see if it exists or log in to OneDrive to view the version history; 3. Use Windows' "Previous Versions" function or third-party tools such as Recuva and EaseUS to scan and restore and completely delete files. The above methods can improve the recovery success rate, but you need to operate as soon as possible and avoid writing new data. Automatic saving, regular saving or cloud use should be enabled
 5 New Microsoft Excel Features to Try in July 2025
Jul 02, 2025 am 03:02 AM
5 New Microsoft Excel Features to Try in July 2025
Jul 02, 2025 am 03:02 AM
Quick Links Let Copilot Determine Which Table to Manipu
 How to use Microsoft Teams?
Jul 02, 2025 pm 02:17 PM
How to use Microsoft Teams?
Jul 02, 2025 pm 02:17 PM
Microsoft Teams is not complicated to use, you can get started by mastering the basic operations. To create a team, you can click the "Team" tab → "Join or Create Team" → "Create Team", fill in the information and invite members; when you receive an invitation, click the link to join. To create a new team, you can choose to be public or private. To exit the team, you can right-click to select "Leave Team". Daily communication can be initiated on the "Chat" tab, click the phone icon to make voice or video calls, and the meeting can be initiated through the "Conference" button on the chat interface. The channel is used for classified discussions, supports file upload, multi-person collaboration and version control. It is recommended to place important information in the channel file tab for reference.
