

2 Ways to Merge Videos on Mac
Feb 05, 2024 pm 04:20 PM
If you're just getting started with video editing on Mac, you're probably working with many video clips in order to add, combine, and rearrange them into a single video. In order to easily manage so many files, you need to use a video editor to splice these clips into one video file.
In this article, we will help you understand how to merge videos into one file on Mac.
How to Merge Videos on Mac [2 Methods]
Here are two easy ways to merge two or more video clips on Mac.
Method 1: Use the QuickTime Player App
The QuickTime Player App preinstalled on your Mac has all the features you need for basic and lightweight editing. While it doesn't promise a ton of features like iMovie, it can do basic things and you can easily merge two or more videos into one using this app on your Mac.
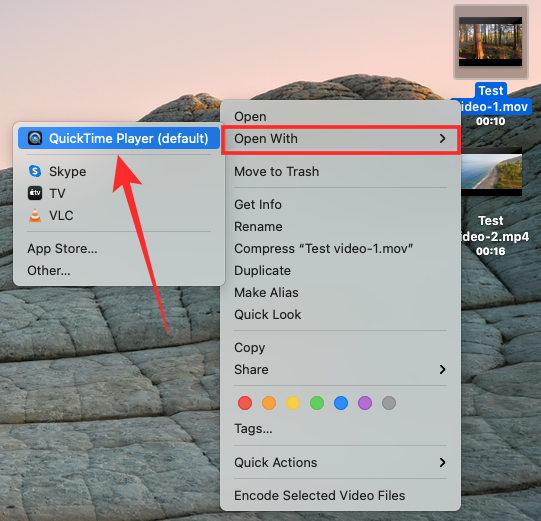
- To start using this feature, open any of the videos you want to combine, preferably the one you want to play at the beginning. By default, QuickTime will be the video player in which the file may open, so you can open it by double-clicking it.
- If not, you need to right-click the video file and select Open with QuickTime Player>.

- Now, go to the folder from which you want to add another video to the current project.
- You can add a second video to the first video by simply dragging and dropping it into the QuickTime Player that has the first video open. You can add multiple videos to your project by dragging and dropping more clips in the same way.
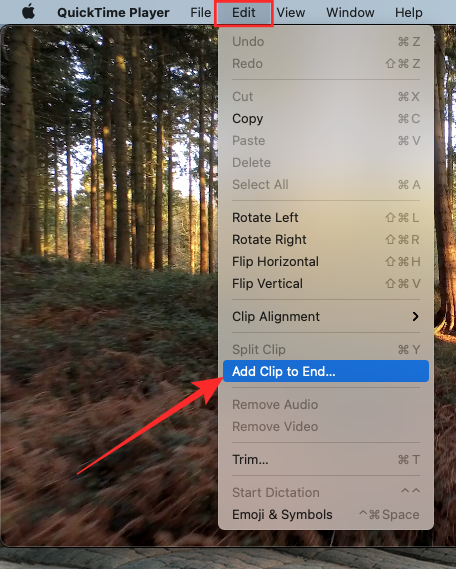
- Alternative method of adding clips: Another way to add clips to your video is to use the Edit option and open QuickTime Player in the foreground. With your first video open, click the "Edit" tab in the menu bar and select "Add clip to ending...".
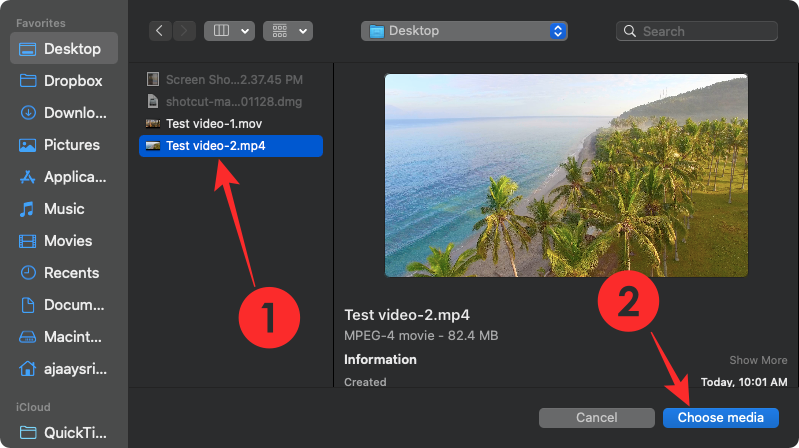
- You can now browse to the folder where the other video is located, select the video, and click Select Media under Video Preview in the lower right corner.
- To change the order in which the videos play, you can drag the clips left or right on the search bar below.
- You can trim or cut each individual clip by double-clicking on one, then resize the clips to your liking by moving the left and right margins. To confirm the video trimming, click Trim after making the necessary changes.
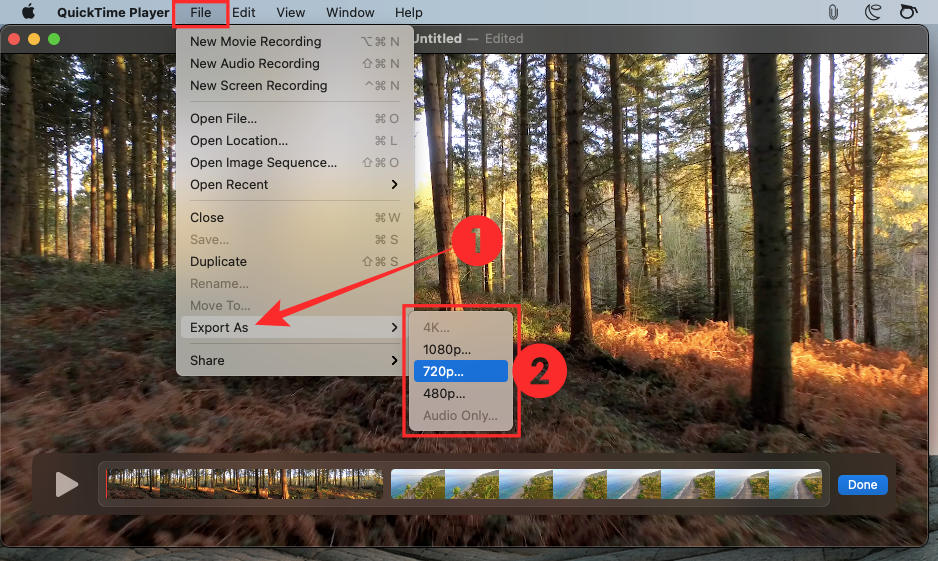
- After you add all clips to the same video and reorder them, you can continue saving new videos. To save a video file, make sure QuickTime Player is the active window on your Mac, then go to the File tab on the menu bar, click Export As, and select the video resolution you want to save it to.
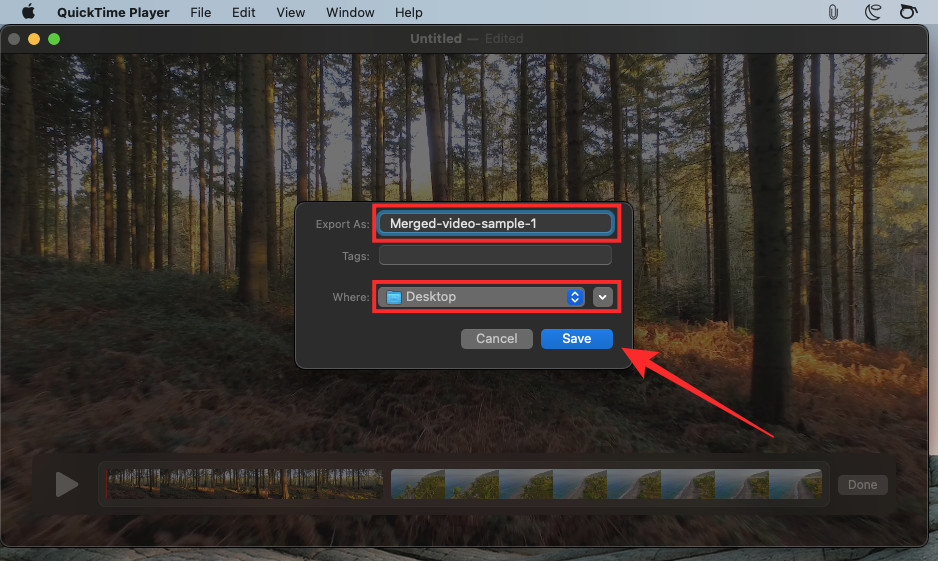
- In the next screen, create a name for your video file, select a location to save it, and click Save.


That's it. You have successfully created a video by merging two or more videos using QuickTime Player on Mac.
Method 2: Use the Shotcut App
Although Apple's QuickTime Player is the best choice if you want to merge two or more videos, if you want to perform a More actions, and other options. Your next best option is Shotcut, an open source, cross-platform video editor you can use on your Mac without paying a penny.
- To use Shotcut, you need to go to Shotcut.org and download the latest ".DMG for macOS" installer. You have to manually download and install the app this way because Shotcut isn't available on the Mac App Store. But you don’t have to worry because Shotcut is a proven app and a widely used one.
- To install the application you will need to first download the ".DMG" file, double click on it to open it, this will load the main Shotcut installer volume.
- Now you can install the Shotcut application by dragging the Shotcut application icon to the Applications folder available in this window. Once the app is installed, it should appear in Launchpad on your Mac.
- You can now start editing your video. To do this, open the Shotcut app on your Mac and click Open File in the upper left corner of the Shotcut window.
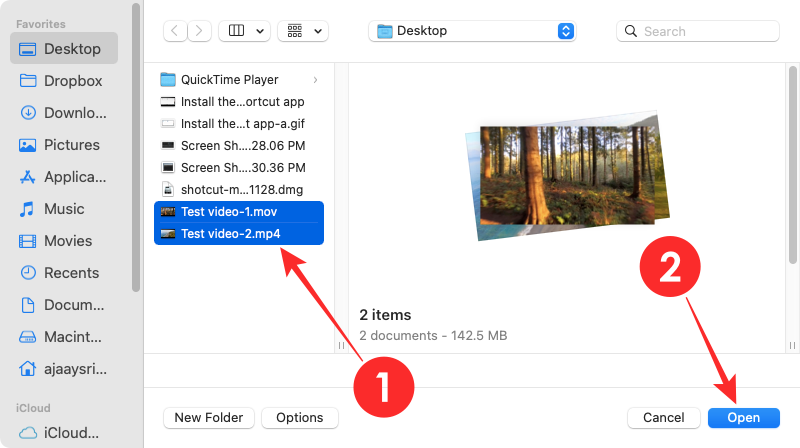
- A new screen will appear prompting you to go to the location of the video file you want to edit. Browse to the folder/location where you want to add the clips to a single file. Instead of adding video clips one after another, you can select multiple video clips to add.
- After selecting all the clips you want to add to your video, click "Open" in the lower right corner of this window.
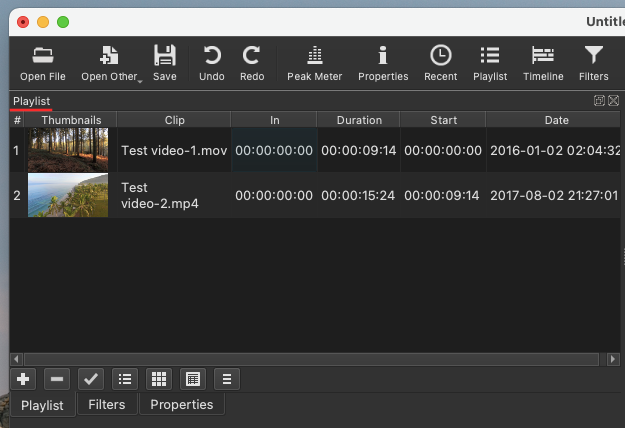
- The newly added clip will appear in the Playlist section of the Shotcut app.
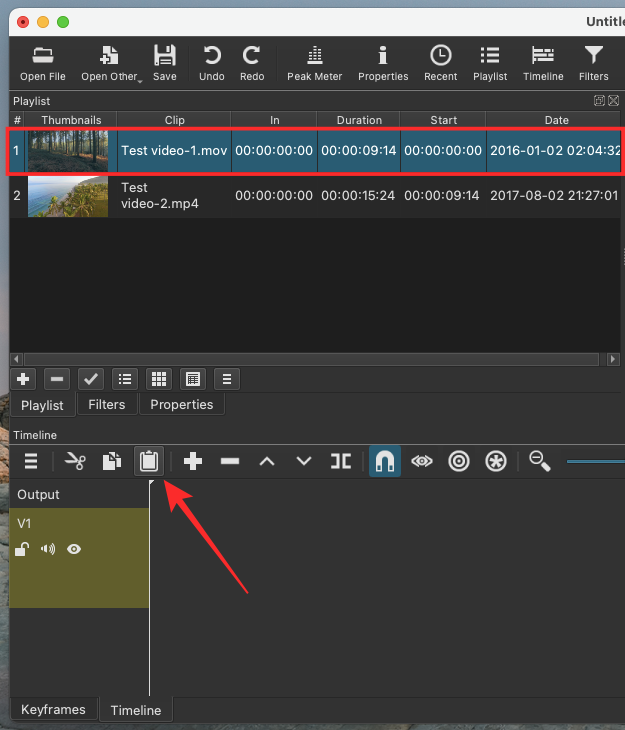
- To start adding videos to your project, you need to add them to your timeline. You can do this by first selecting the video you want to add and then clicking the Paste icon in the Timeline section. You can also drag and drop videos into boxes within the Timeline section.
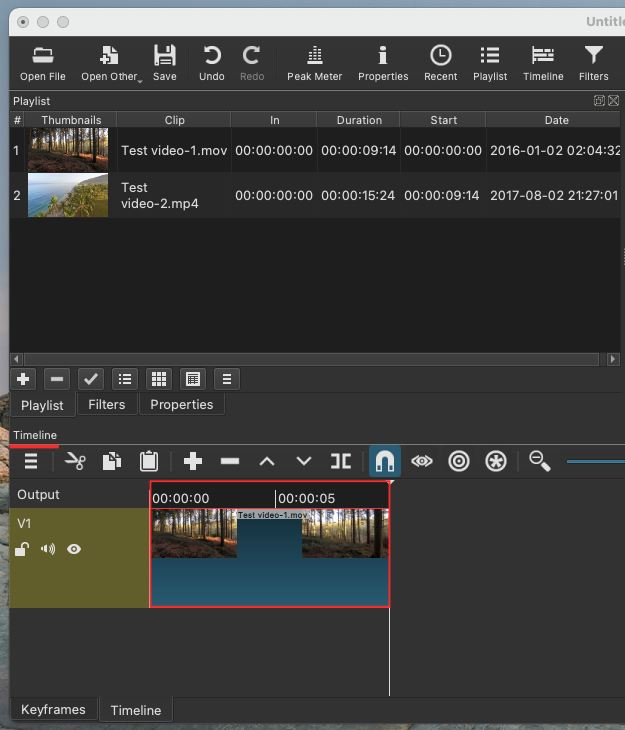
- Your first video will now appear in the Timeline section.
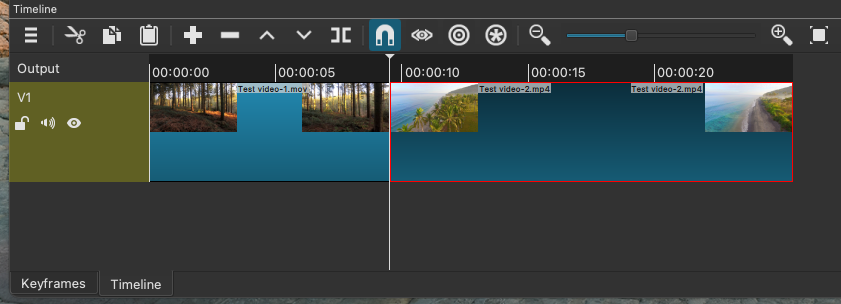
- Now you can add the next video by selecting the clip and then dragging and dropping the clip onto the timeline.
- When adding the next clip, you need to make sure that the clip is glued to the end of the previous video so that there is no gap when the video plays. Repeat the process to add more clips to the same video.
- Shotcut lets you modify other aspects of your video such as color, audio, FX, etc. to make it look better.
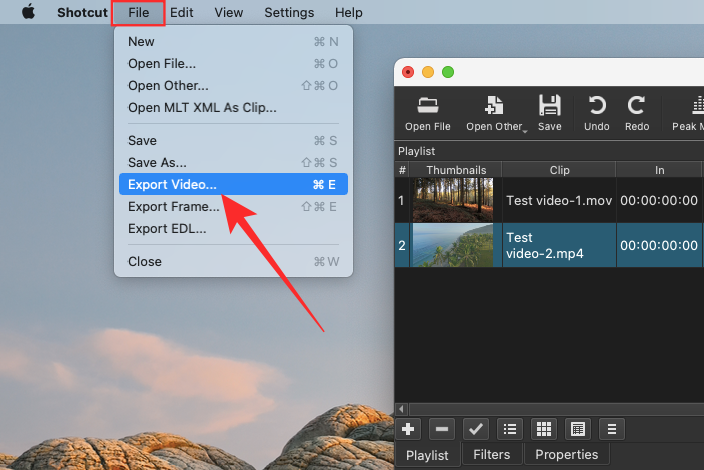
- After making all necessary changes and keeping the Shotcut window active, click the File tab in the menu bar and select Export Video.
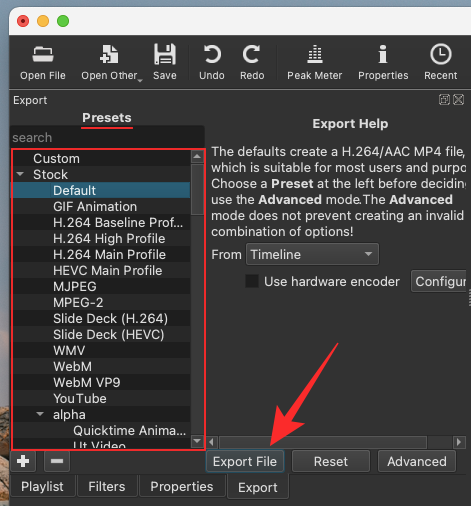
- The Export section will now appear in the Shotcut app. In this section, select the preset (format) in which you want to save the video from the list on the left and click "Export File".
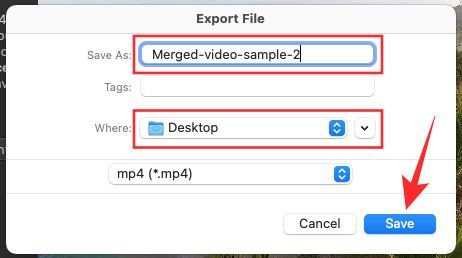
- The next step is to give the newly created video a name and choose a location where you want to save it. After that, click Save. When ready, the video should appear in the selected location.


The above is the detailed content of 2 Ways to Merge Videos on Mac. For more information, please follow other related articles on the PHP Chinese website!

Hot AI Tools

Undress AI Tool
Undress images for free

Undresser.AI Undress
AI-powered app for creating realistic nude photos

AI Clothes Remover
Online AI tool for removing clothes from photos.

Clothoff.io
AI clothes remover

Video Face Swap
Swap faces in any video effortlessly with our completely free AI face swap tool!

Hot Article
Hot Tools

Notepad++7.3.1
Easy-to-use and free code editor

SublimeText3 Chinese version
Chinese version, very easy to use

Zend Studio 13.0.1
Powerful PHP integrated development environment

Dreamweaver CS6
Visual web development tools

SublimeText3 Mac version
God-level code editing software (SublimeText3)


 How to set up file sharing between two Macs on the same network?
Jul 14, 2025 am 12:08 AM
How to set up file sharing between two Macs on the same network?
Jul 14, 2025 am 12:08 AM
To share files between two Macs on the same network, first make sure that the two devices are connected to the same LAN, then enable file sharing on the host, set shared folders and access permissions, and then connect from another Mac through the access sidebar or manually enter the SMB address, and finally you can browse, copy or transfer files. Common problems include waiting or restarting the network when the device cannot be discovered. If the permissions are incorrect, you need to check the username, password and sharing settings. If the connection fails, you can try the SMB address. If the firewall blocks, you can temporarily close the test.
 What is the K-line? How to view the Bitcoin K-line chart? Analysis of common K-line patterns
Jul 22, 2025 pm 11:15 PM
What is the K-line? How to view the Bitcoin K-line chart? Analysis of common K-line patterns
Jul 22, 2025 pm 11:15 PM
What is the essence of the directory K-line chart? The core component of the K-line is the time period and the uniqueness of the Bitcoin market: The advantages of the K-line chart compared to the ordinary price curve How to interpret a single K-line? Typical forms and practical signal analysis. Two forms: Large entity, short shadow K-line meaning (strong entry or kinetic energy exhaustion) long shadow, and small entity K-line meaning (trend turning point or market hesitation) appear one after another (the probability of changing the market has increased significantly) Where to view the Bitcoin K-line chart? How many minutes should I look at the K-line? Select the right time period to grasp the trend direction Frequently asked questions about Bitcoin K-line chart Q&A conclusion: Master the basics of K-lines and move towards the advanced technology analysis How to quickly get started with the Bitcoin K-line? K-line chart is a tool to visualize price fluctuations and is widely used in stocks, gold,
 How to share my Mac's screen
Jul 14, 2025 am 01:18 AM
How to share my Mac's screen
Jul 14, 2025 am 01:18 AM
To share your Mac screen with others, you can choose the appropriate method according to different scenarios. First, through video conferencing tools such as Zoom, click the "Share" button to select the screen or a specific window for sharing; second, use Messages or FaceTime to initiate a screen sharing session, click the " " to select "Screen Sharing" and invite the other party to view or control it; third, use the "Screen Sharing" App that comes with the system to enable this function on the target Mac and connect to the server address through Finder to achieve remote access; in addition, you need to pay attention to details such as permission settings, privacy protection and network performance impact.
 How to take a scrolling screenshot on Mac
Jul 13, 2025 am 01:24 AM
How to take a scrolling screenshot on Mac
Jul 13, 2025 am 01:24 AM
Mac screenshots themselves do not support scrolling screenshots, but can be implemented through system functions or third-party tools. 1. Use the screenshot tool in macOS to manually splice the preview app: take a segmented screenshot and leave an overlapping area. Drag in the picture through the preview app to export it as a PDF or picture. 2. Safari browser native scrolling screenshots: In macOSMojave and above, press Cmd Shift 4 spaces and click "Enterprise Page" to automatically generate a complete screenshot. 3. Automatic scrolling screenshots for third-party tools: such as Lightshot, Snagit, Shottr, supports shortcut key operations and automatic scrolling screenshots, suitable for frequent use scenarios. Just choose the right method according to your needs.
 Where is the Library folder on a Mac and how do I access it?
Jul 15, 2025 am 12:49 AM
Where is the Library folder on a Mac and how do I access it?
Jul 15, 2025 am 12:49 AM
To find the Library folder on your Mac, you can follow the following steps: 1. Open the Finder window; 2. Click "Go" in the top menu bar; 3. Press and hold the Option (?) key to make the "Library" option appear; 4. Click to enter the Library folder. This folder contains subfolders such as application support files, caches, preferences, logs, and keychains, and is suitable for debugging applications, clearing caches, or managing extensions. If you need frequent access, you can run the "chflagsnohidden~/Library/" command through the terminal to make it permanently displayed. If you hide it again, use "chflagshidden~/Library/".
 How to use ssh to connect to a remote server from a Mac?
Jul 17, 2025 am 12:46 AM
How to use ssh to connect to a remote server from a Mac?
Jul 17, 2025 am 12:46 AM
To connect to a remote server using SSH from your Mac, just run the corresponding command through the terminal. First open the terminal program (you can search through "Applications" → "Utilities" or Spotlight), and then enter the command in sshusername@server_ip format. If you want to specify a non-default port, add the -p parameter. If you want to log in without password, you can execute ssh-keygen to generate the key, ssh-copy-id upload the public key to the server, and ensure that the server configuration allows key authentication. Common problems include network blockage, port not open, username errors and improper permission settings. It is recommended to use the ssh-v command to troubleshoot problems. Although the whole process is simple, you need to pay attention to the firewall and files
 How to force quit an unresponsive application on a Mac?
Jul 17, 2025 am 01:41 AM
How to force quit an unresponsive application on a Mac?
Jul 17, 2025 am 01:41 AM
When the Mac application is unresponsive, there are three ways to force exit: 1. Use the shortcut key Command Option Esc to pop up the "Force Exit Application" window, select the unresponsive application and click "Force Exit", which is suitable for daily GUI applications; 2. Find and end the process that occupies resources through "Activity Monitor", which is suitable for troubleshooting background problems; 3. After using psaux|grep "application name" to obtain the PID in the terminal, enter kill or kill-9 to terminate the process, which is suitable for advanced users to handle complex situations.
 How to completely uninstall an application on a Mac?
Jul 24, 2025 am 12:38 AM
How to completely uninstall an application on a Mac?
Jul 24, 2025 am 12:38 AM
Completely uninstalling Mac applications requires clearing residual files. There are four specific methods: 1. Manually delete the main program and check the residual files in ~/Library/ApplicationSupport/, ~/Library/Preferences/, ~/Library/Caches/; 2. Use Launchpad to uninstall the app installed in AppStore, but the configuration files may still be left behind; 3. Use AppCleaner or CleanMyMacX and other tools to clear the associated files in one click, suitable for users who are not familiar with the system; 4. Use special software such as Adobe and ParallelsDesktop to use official uninstall tools or reference official websites
